


Want to use Postman to do API testing? Then this blog on how to automate and load test your API with Postman is for you. Let's get started!
Assumptions
The Loadbalancer.org IP address used in the following examples is: 192.168.5.100. Replace this with your own appliance’s IP address.
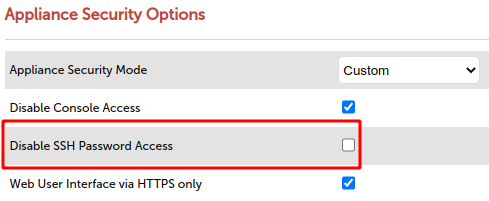
Appliance Security Options
Before we can connect to the loadbalancer appliance using SSH, we first need to allow this action through the Appliance Security Options via Local Configuration and then, Security.
Here, you will need to change Appliance Security Mode to Custom. This will then reveal additional security options.
Un-check the Disable SSH Password Access options, as per the example below, then Update:
Set credentials
Connect to the load balancer appliance using ssh with the root user (assuming that 192.168.5.100 is the appliance IP address being used in this example):
ssh [email protected]Enter your password for the root user when prompted.
Once connected, from the terminal prompt, enable API access with the following command (we’ll keep the user and password credentials the same):
lbcli --action api --function enable --username loadbalancer --password loadbalancerThis should output something similar to the following:
LBCLI API Credentials have been set as
username=loadbalancer
password=loadbalancer
apikey=bHCRj8XzIYsL9nVDKgwyeqONvQfFUx3B
IMPORTANT
The provided apikey will need to be encoded further into base64 before the key will work with the api calls. If echo is being used with | base64 please remember to use the -n parameter as this will suppress the newline that is normally added at the end of the echo output.
For example:
echo -n bHCRj8XzIYsL9nVDKgwyeqONvQfFUx3B | base64Result (correct):
YkhDUmo4WHpJWXNMOW5WREtnd3llcU9OdlFmRlV4M0I=If the -n parameter is omitted then the result is completely different, for example:
echo bHCRj8XzIYsL9nVDKgwyeqONvQfFUx3B | base64Result (incorrect):
YkhDUmo4WHpJWXNMOW5WREtnd3llcU9OdlFmRlV4M0IKNOTE: If the apikey is wrong, then there is no feedback returned. A response code of 200 only indicates the post was successful, but this is no indication that the post was successful once it reaches the API interface.
Test the connection using curl via the terminal
Before using Postman, let’s test the API via the command line. Use:
curl -u loadbalancer:loadbalancer -X POST \
https://192.168.5.100:9443/api/v2/ \
-H "X-LB-APIKEY: $(echo -n bHCRj8XzIYsL9nVDKgwyeqONvQfFUx3B | base64)" \
-H "Content-Type:application/json" \
-d '{"lbcli":[{"action":"dns","function":"get"}]}'  -k
NOTE: The apikey in the example above is piped through base64. You can however use the already encoded apikey directly here.
Result (example)
{"lbapi":[
[{"itteration":[{"lbcli":[{"action":"dns","function":"get",
"servers":["dns0": "192.168.4.152","dns1": "192.168.4.162","dns2": ""}
]}]}]}]]}
Turn off SSL verification
It’s also worth pointing out that when using curl, if you haven't already uploaded a proper SSL certificate for the Web UI, remember to use the -k option to turn off SSL verification.
Using Postman
First, create a new Workspace, for example, call it “Loadbalancer”.

Then:

Now set the URL to your loadbalancer IP address, with the path set to /api/v2/ with the form action set to POST.
For example:
https://192.168.5.100:9443/api/v2/

NOTE: Ensure that SSL verification is turned off within the API client.

1.Set Authorisation

Open the Authorisation tab, set the authorisation Type, Username and Password fields to the following:
Type: Basic Auth
Username: loadbalancer
Password: loadbalancer
2.Set Headers

Now open the Headers tab and set the Content-Type and add the X-LB-APIKEY to the following:
Content-Type: application/json
X-LB-APIKEY: V2dPWUlVN21rVkNNOGZ2bE5peXFvcFhMZEJHMjMxemU=
NOTE: Ensure the apikey has already been encoded using base64.
3.JSON Payloads
JSON payloads form the essential info in the data block for you to send/receive from the server when making API requests. To define the payload, open the Body tab and set the body to Raw and the payload type to JSON.

Copy and paste the JSON payload into the body field. After this, click on Send to submit the payload.
The following JSON payload will return the list of defined DNS entries within the load balancer:
{"lbcli":[
      {
         "action":"dns",
         "function":"get"
      }
   ]
}
Once the JSON payload has been submitted, a successful request will return a JSON formatted result similar to the following:
{
    "lbapi": [
        [
            {
                "itteration": [
                    {
                        "lbcli": [
                            {
                                "action": "dns",
                                "function": "get",
                                "servers": [
                                    "dns0": "8.8.8.8",
                                    "dns1": "1.1.1.1",
                                    "dns2": ""
                                }
                            ]
                        }
                    ]
                }
            ]
        }
    ]
]
}
The Body section will feedback the results of the submitted payload:

Other JSON payloads...
And if you're really keen, why not give these other JSON payloads a try?!
Adding a VIP
{"lbcli":[
      {
         "action":"add-vip",
         "vip":"L4 Vip via API",
         "layer":"4",
         "ip":"192.168.5.123",
         "ports":"80",
         "forwarding":"gate",
         "protocol":"tcp"
      }
   ]
}
Should result with the following results returned back to the Postman client:
{
    "lbapi": [
        [
            {
                "itteration": [
                    {
                        "lbcli": [
                            {
                                "action": "add-vip",
                                "vip": "L4_Vip_via_API",
                                "status": "success"
                            }
                        ]
                    }
                ]
            },
            {
                "itteration": [
                    {
                        "lbcli": [
                            {
                                "action": "edit-vip",
                                "vip": "L4_Vip_via_API",
                                "status": "success"
                            }
                        ]
                    }
                ]
            }
        ]
    ]
}
Phew! We made it! And we're done.
For more on how to automate load balancer deployments, check out our other blogs on this topic.