


Upgrading F5 BIG-IP* is a critical process to ensure that you have the latest features, security patches, and bug fixes. This article describes how to upgrade your BIG-IP, 11.x through 17.x, without falling victim to some of the potential challenges. And for those of you wondering why Loadbalancer.org is talking about F5, check out this blog: How to manage all your load balancers from one platform.
Things to be aware of before you start updating your F5 BIG-IP
💡 PRO TIP
Before you start, be aware of the following.
- Review release notes: Carefully review the release notes for the version you are upgrading to. This will provide important information about new features, known issues, and any special considerations for the upgrade.
- Backup configuration: Create a backup of your current configuration. This ensures that you have a snapshot of your existing settings that you can revert to if any issues arise during or after the upgrade.
- Check compatibility: Verify that your current hardware and software configuration is compatible with the target version. This includes checking for any deprecated features or changes in system requirements.
- Reactivate license: A license reactivation may be necessary on each node to avoid problems during the upgrade process. Determine the service check date by running this command:
grep "Service check date" /config/bigip.license

Then, if the service check date is earlier than the license check date (you can check it on the image in the download section), you need to reactivate the license by doing the following:
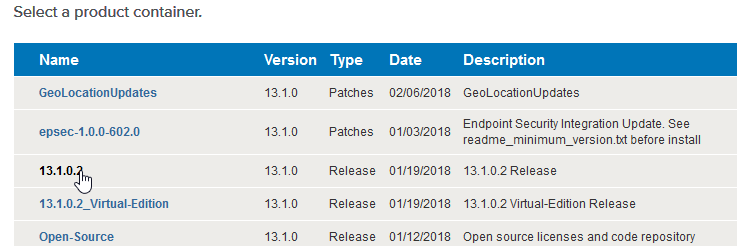
- Log in to the Configuration utility with administrative privileges.
- Go to System > Licence :
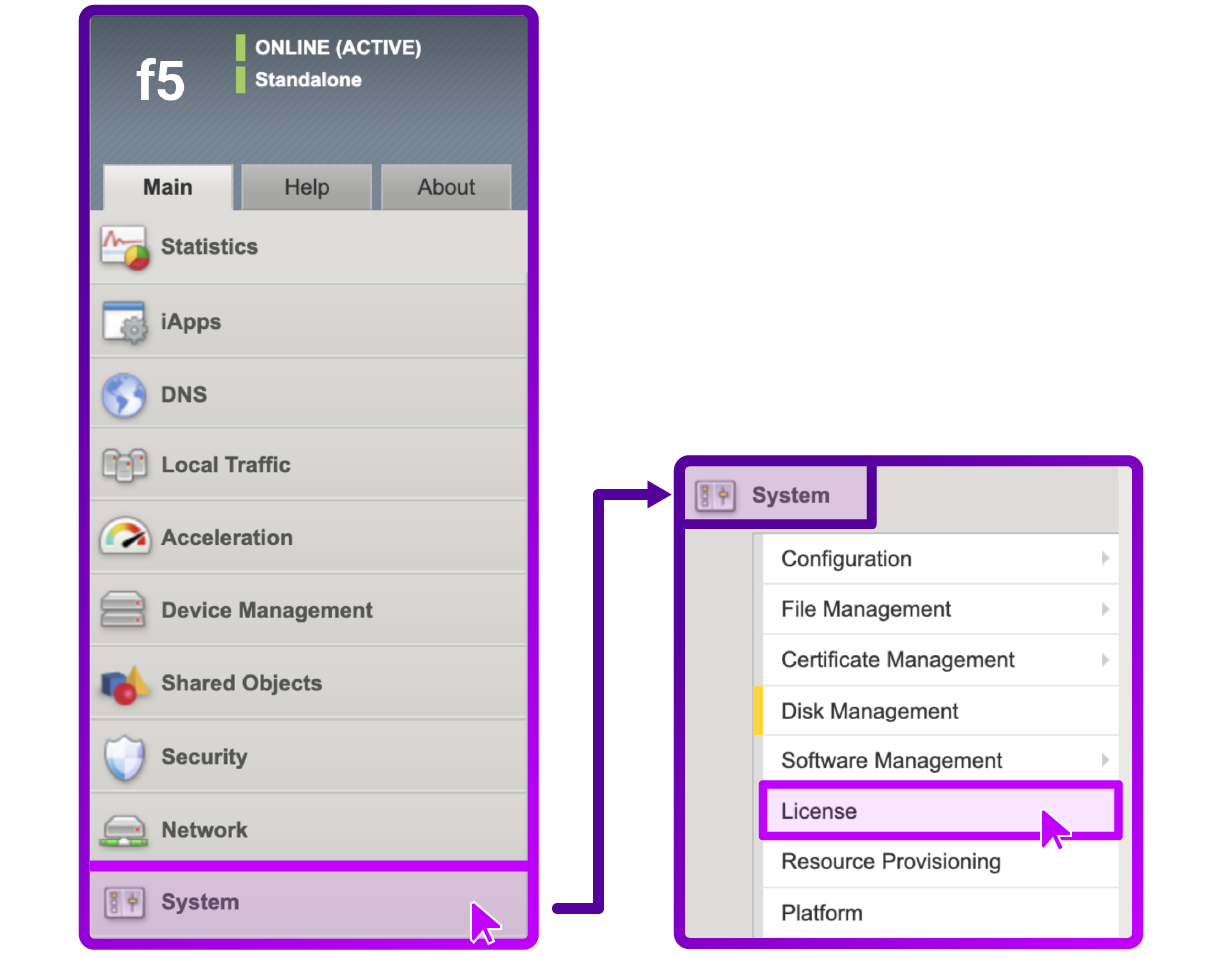
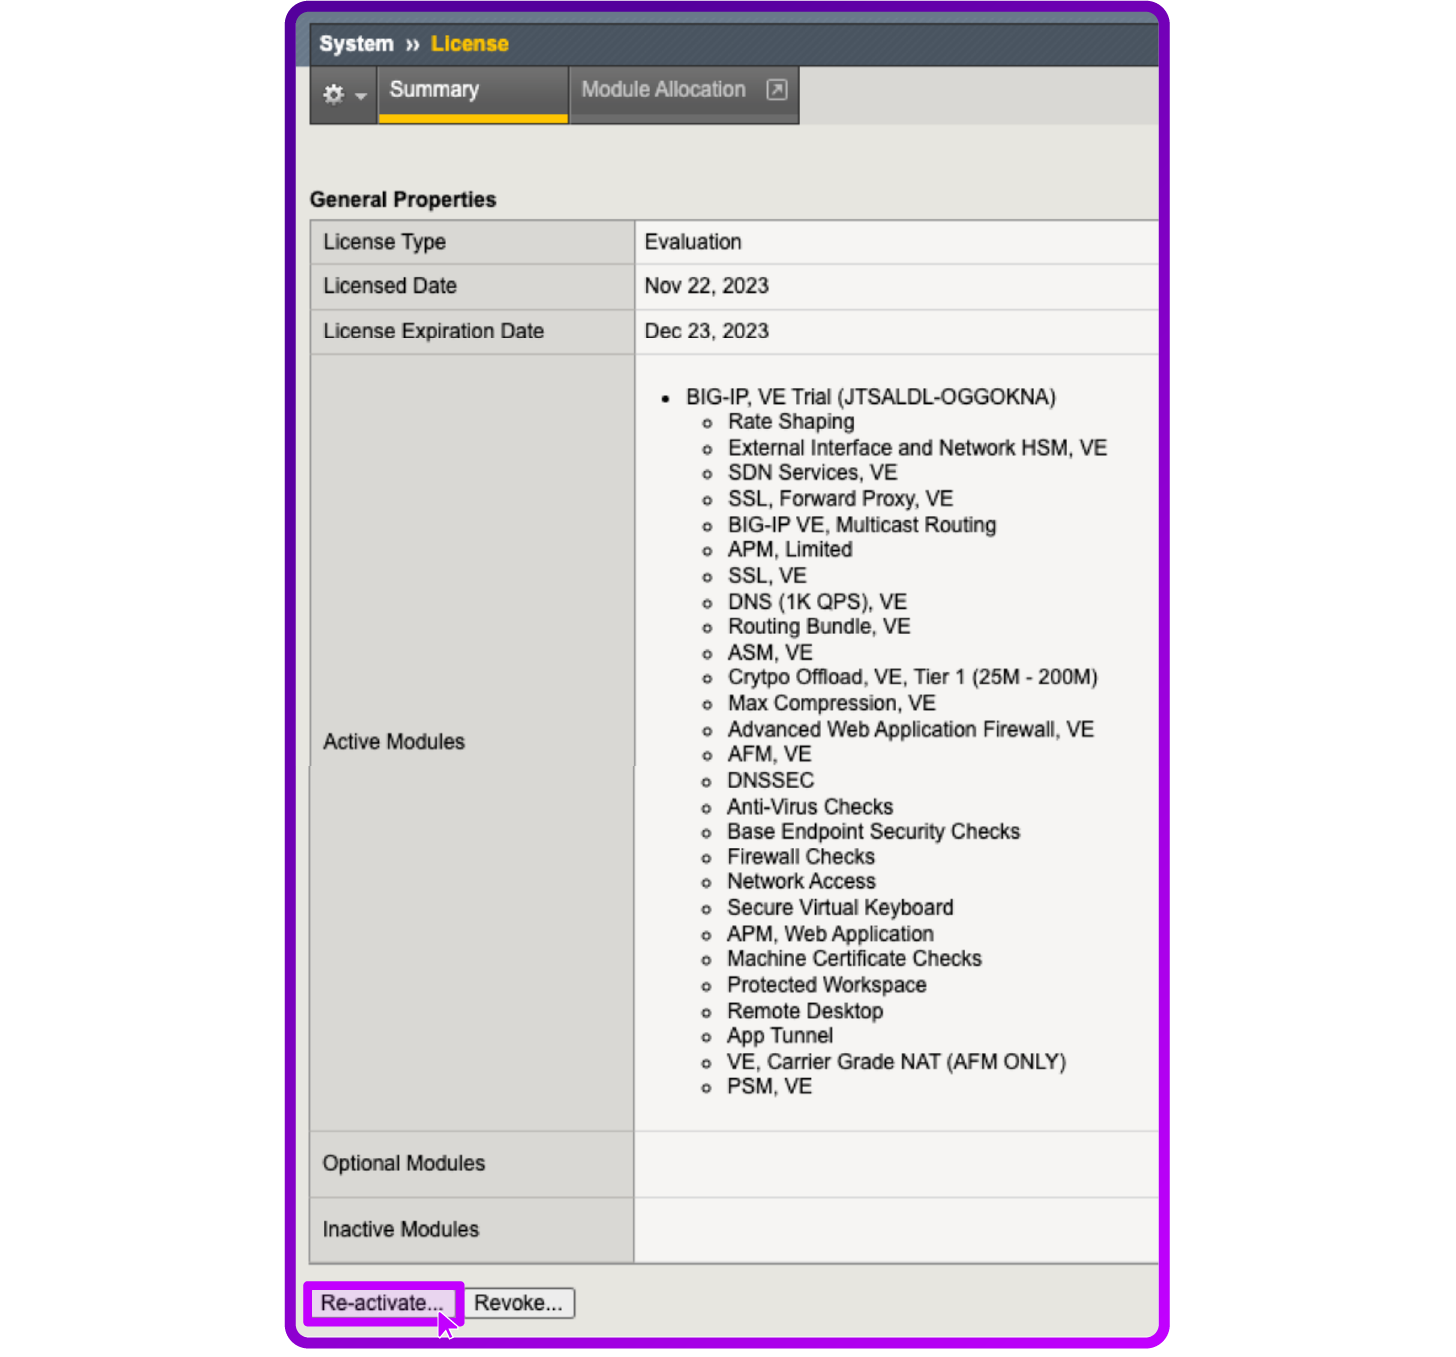
- Select Re-activate .... :
How to do an F5 BIG-IP update and upgrade
Update or upgrade a standalone F5 BIG-IP system using the Configuration utility
The upgrade process leaves the existing boot location unaffected so that you can boot back into the original volume in the event any issues occur during the upgrade process. Therefore, to limit the duration of the maintenance window, you can perform the actual installation during normal operation, and then schedule a separate maintenance window to reboot the BIG-IP system into the newly upgraded software volume.
1. Upload a software image to a BIG-IP system
💡 PRO TIP
Follow this procedure to avoid any negative impact on your system!
- Log in to the Configuration utility with administrative privileges.
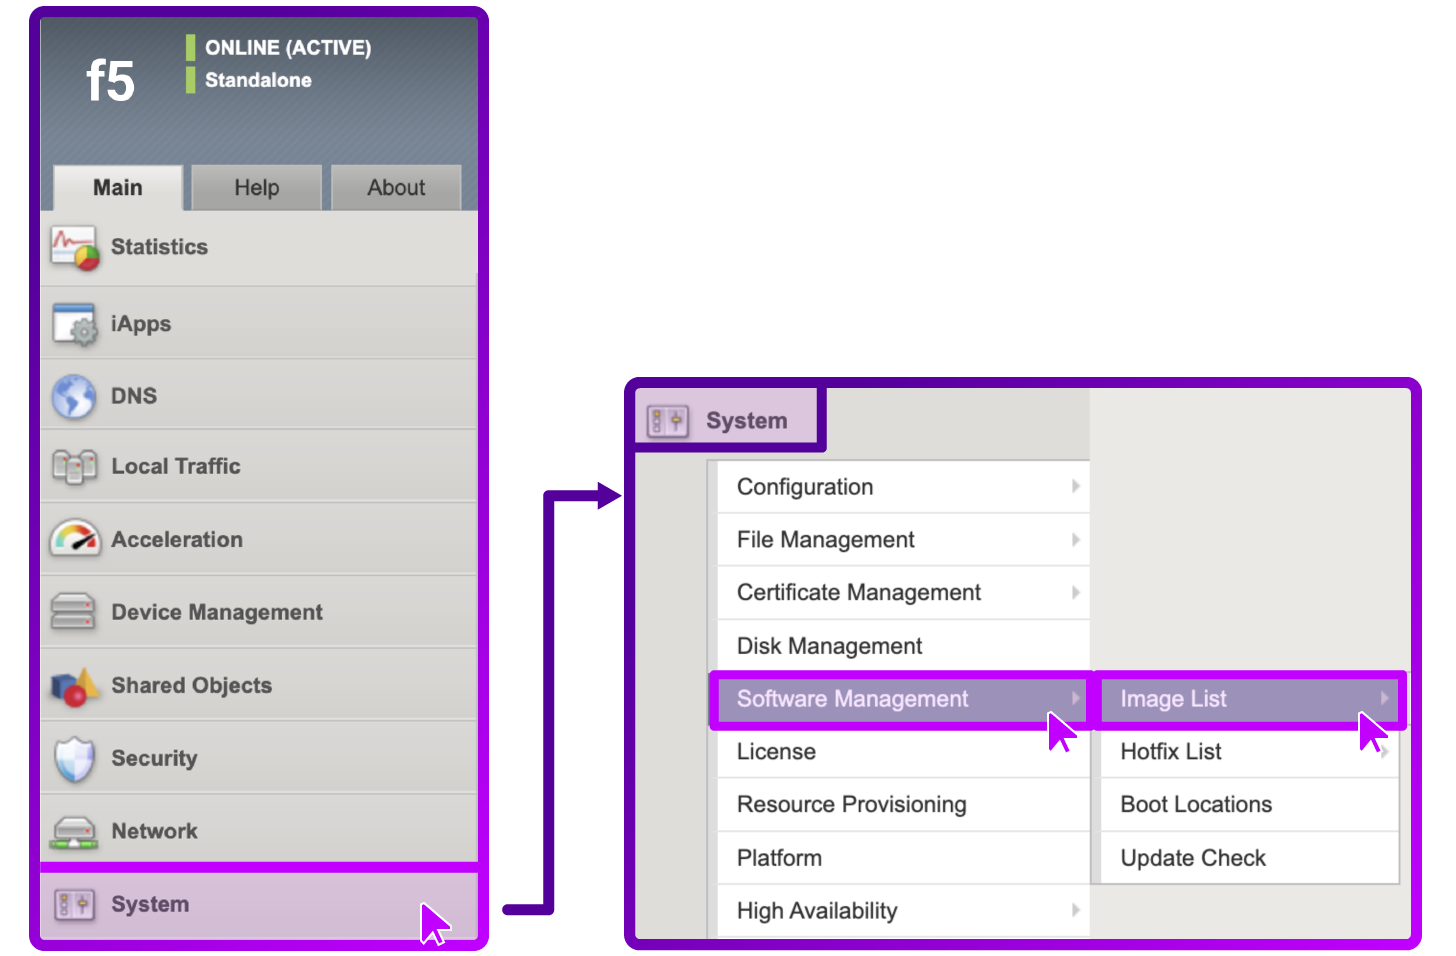
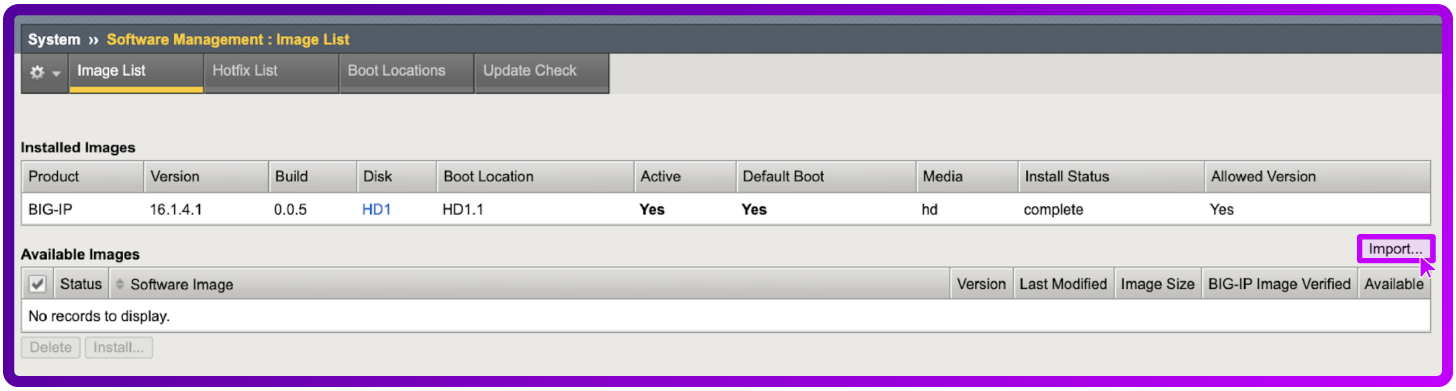
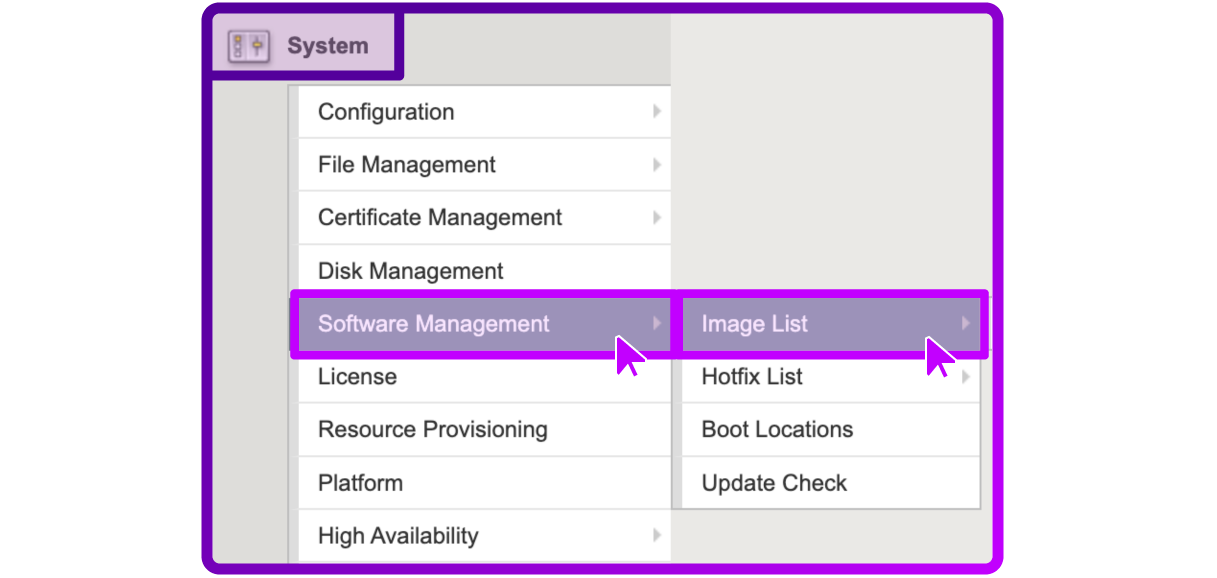
- Go to System > Software Management to view information about the current BIG-IP Installed Images:
- Go to System > Software Management to upload the BIG-IP upgrade image. For example, BIGIP-17.1.1-0.0.6.iso.
- Select Import:
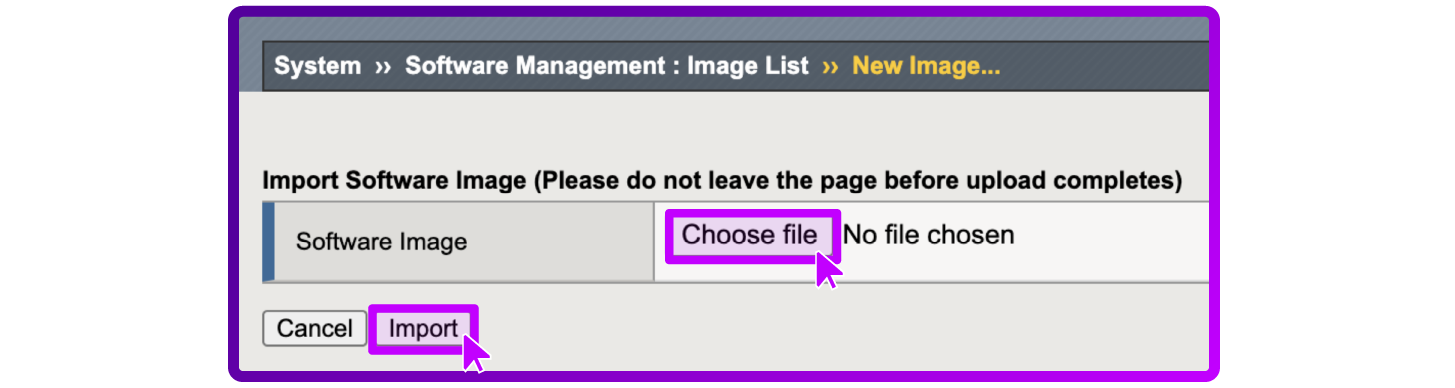
- Select Choose file to locate the file to upload from your local computer.
- Select Import:
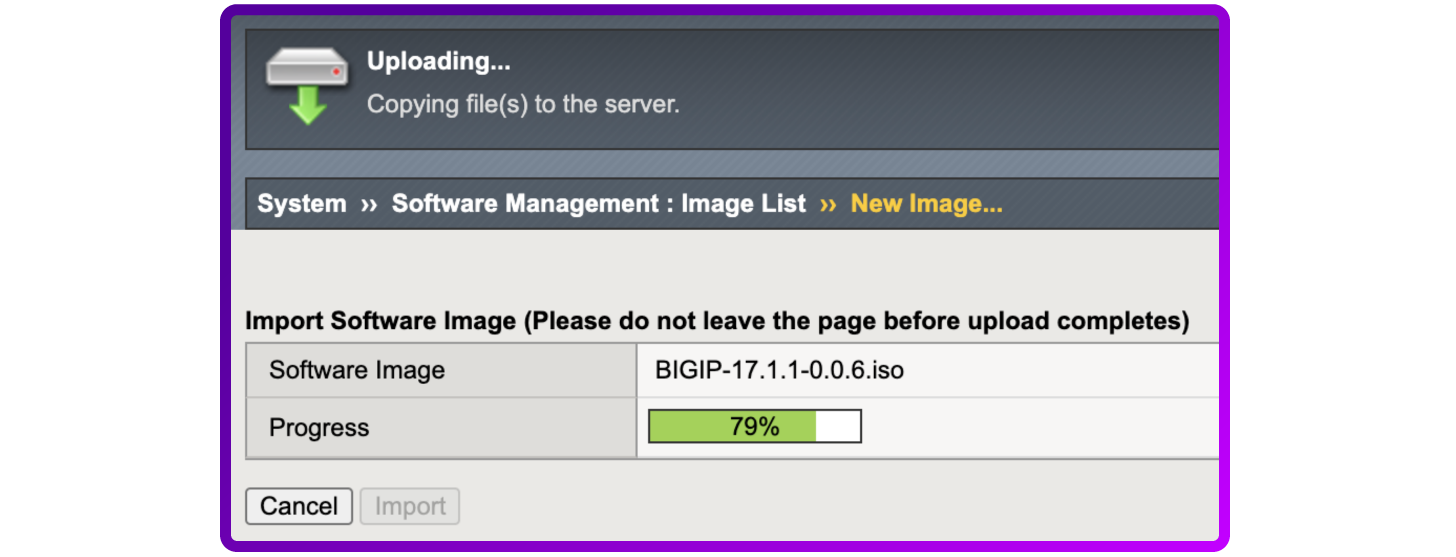
- The Import progress is displayed:
💡 PRO TIP
Alternatively, you can use Secure Copy (SCP) protocol from a remote computer to transfer images to the BIG-IP /shared/images/ directory.
2. Install a software image on the BIG-IP system
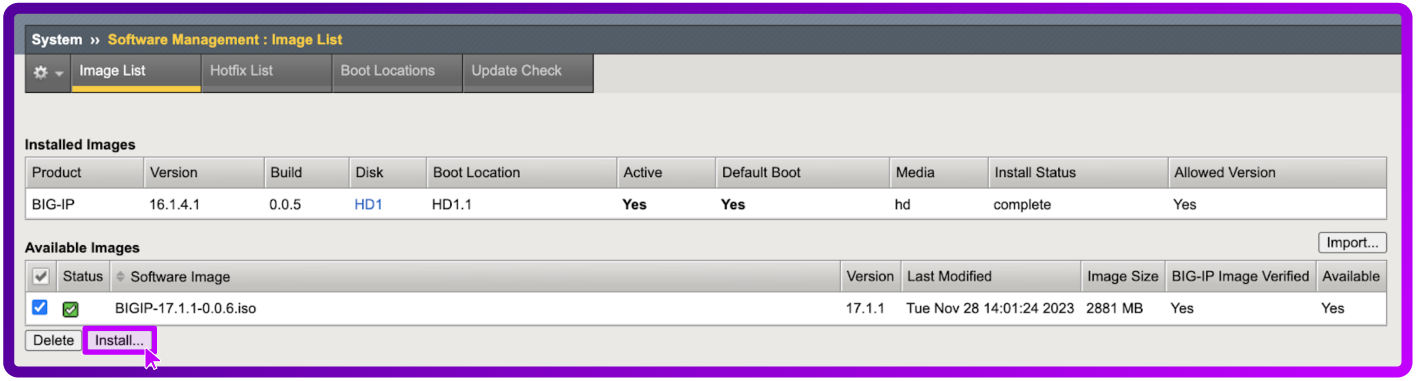
- Go to System > Software Management > Image list:
- Select the check box next to the image you are installing:
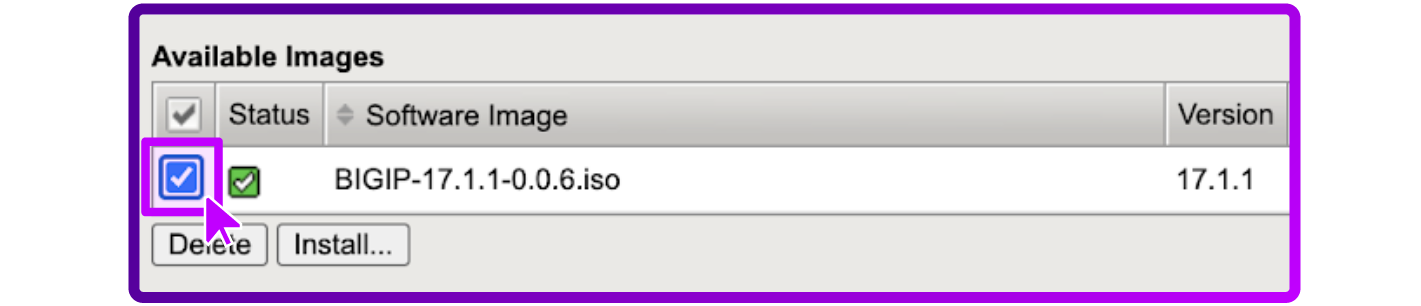
- Select Install:
- For Select Disk, select an available disk:

- For Volume set name, enter a new name, or select an existing volume to overwrite:
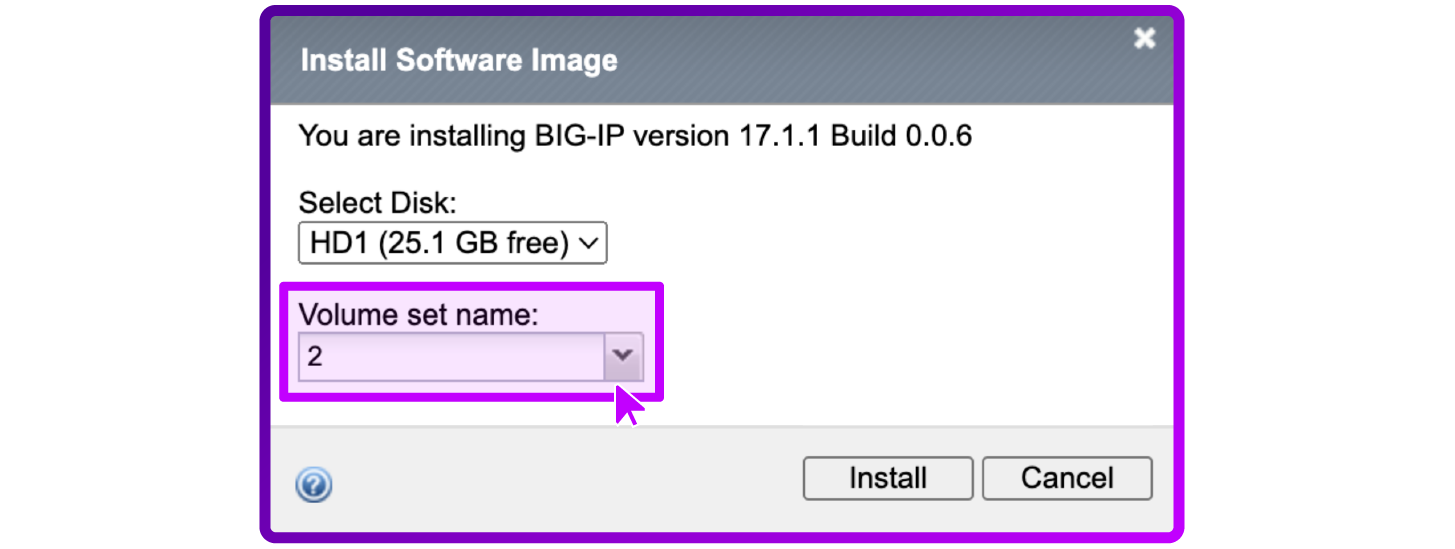
- Select Install:

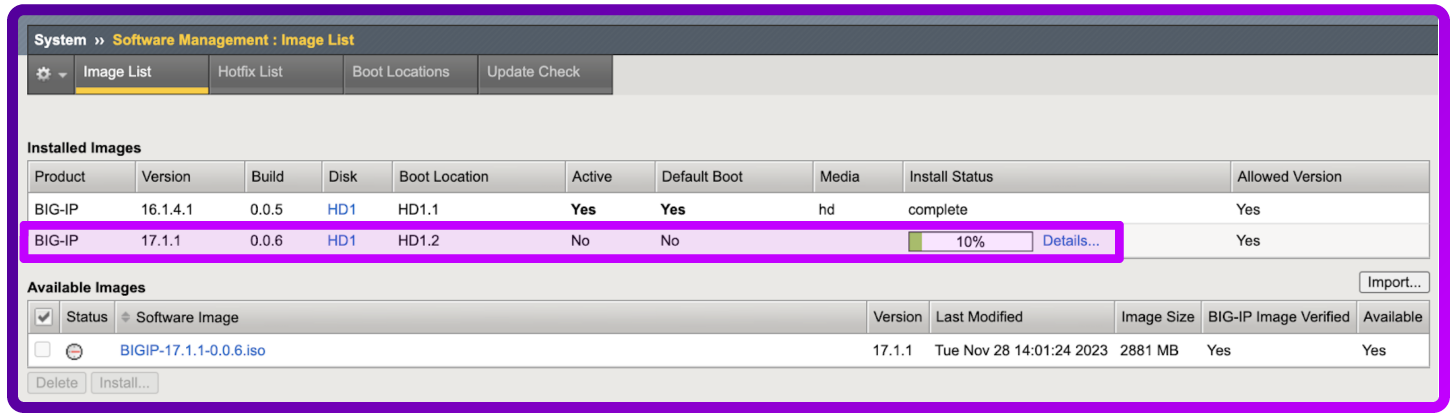
- To see the installation progress, observe the Install Status column of the Installed Images section of the page:
3. Reboot to the newly updated or upgraded software volume
💡 PRO TIP
Perform the following procedure during a maintenance window.
This procedure requires that you restart the system. During this time, the system is not available to process traffic. F5 recommends that you perform this procedure during a maintenance window. Additionally, the first time that you restart and boot to the new volume, the process can take up to 30 or more minutes, depending on the size of the configuration.
- Log in to the Configuration utility with administrative privileges.
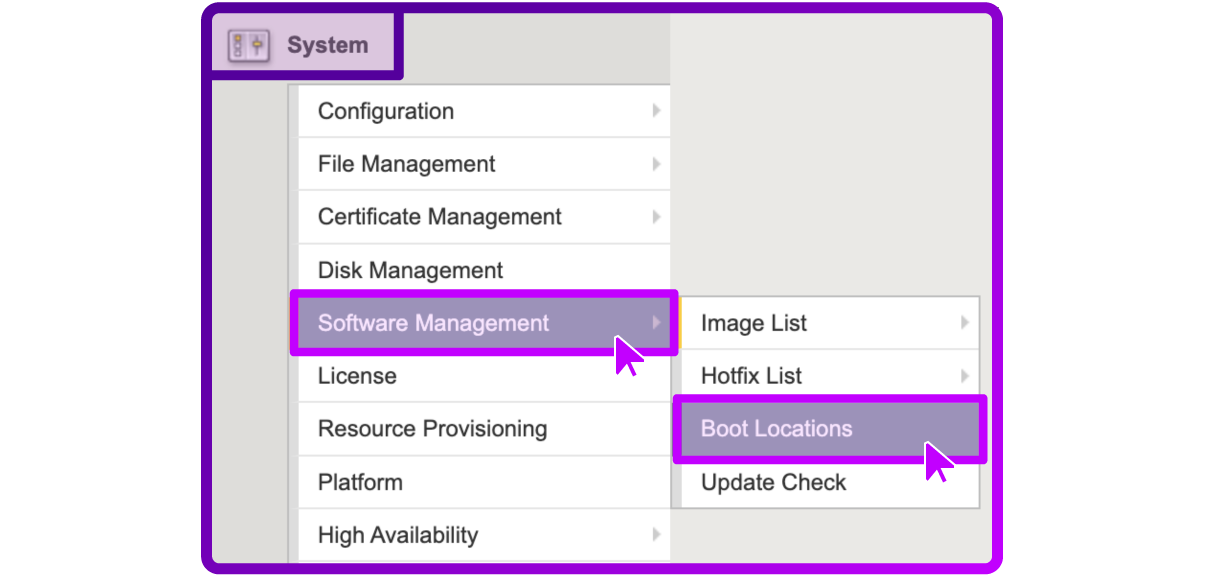
- To view the current active BIG-IP boot location, go to System > Software Management > Boot Locations:
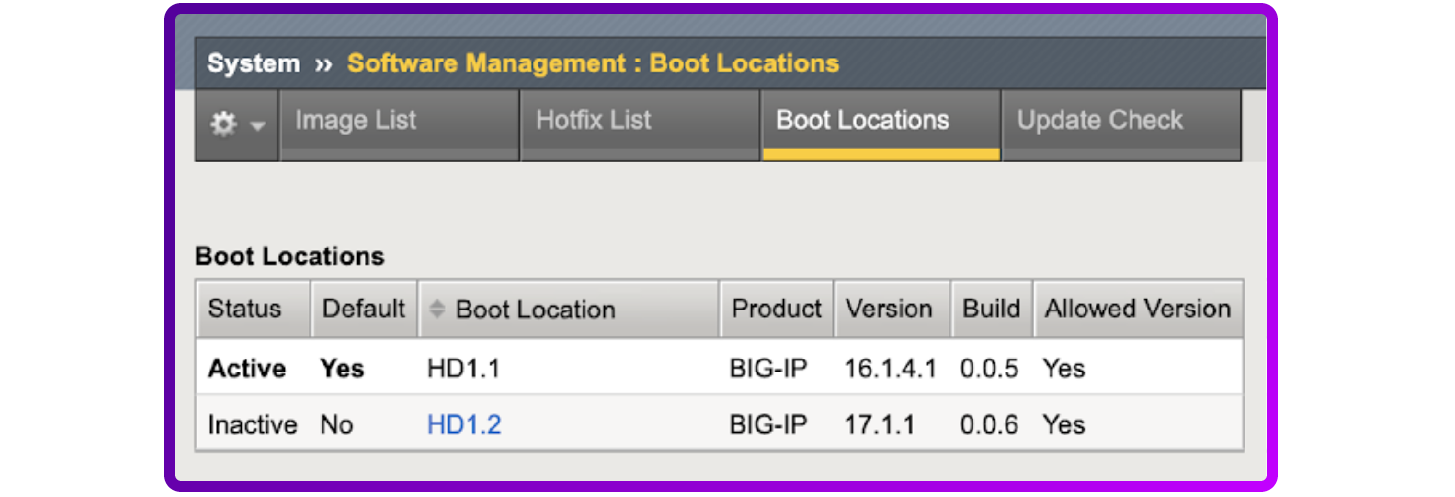
- Select the Boot Location of the newly installed software volume. For example, HD1.2:
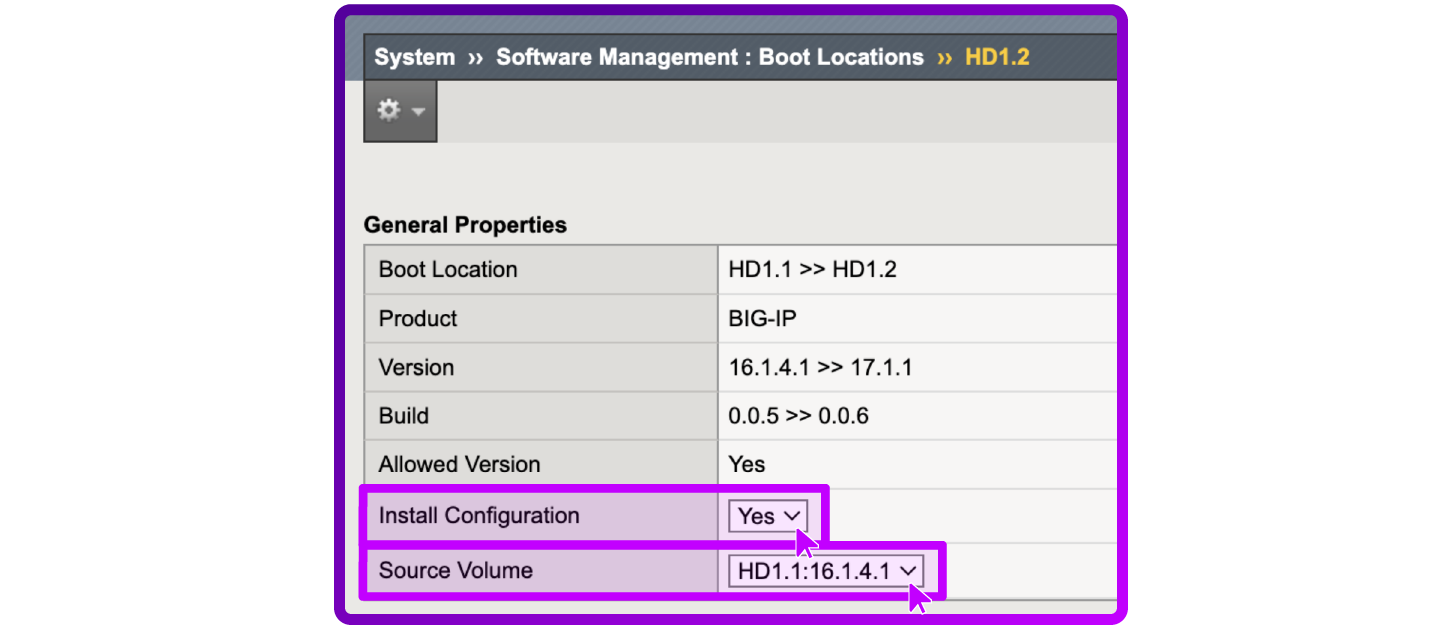
- To restart the system and boot to the specified location, select Activate:
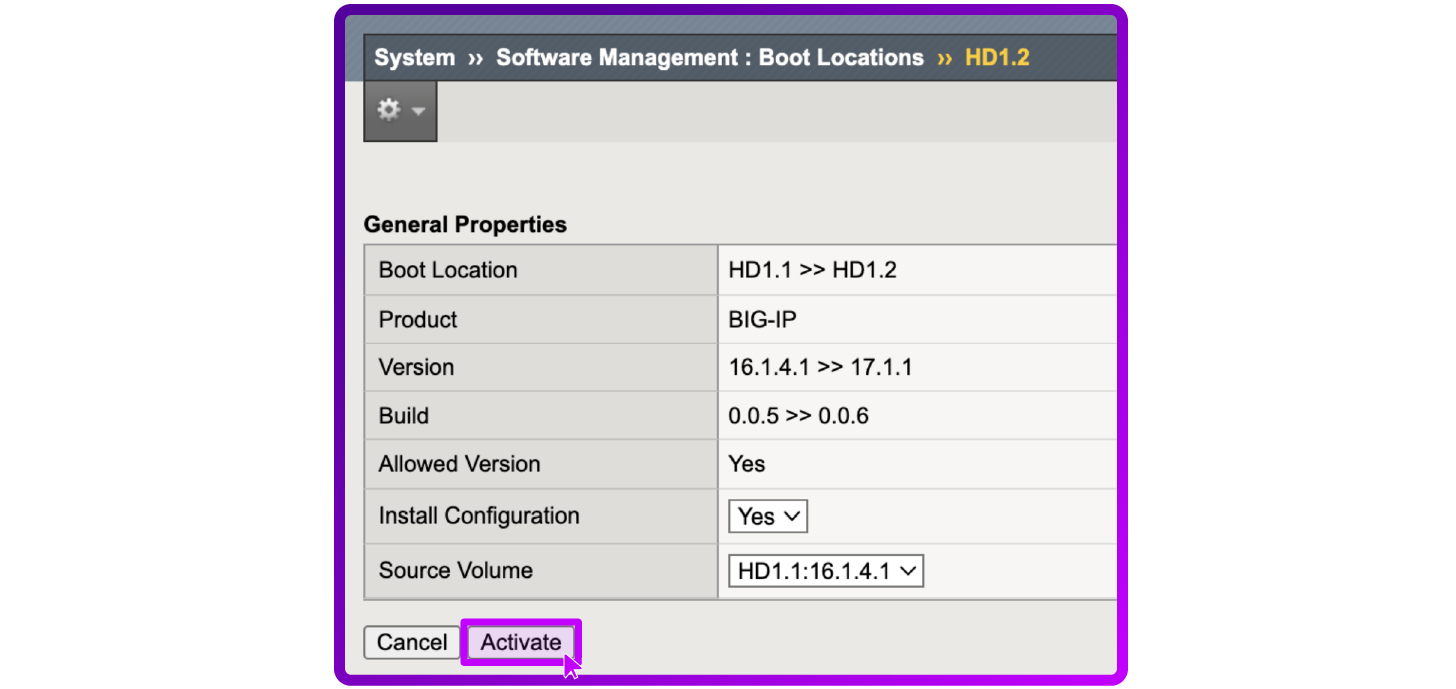
- To confirm that you want to boot into another volume, select OK:

After you select OK, the system will immediately begin restarting. All existing connections will be dropped, and no traffic passes until the restart completes and the BIG-IP configuration loads.
Update or upgrade a standalone BIG-IP VE system using the Configuration utility
Upload a software image to a BIG-IP system
💡 PRO TIP
The following procedure should not have a negative impact on your system.
Secure copy (SCP) protocol is the preferred method to transfer files to or from an F5 device. SCP securely transfers files between hosts using the SSH protocol for authentication, encryption, and data transfer.
Windows systems
The WinSCP utility is a third-party software that provides a graphical user interface to transfer files between systems using SCP. For instructions on installing the software, refer to your software vendor documentation.
- Open the WinSCP utility on your Windows computer.
- In the Login window, select New Site.
- For File Protocol, select SCP.
- For Hostname, enter the management IP address of your BIG-IP system.
- For User name, enter root.
- For Password, enter the BIG-IP root user password.
- Select Login.
- If this is the first time you have connected to this BIG-IP system, a pop-up window prompts you to continue, with a message similar to the following: Continue connecting to an unknown server and add its host key to a cache?. Select Yes to continue.
- Locate and upload the BIG-IP upgrade image to the /shared/images directory of your BIG-IP system.
Mac OS or Linux systems
On a Mac OS or Linux system, the SCP utility is typically already installed. If you need to install the SCP utility, refer to your software vendor documentation.
- Launch a command terminal. Perform the following commands at the command prompt.
- Use the SCP utility to upload the BIG-IP upgrade image to your BIG-IP system.
For example, to upload the BIGIP-17.1.1-0.0.6.iso image, you enter the following command:
scp BIGIP-17.1.1-0.0.6.iso [email protected]:/shared/images
- When prompted, enter your BIG-IP root user password.
Install a software image on the BIG-IP system
💡 PRO TIP
Perform the following during a maintenance window.
If the BIG-IP system serves high volume traffic, F5 recommends that you perform the entire upgrade during a maintenance window, to lessen the impact on a busy system.
- Log in to the command line of the BIG-IP system using the Advanced shell (bash).
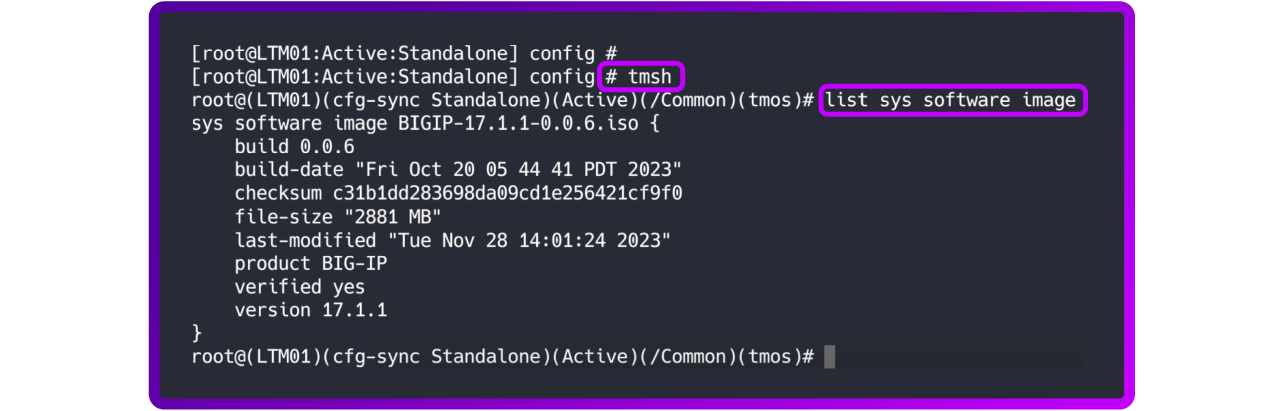
- Enter the following command to view information about the software images that are available for installation on the BIG-IP system:
tmsh list sys software image
- The output appears similar to the following example:
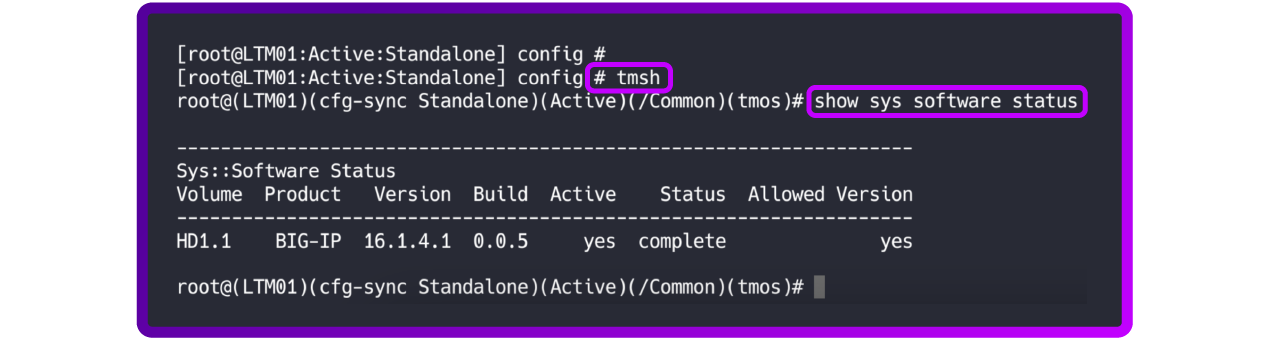
- Enter the following command to view information about the current BIG-IP installed images:
tmsh show sys software status
- Make a note of the Volume name, for use when installing the upgrade image, such as HD1.1.
- The output appears similar to the following example:
- Use the following command syntax to create a new volume, and install an available image to the new volume:
tmsh install sys software image <BIG-IP image ISO name> volume <volume name> create-volume
- For example, to create a volume named HD1.2 and install the BIGIP-17.1.1-0.0.6.iso image to that volume, you enter the following command:
tmsh install sys software image BIGIP-17.1.1-0.0.6.iso volume HD1.2 create-volume

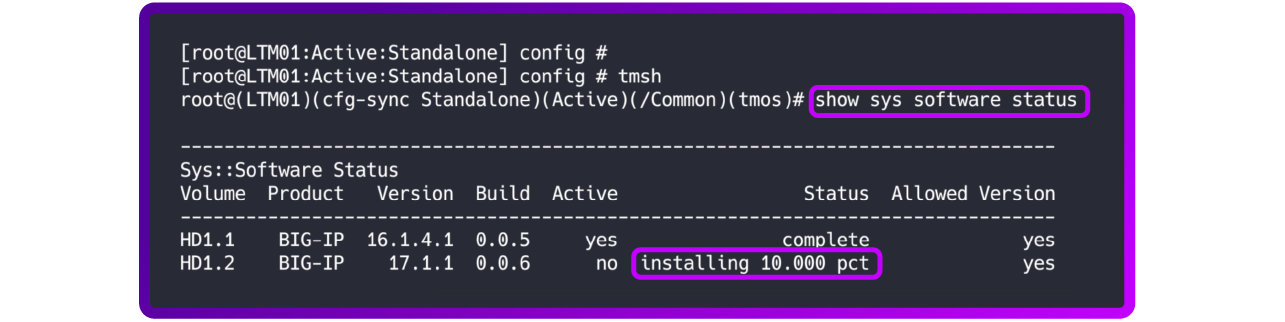
- Enter the following command to view the installation status:
tmsh show sys software status
- The output appears similar to the following example, with the percent (pct) installed status incrementing until installation is complete:
- You can use the watch utility to monitor the installation status, for example:
watch -n 30 "tmsh show sys software status"

- This causes the screen to refresh every 30 seconds, providing the current installation status. Select Ctrl+C to exit the watch utility.

Restart the system and boot to the newly updated or upgraded software volume
💡 PRO TIP
Perform this procedure during a maintenance window.
This procedure requires that you restart the system. During this time, the system is not available to process traffic. F5 recommends that you perform this procedure during a maintenance window. Additionally, the first time that you restart and boot to the new volume, the process can take up to 30 or more minutes, depending on the size of the configuration.
- Log in to the command line of the BIG-IP system using bash.
- Enter the following command to view the current active BIG-IP boot location:
tmsh show sys software status
- The output appears similar to the following example:
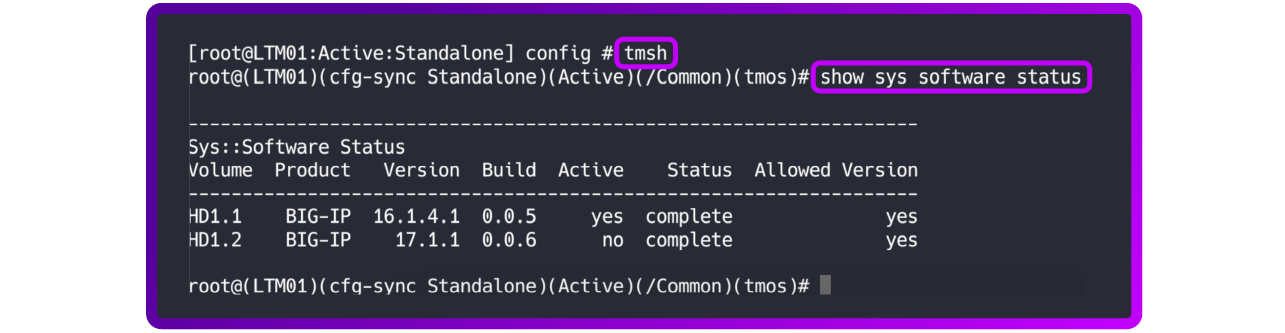
- In the previous output, HD1.1 is the current active boot location.
- Optionally, use the following syntax to copy the configuration from the current active configuration to the new boot location, prior to restarting and booting into the new volume:
cpcfg --source=<volume name to copy the configuration from><newly installed software volume>
- For example, to copy the configuration from the active volume HD1.1 to the newly installed volume HD1.2, enter the following command:
cpcfg --source=HD1.1 HD1.2
- The output appears similar to the following example:

- Use the following command syntax to restart the system and boot to the upgraded software volume:
tmsh reboot volume <volume name>
- After you enter this command, the system immediately begins restarting. The system drops all existing connections and does not pass traffic until the restart completes and the BIG-IP configuration loads.
- For example, to boot to the volume named HD1.2, you enter the following command:
tmsh reboot volume HD1.2
- The output appears similar to the following: The system will be rebooted momentarily.
Update or upgrade a standalone F5 BIG-IP HA systems
The steps for upgrading an HA system are the same steps used to upgrade a standalone system, we must start with the standby node and adding the following two steps:
- Before restarting the upgraded node, we force it offline (optional step)
- After restarting the upgraded node, we force the not-upgrade node (Active one) to standby state
Force offline
This is not an essential step (given that we are always updating a standby node), but there is still one step to be sure that the upgraded node is in standby state:
- Log in to standby node with administrative privileges.
- Press Online (STANDBY) link:

- Select the “Force offline” button:

- The state becomes “FORCED OFFLINE”:

Force to standby the not-upgraded node
After restarting the upgraded node, the next step is to put it in Active mode, to do this, you must force the primary node (not-upgraded) into the standby state.
- Log in to active node (not upgraded) with administrative privileges.
- Press Online (Active) link:

- Select the “Force to Standby” button

Upgrade the other node
Repeat the same steps to upgrade the second node to finally finish the procedure with both nodes upgraded and as active/standby states.
And there you have it! You're done!!
I hope this was helpful. Got issues or outstanding questions? Feel free to comment below.
*F5 and BIG-IP are trademarks of F5, Inc. Loadbalancer.org Ltd has no affiliation with F5, Inc. so use of these names, trademarks and brands does not imply endorsement by either party.