


Load balancing is a critical component of modern infrastructure, ensuring high availability and optimal performance for your applications.
While Loadbalancer.org's Enterprise appliance provides an intuitive Web Interface for most common configurations, there are times when you need to dive deeper and implement advanced settings that aren't directly available through the standard interface.
This is where Layer 7 Manual Configuration becomes invaluable. In this comprehensive guide, I'll walk you through the process of setting up a Layer 7 Virtual Service in Manual mode, using VMware vCloud Director (VCD) as example.
Table of contents
- Understanding the architecture
- When to use Manual Configuration
- VMware Cloud Director implementation walkthrough
- The power of Global Configuration settings
- Best practice and considerations
- How to troubleshoot common errors
Want more?
Check out these related resources
Understanding the architecture
Loadbalancer.org Enterprise is built on proven open-source technologies including HAProxy, Linux Virtual Server, and Apache. This foundation provides a robust platform for load balancing, content delivery, and application delivery services.
While the Web UI simplifies most configurations, manual configuration gives you access to the full power and flexibility of these underlying technologies.
When to use manual configuration
Manual configuration is particularly useful when you need to:
- Implement advanced HAProxy directives not available in the Web Interface
- Configure complex routing rules
- Set up specialized persistence mechanisms
- Integrate with applications that require specific load balancing behaviours
VMware Cloud Director implementation walkthrough
VMware's Cloud Director (VCD) is a great example to use for a Manual Config, as it presents a unique challenge due to certain configuration that are atypical for most of the HTTP-based applications.
Step 1: Create the initial Layer 7 Virtual Service
Start by creating a basic virtual service using the WebUI. This approach allows you to leverage the interface for standard settings before moving to manual configuration.
Navigation path
- Cluster Configuration → Layer 7 - Virtual Service
Configuration details
- Service Name: Choose a descriptive name like "vCloud Director"
- Virtual IP (VIP): Assign your dedicated IP address
- Port: Set to 80
- Protocol: Select HTTP
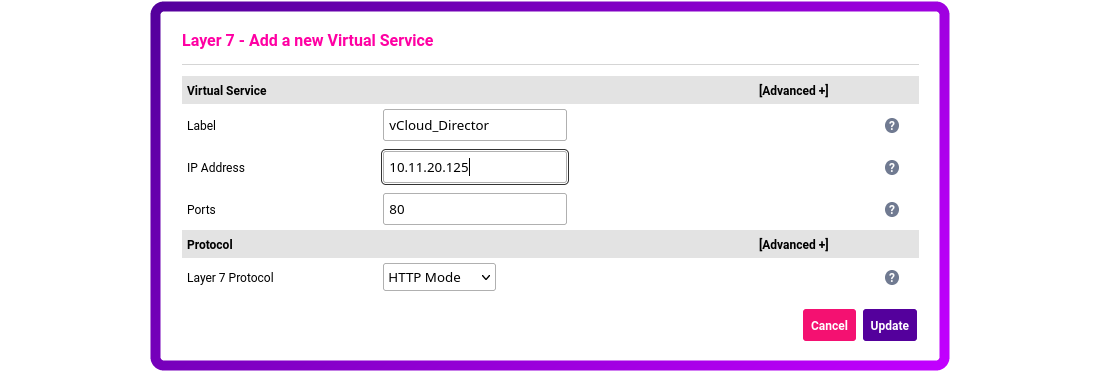
This initial setup creates the foundation that you'll later enhance with manual configuration.
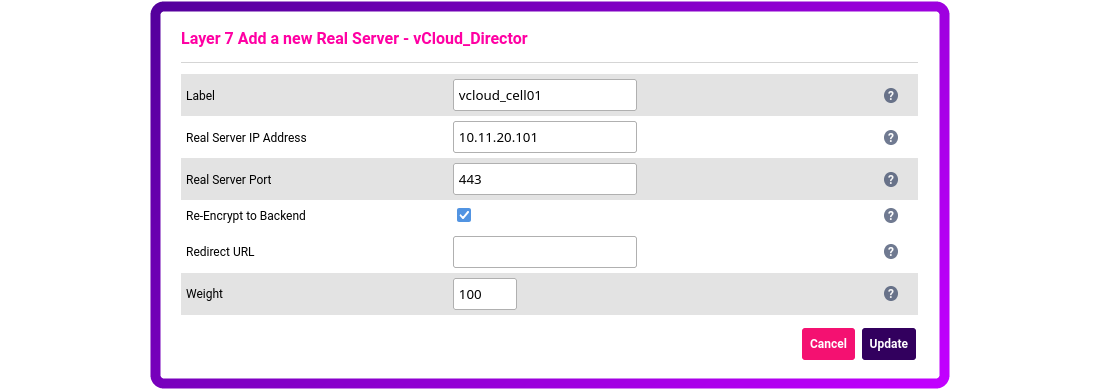
Step 2: Configure Your Real Servers
Define the backend servers (VCD cells) that will handle the actual traffic.
In the Real Servers section
- Click "Add New Real Server"
- Enter the IP address of each vCloud Director cell
- Set the port to 443
- Important: Enable re-encryption since vCloud Director requires encrypted backend communication.
- Repeat for all vCloud Director cells in your environment
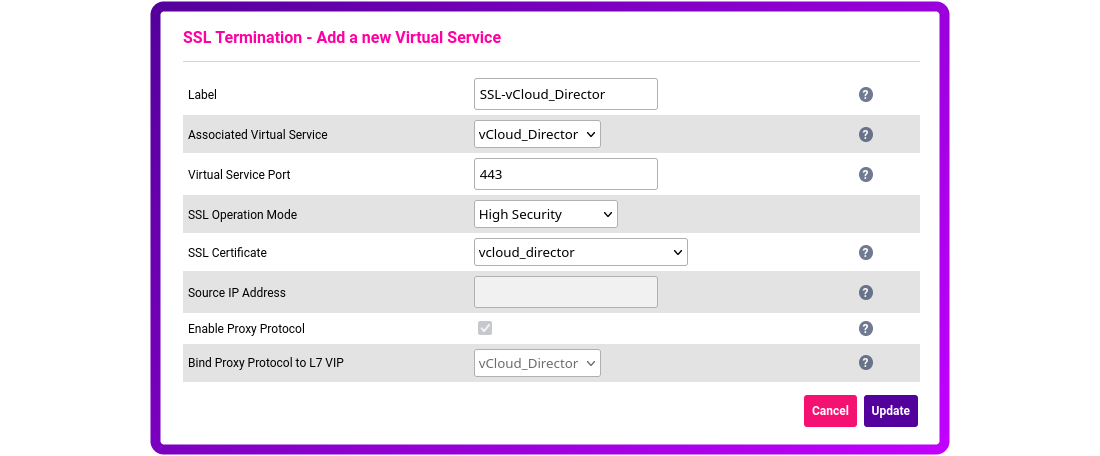
Step 3: Enable HTTPS and SSL offloading
SSL termination at the load balancer improves performance and simplifies certificate management.
SSL Termination Configuration
- Upload your SSL certificate and private key for the vCloud Director public hostname
- Navigate to the SSL Termination in Cluster Configuration section
- Click Add a new Virtual Service and from the Associated Virtual Service choose your vCloud Director Service
- Make sure to choose the right Certificate from the list
- This setup allows the load balancer to handle encryption/decryption, reducing computational load on your vCloud Director cells
Step 4: Configure your Layer 7 Virtual service
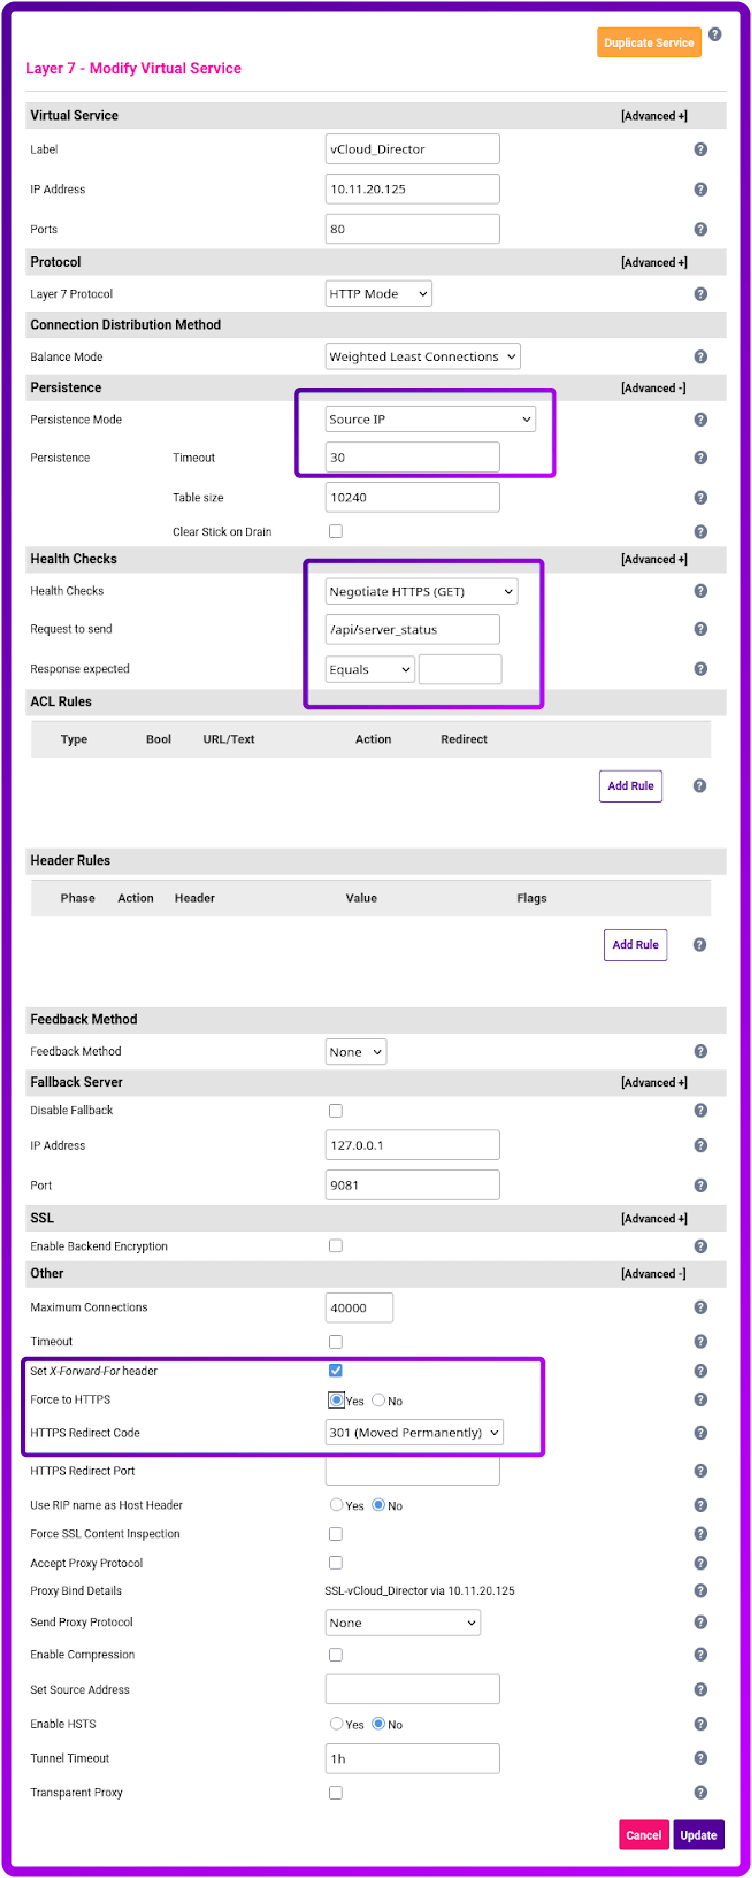
Now we need to make a few changes to the Layer 7 Service in order to work correctly with the vCloud Director. Navigate to Cluster Configuration → Layer 7 - Virtual Service and click “Modify” button by the name of your VIP.
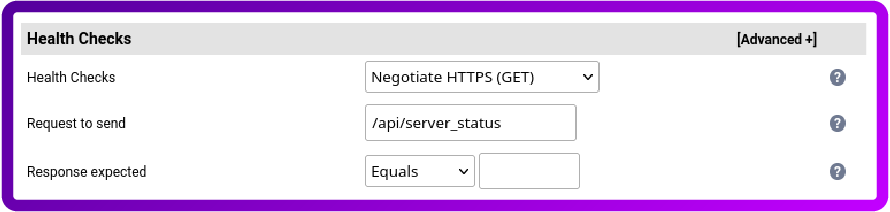
Firstly, health checking ensures traffic only reaches operational servers.
Health check setup
- Scroll down to Health Checks section
- Configure an HTTP health check targeting /api/server_status
- Leaving the expected response field empty means that we expect a valid response from the URL i.e. 200 OK
- The load balancer automatically removes failed servers from rotation
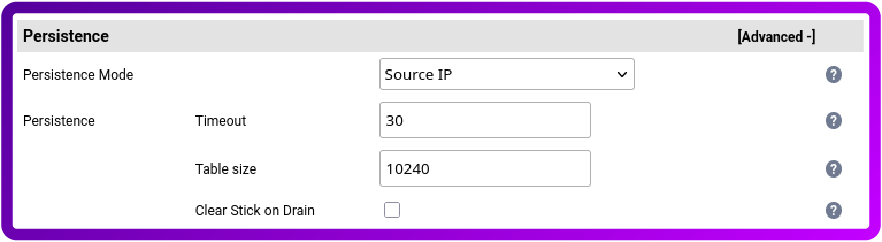
vCloud Director requires consistent session handling to prevent user disconnections.
Persistence Configuration
- Scroll down to the Persistence section
- Select "Source IP" as the persistence method
- Set Persistence Timeout to 30 minutes (adjust based on your session requirements)
- This ensures all requests from a single user session reach the same vCloud Director cell
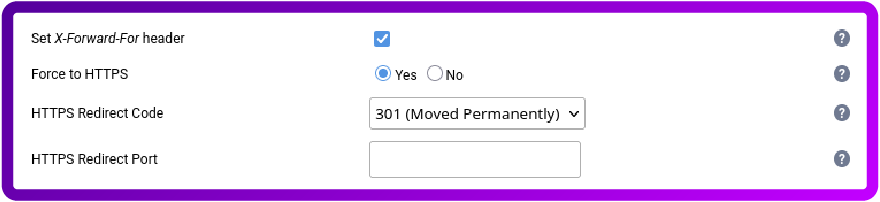
X-Forwarded-For and Force to HTTPS (optional)
- Navigate to the Other section and click on [Advanced]
- Make sure the Set X-Forwarded-For header box is ticket
- And Force to HTTPS is set to Yes
Here's a SINGLE all-in-one screenshot which you might find useful, just in case!!!
Step 5: Extract the Current Configuration
Process
- Navigate to View Configuration → Layer 7
- Locate your newly created VIP
- Copy the entire configuration section from the initial listen <VIP name> line through the end of the Real Server definitions
- Save this configuration text for the next step
Step 6: Enable Manual Configuration Mode
Activation process
- Click "Modify" next to your VIP
- Click "[Advanced]" in the Virtual Service section
- Check the "Manual Configuration" checkbox
- Click "Update" to confirm

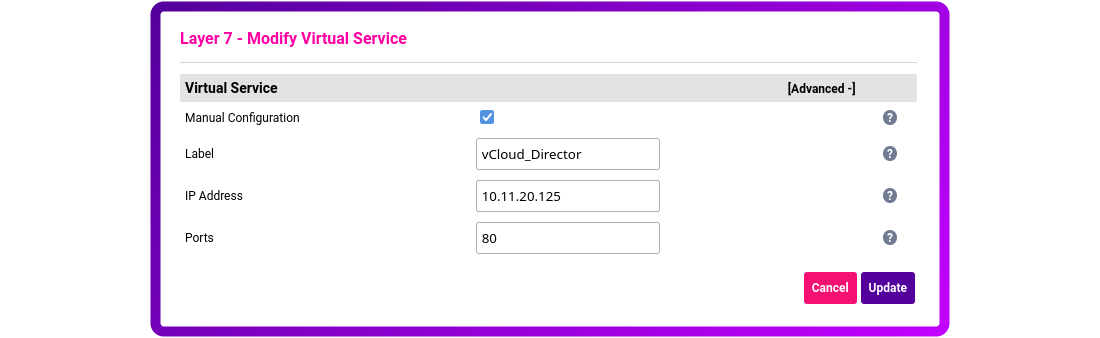
- Important: Once you enable manual configuration, all future changes must be made through the manual interface, not the WebUI.
Step 7: Add the required Global Configuration
Final implementation
- Navigate to Cluster Configuration → Layer 7 - Manual Configuration
- Add the essential global section at the top of your configuration:
global
    tune.bufsize 65536
    tune.http.maxhdr 256


listen vCloud_Director
    bind 10.11.20.125:80 transparent
    default-server on-marked-up shutdown-backup-sessions
    id 332527946
    mode http
    balance leastconn
    acl src_stunnel src 10.11.20.125
    tcp-request connection expect-proxy layer4 if src_stunnel
    stick on src
    stick-table type ip size 10240k expire 30m peers loadbalancer_replication
    server backup 127.0.0.1:9081 backup  non-stick
    option httpchk GET /api/server_status HTTP/1.0
    acl :connection_via_termination always_false
    option http-keep-alive
    timeout http-request 5s
    option forwardfor
    timeout tunnel 1h
    option redispatch
    option abortonclose
    maxconn 40000
    acl force fc_rcvd_proxy
    reqadd X-Forwarded-Proto:\ https if force or :connection_via_termination
    redirect scheme https code 301 if !force !:connection_via_termination
    option httplog
    server vcloud_cell01 10.11.20.101:443 id 2  weight 100  check  check-ssl verify none inter 4000  rise 2  fall 2  slowstart 8000 minconn 0  maxconn 0  on-marked-down shutdown-sessions  ssl verify none sni req.hdr(host) sni req.hdr(host) resolve-prefer ipv4
    server vcloud_cell02 10.11.20.102:443 id 2  weight 100  check  check-ssl verify none inter 4000  rise 2  fall 2  slowstart 8000 minconn 0  maxconn 0  on-marked-down shutdown-sessions  ssl verify none sni req.hdr(host) sni req.hdr(host) resolve-prefer ipv4
- Below the global section, paste the VIP configuration copied in Step 6
- Click "Update" to apply the complete configuration
Why these Global Settings matter
- vCloud Director generates large HTTP requests and responses that exceed default HAProxy buffer sizes
- The API-heavy nature of vCloud Director requires support for numerous HTTP headers
- Without these tuning parameters, you may experience connection timeouts or dropped requests
The power of Global Configuration settings
Here's where manual configuration truly shines - adding global HAProxy settings that aren't available through the WebUI. For vCloud Director, specific tuning parameters are required to handle its communication patterns effectively.
The key requirement for vCloud Director is adding a global section with these critical tuning parameters:
global
    tune.bufsize 65536
    tune.http.maxhdr 256
These settings are essential because:
- tune.bufsize 65536: Increases the buffer size to handle vCloud Director's larger HTTP requests and responses
- tune.http.maxhdr 256: Allows for more HTTP headers, which vCloud Director uses extensively for API communications
Best practice and considerations
Before you begin
- Test in Development: Always test manual configurations in a non-production environment first
- Backup Current Config: Save your working WebUI configuration before converting to manual mode
- Plan Your Changes: Document all custom settings you'll implement
During implementation
- Incremental Changes: Make one change at a time and test functionality
- Monitor Logs: Watch HAProxy logs for any configuration errors
- Validate Syntax: Ensure HAProxy configuration syntax is correct before applying
After implementation
- Performance Monitoring: Monitor response times and connection patterns
- Health Check Verification: Confirm health checks are working as expected
- Session Persistence Testing: Verify user sessions maintain consistency
How to troubleshoot common errors
Configuration syntax errors
- Use HAProxy configuration checker tools
- Review logs in /var/log/haproxy.log
- Validate indentation and syntax formatting
Persistence problems
- Verify stick-table configuration
- Check client IP addressing (especially with proxy chains)
- Monitor session distribution patterns
Health check failures
- Confirm endpoint availability on backend servers
- Verify network connectivity between load balancer and real servers
- Check HTTP response codes and content
Conclusion
Manual Layer 7 configuration in Loadbalancer.org Enterprise unlocks powerful capabilities for complex deployment scenarios. While the Web Interface handles most common use cases efficiently, manual configuration provides access to global HAProxy settings that are essential for specific applications like vCloud Director.
The key to success lies in starting with a solid Web Interface foundation, then thoughtfully transitioning to manual mode to add the required global tuning parameters. This approach combines the ease of the graphical interface with the power of direct HAProxy global configuration.
Remember that with great power comes great responsibility – manual configuration requires deeper understanding of load balancing concepts and careful testing to ensure optimal results.
By following this guide, you'll be well-equipped to leverage the full potential of Loadbalancer.org Enterprise for even the most demanding application delivery requirements that need global HAProxy tuning.