


We're committed to delivering effective, secure, and scalable application delivery solutions, with a strong focus on robust authentication and authorization. That's why I'm excited to dive into a powerful solution that secures your website, using your OpenID Connect (OIDC) provider in combination with Apache HTTP Server, mod_auth_oidc, and Okta.
This setup allows you to leverage the power of a centralized identity management system like Okta to secure your web applications served by Apache, while maintaining the flexibility and performance you expect.
Why Okta, OpenID Connect, and Apache?
Let's break down why this solution is so effective by examining the core components in isolation:
Okta
Okta is a leading independent identity provider, offering a scalable and secure platform for managing user identities, authentication, and authorization. It simplifies the complexities of identity management, allowing you to focus on your core applications. Any other identity provider that supports OpenID Connect can also be used if you prefer.
OpenID Connect (OIDC)
Built on top of OAuth 2.0, OIDC is an authentication layer that allows clients to verify the identity of the end-user based on the authentication performed by an authorization server (like Okta) and to obtain basic profile information about the end-user. It's the modern standard for federated identity.
Apache mod_auth_oidc
This open-source Apache module provides a robust and well-maintained implementation of an OpenID Connect Relying Party. It enables your Apache server to delegate authentication to an OIDC provider, seamlessly integrating with your existing web applications. This module is included in our load balancer product with the WAF gateway.
Our objective with this combined solution is to offload authentication to Okta, so your Apache Servers can focus on serving content, while at the same time enhancing your security posture and application performance.
A partial replacement for Citrix Gateway
For organizations looking to modernize or simplify their remote access infrastructure, this Apache, mod_auth_oidc, and Okta combination can serve as a compelling partial replacement for certain functionalities traditionally handled by Citrix Gateway.
While Citrix Gateway offers a comprehensive suite of features, including full VPN capabilities and ICA proxying for Citrix Virtual Apps and Desktops, this setup effectively handles secure web application access.
If your primary need is to provide users with authenticated, single sign-on access to internal web-based applications, often accessible via a Loadbalancer appliance acting as a reverse proxy, then leveraging Apache with mod_auth_oidc and Okta can provide a streamlined, highly secure, and cost-effective alternative for that specific use case, leveraging open source technologies and a modern identity platform.
Getting started: A practical walkthrough
Here's my step-by-step guide to setting up Apache with mod_auth_oidc and Okta. I'll assume from the outset that you already have a basic Apache installation.
Step 1. Install mod_auth_oidc
First, you need to install the mod_auth_oidc module. On most Linux distributions, you can do this via your package manager:

After installation, ensure the module is enabled:

Step 2. Configure Your Application in Okta
Next, you'll need to create an application in your Okta tenant.
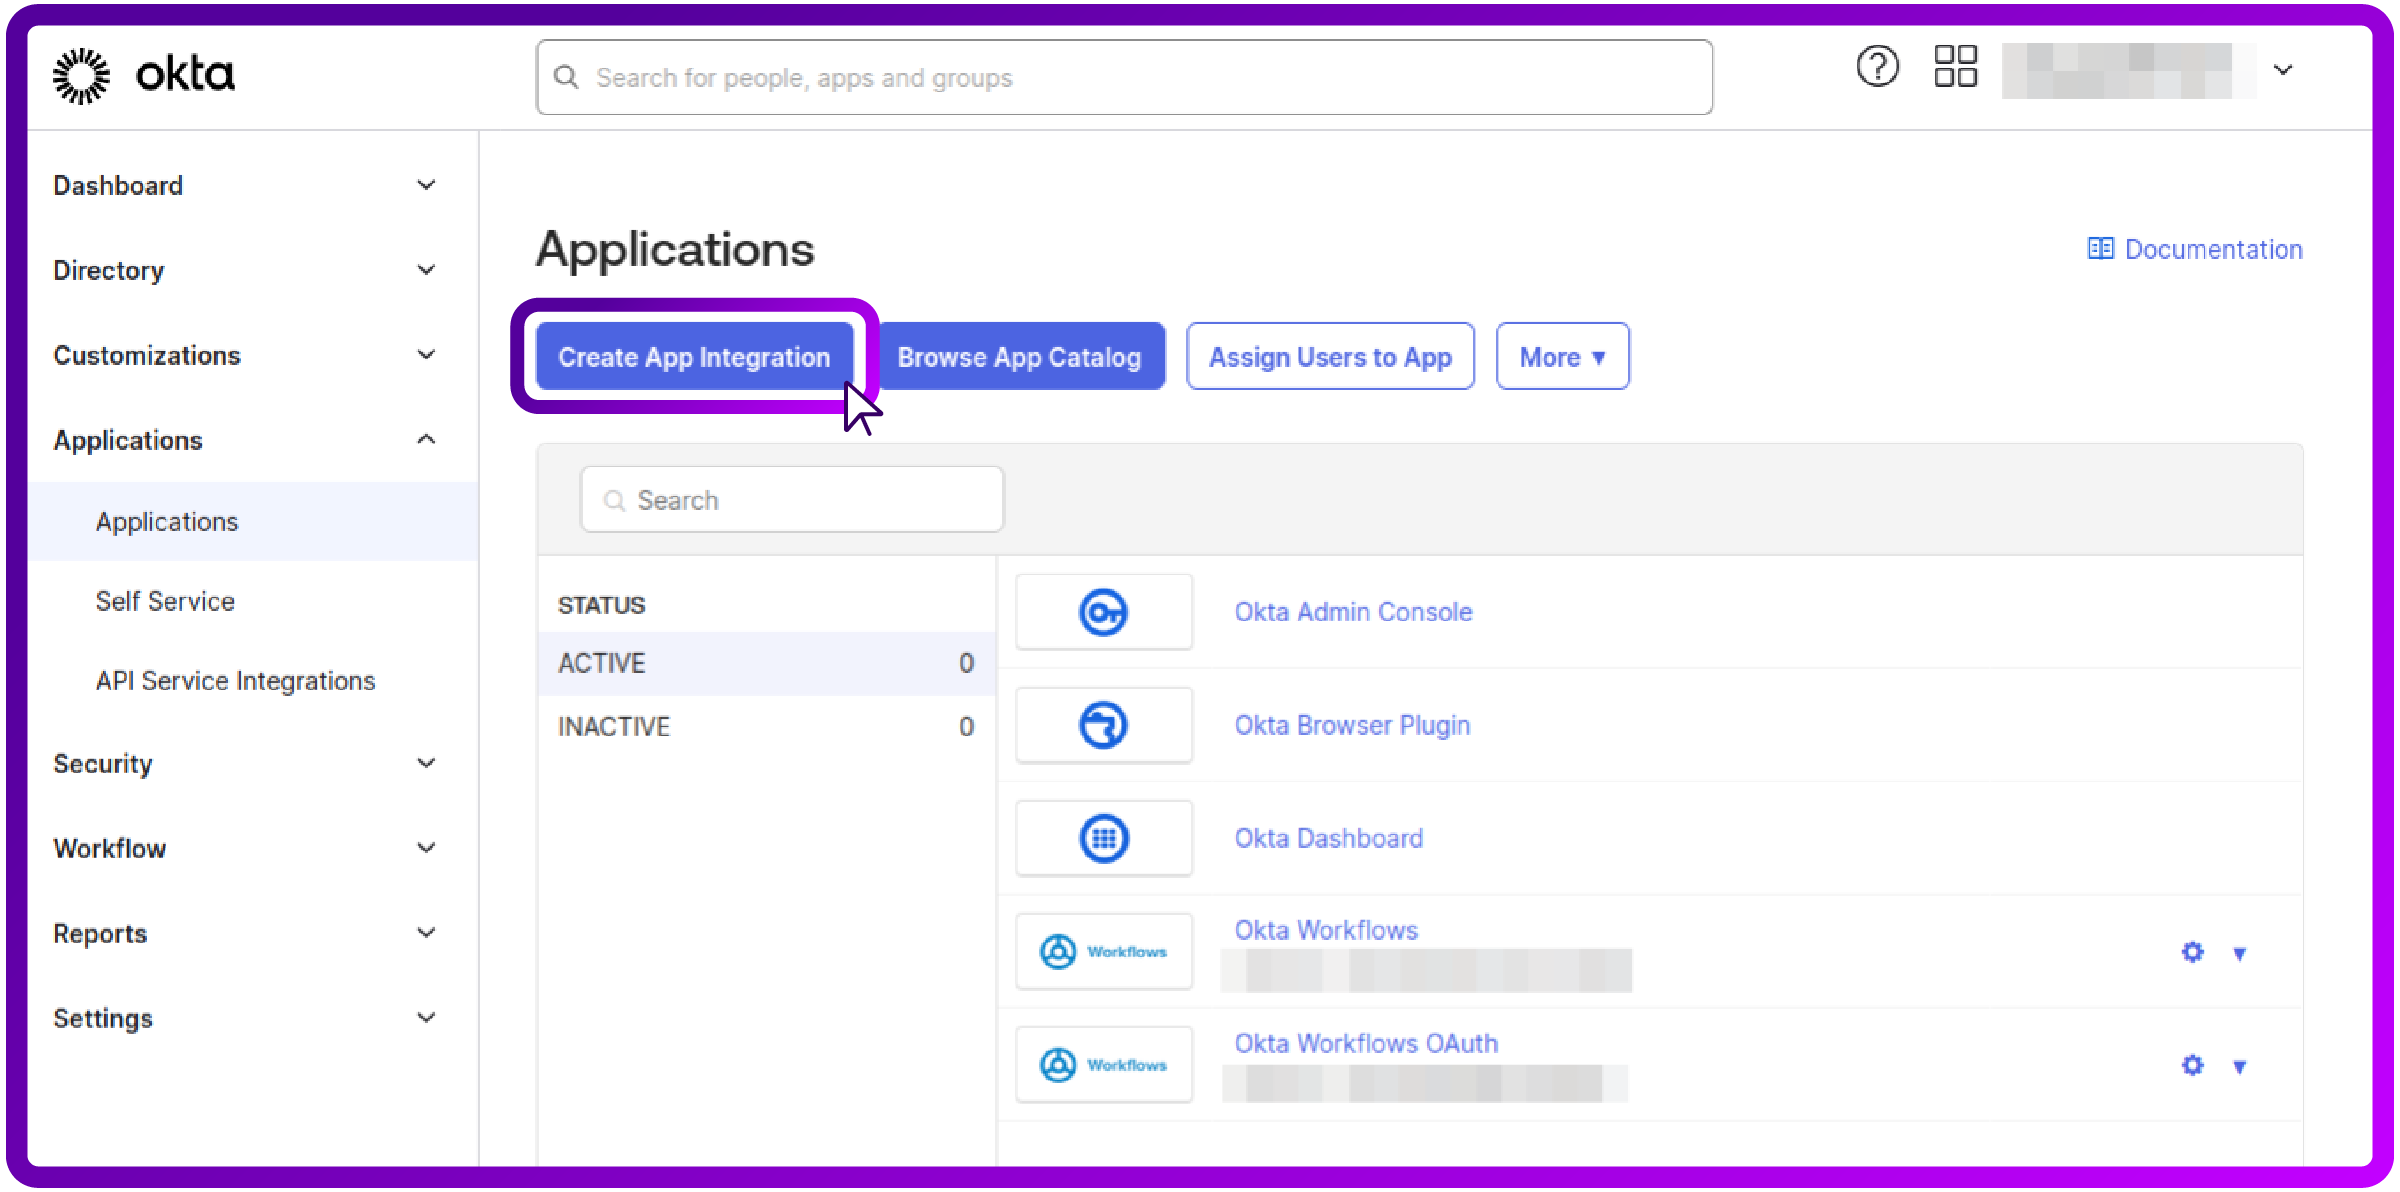
- Log in to your Okta Developer Console.
- Navigate to Applications > Applications and click Create App Integration:
3. Choose OIDC as the Sign-in method and click Next:
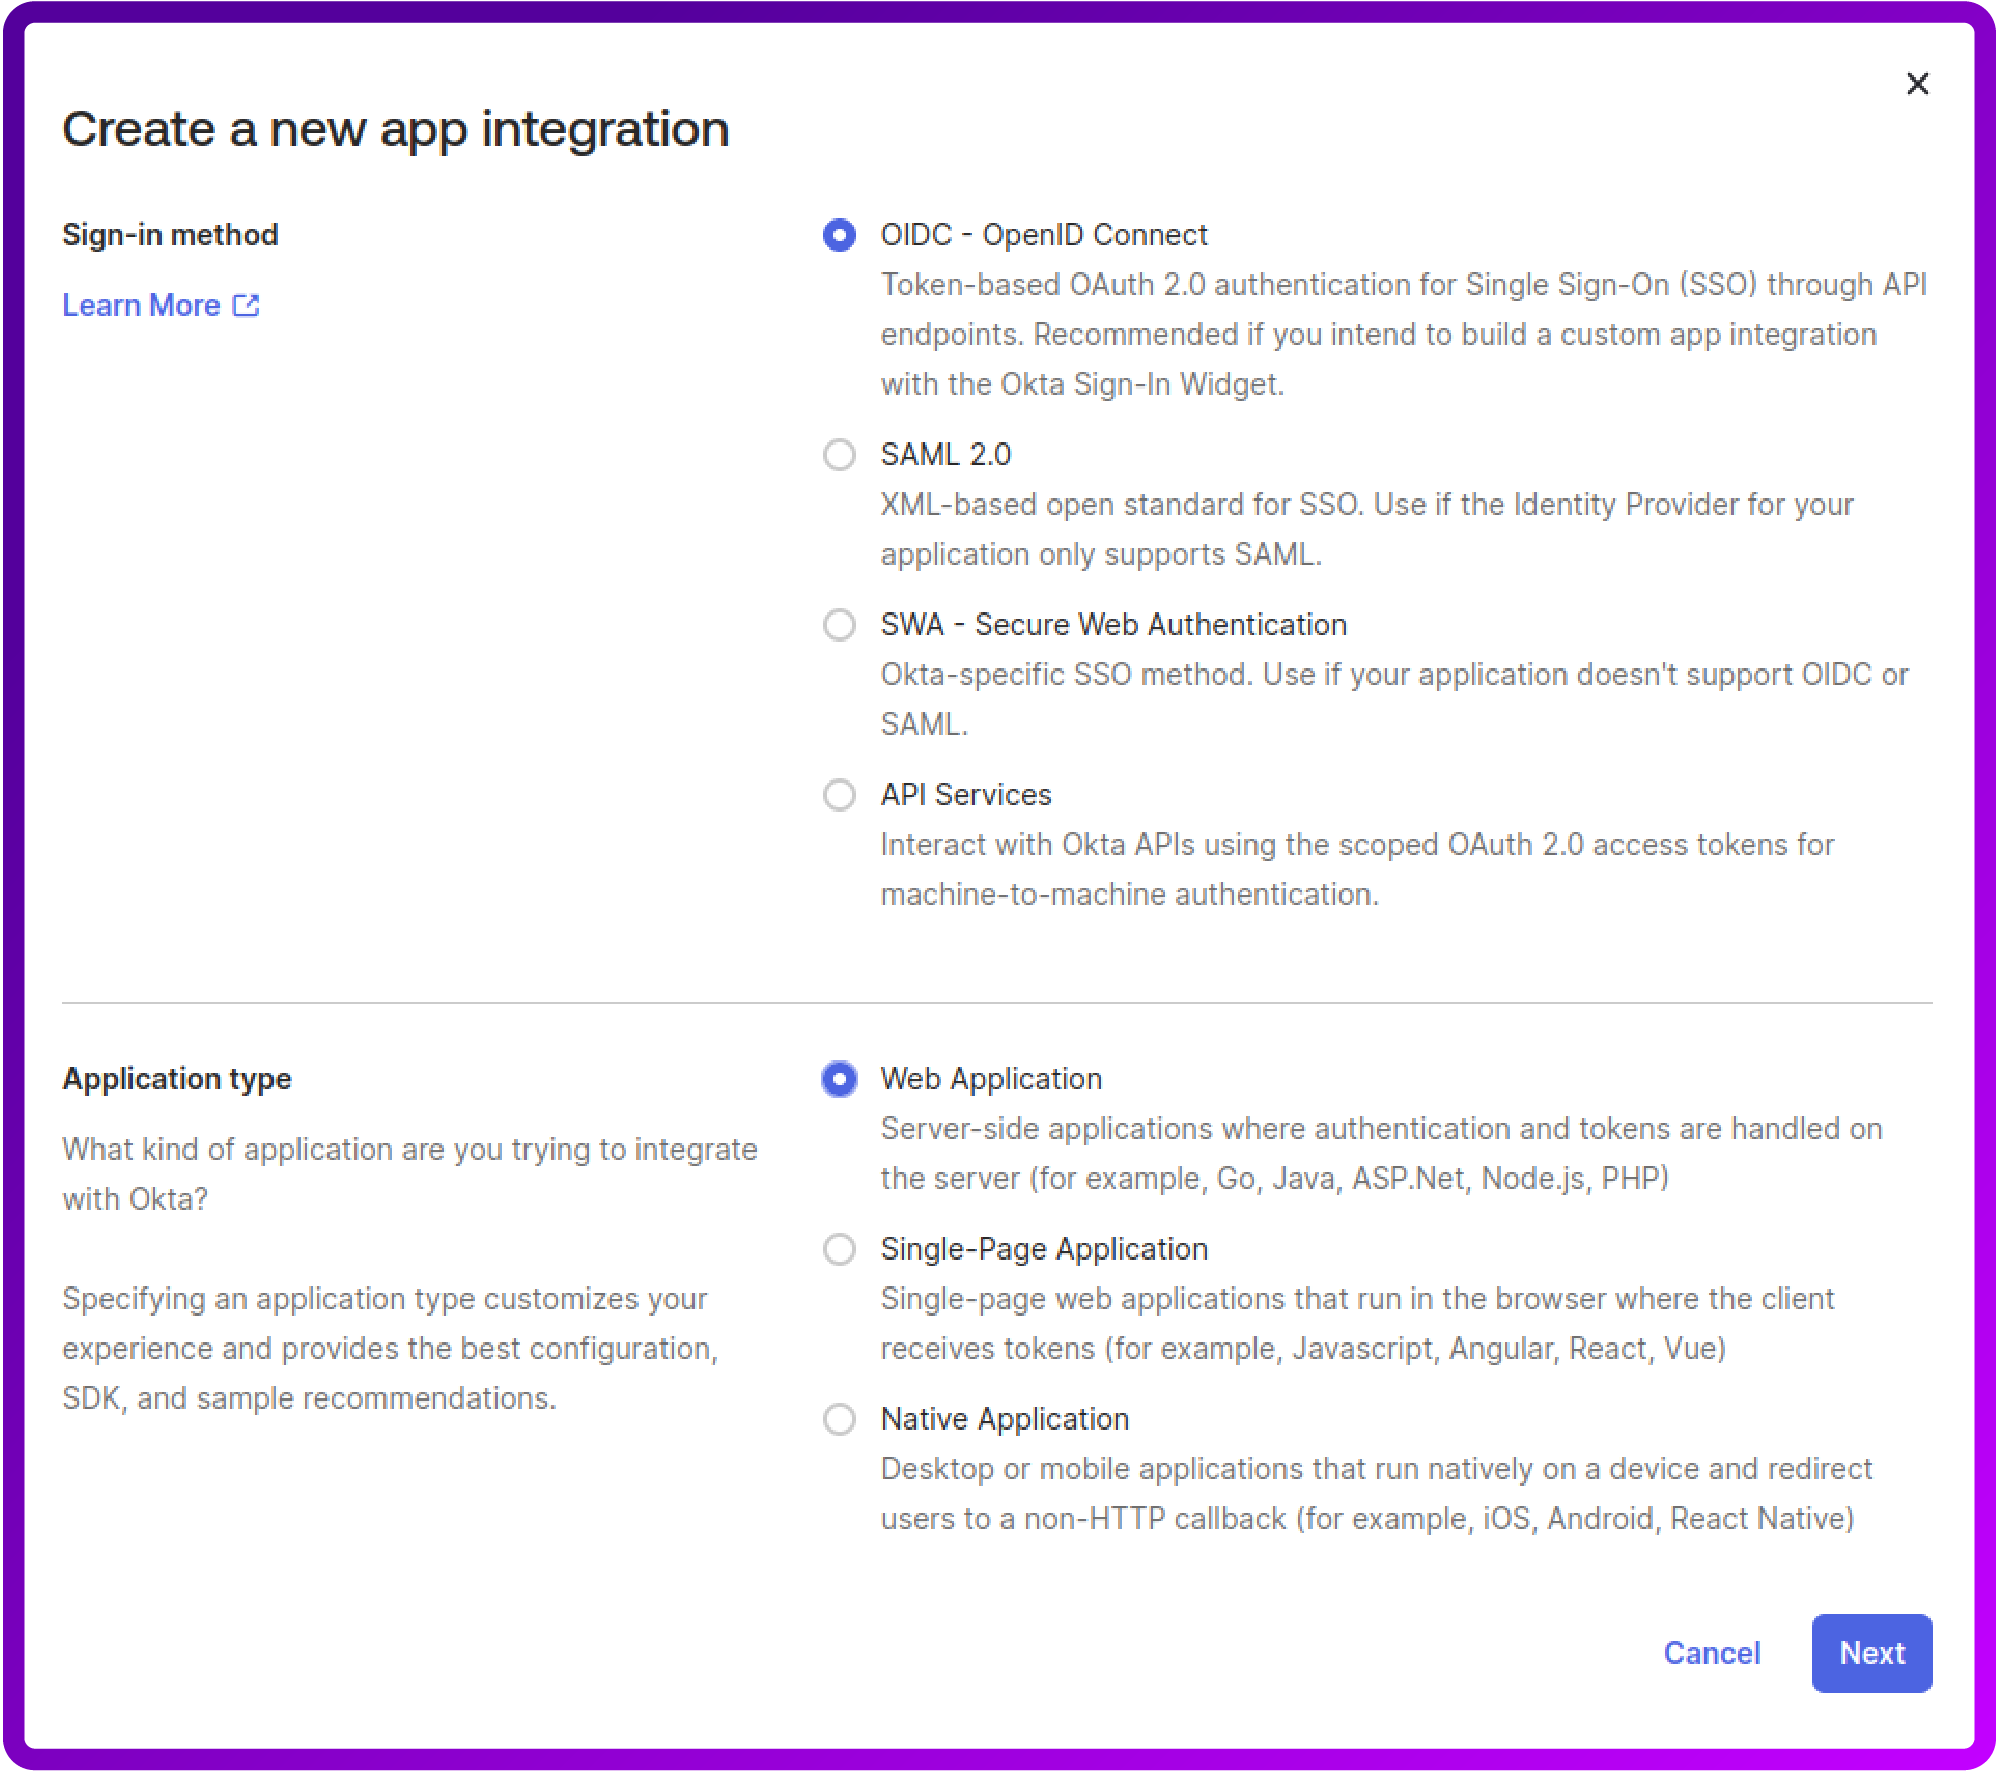
4. Give your application a name (e.g. "Loadbalancer").
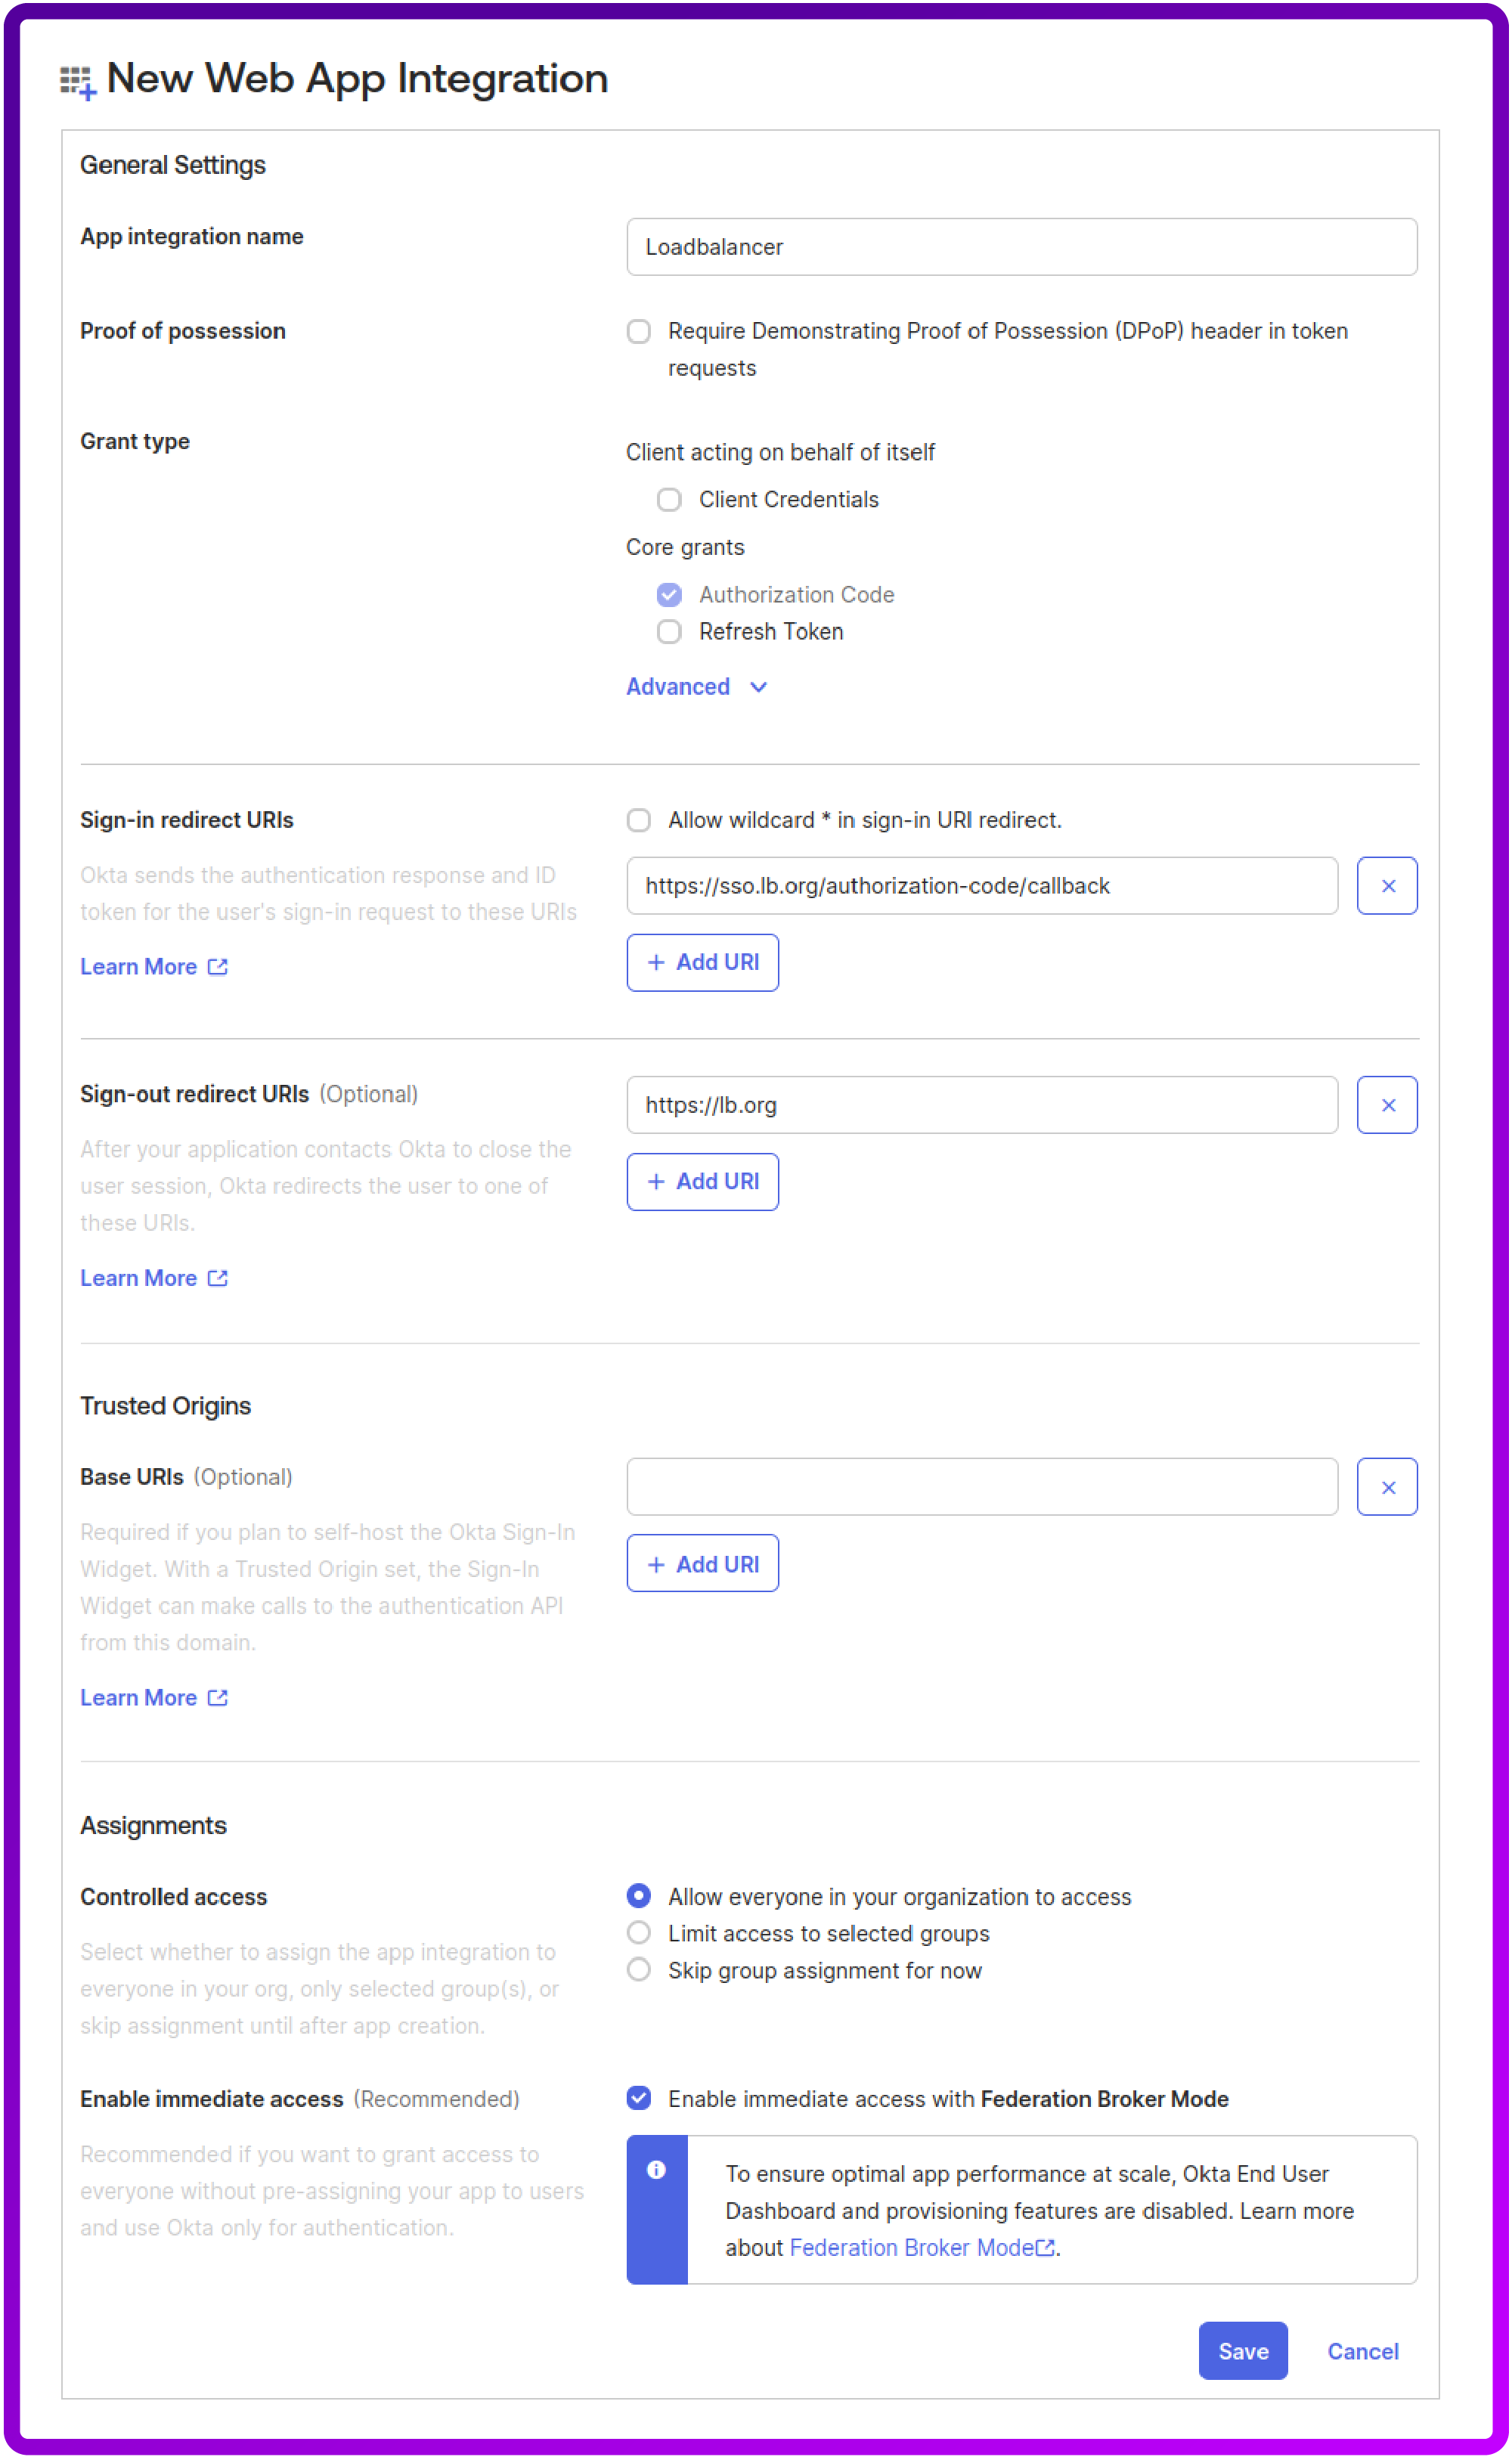
5. Crucially, configure the Sign-in redirect URIs and Sign-out redirect URIs. These must match the URIs you configure in your Apache virtual host. A common pattern for mod_auth_oidc is:
- Sign-in redirect URI: https://sso.lb.org/authorization-code/callback
- Sign-out redirect URI: https://sso.lb.org/ (or wherever you want users to land after logout)
6. Under Assignments, choose your preferred assignment method (e.g., "Allow everyone in your organization to access").
7. Then click Save:
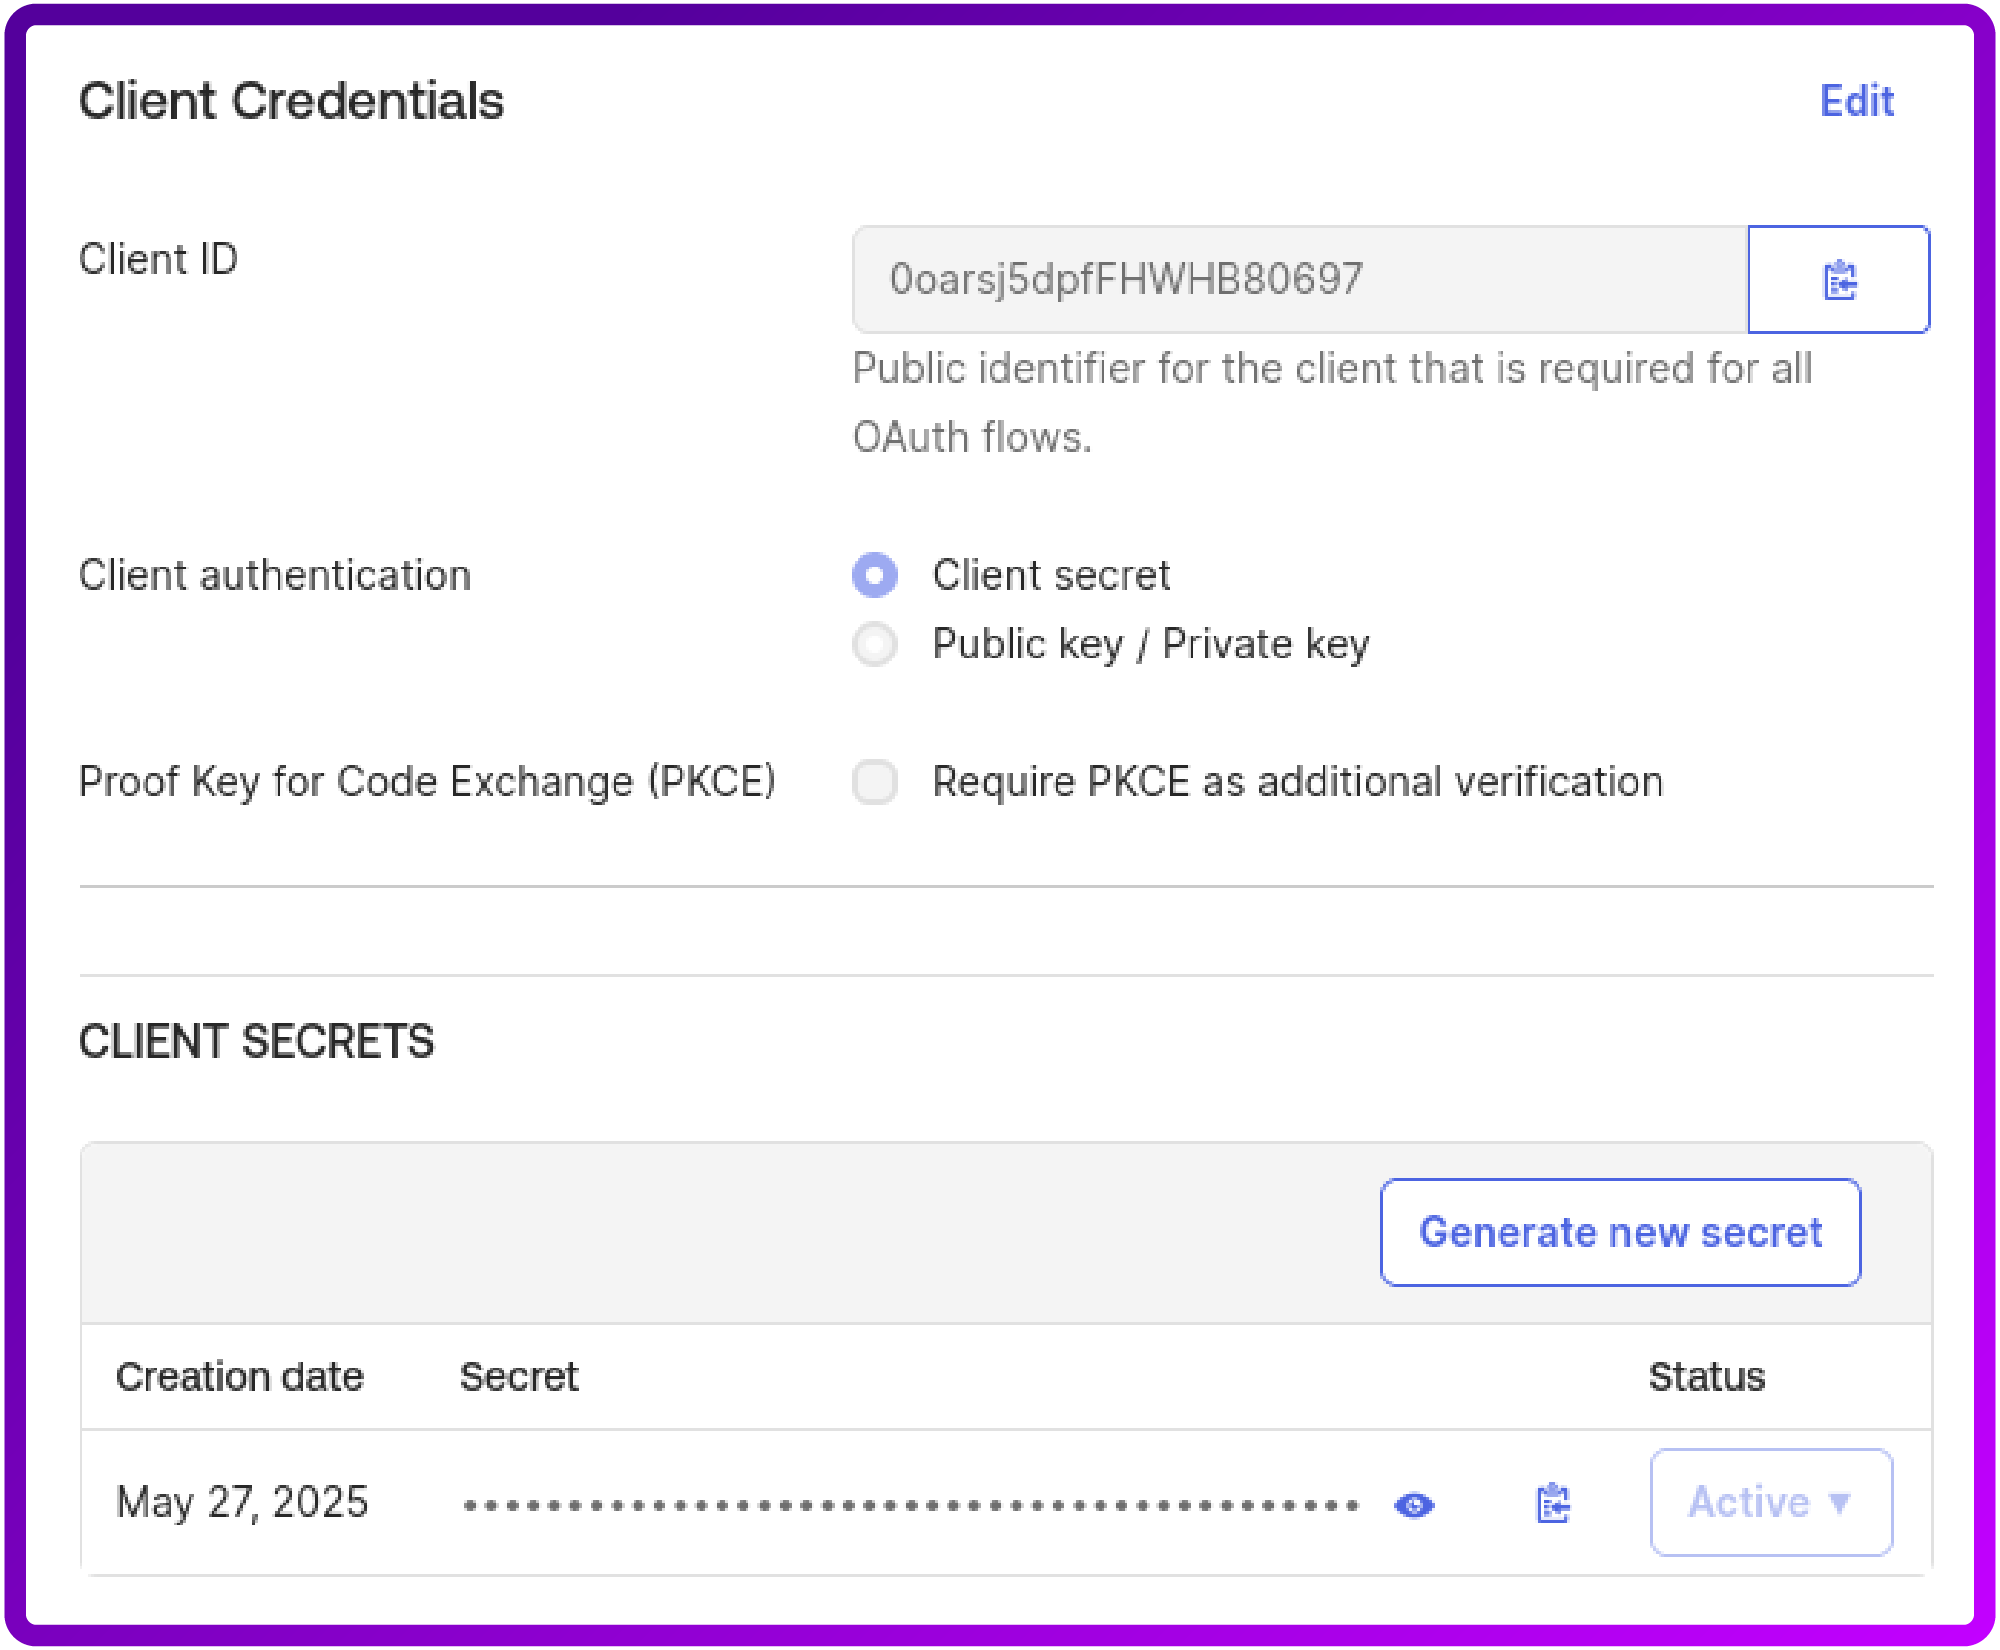
8. After creation, make a note of your Client ID and Client secret. You'll need these for your Apache configuration:
Step 3: Configure Apache Virtual Host
Next, let's configure your Apache virtual host to use mod_auth_oidc.
You'll need to add the following directives (remember to replace placeholders with your actual values!):
<VirtualHost *:443>
    ServerName sso.lb.org

    # SSL configuration (ensure you have SSL set up)
    SSLEngine on
    SSLCertificateFile /etc/ssl/certs/your-certificate.crt
    SSLCertificateKeyFile /etc/ssl/private/your-key.key

    # OIDC Configuration
    OIDCProviderMetadataURL https://YOUR_OKTA_DOMAIN/.well-known/openid-configuration
    OIDCClientID YOUR_OKTA_CLIENT_ID
    OIDCClientSecret YOUR_OKTA_CLIENT_SECRET
    OIDCRedirectURI https://sso.lb.org/authorization-code/callback

    OIDCCryptoPassphrase a-long-random-string # IMPORTANT: Change this!

    # Protect a whole website
    <Location />
        AuthType openid-connect
        Require valid-user

    </Location>

    # or a certain location
    <Location /protected>
        AuthType openid-connect
        Require valid-user

    </Location>
</VirtualHost>
Here's an explainer of the key directives:
- OIDCProviderMetadataURL: This is where mod_auth_oidc discovers all the necessary OIDC endpoints from Okta. Your Okta domain typically looks like dev-XXXXXXXX.okta.com or yourcompany.okta.com.
- OIDCClientID and OIDCClientSecret: These are the credentials you obtained from your Okta application.
- OIDCRedirectURI: This must match the "Sign-in redirect URI" configured in your Okta application.
- OIDCCryptoPassphrase: CRITICAL! This passphrase is used to encrypt sensitive session data. Generate a strong, random string and keep it secure. Never use a default or easily guessable value.
- <Location /protected>: This block specifies that any request to https://your-apache-domain.com/protected (and its sub-paths) will require OpenID Connect authentication.
- AuthType openid-connect: This directive tells Apache to use mod_auth_oidc for authentication.
- Require valid-user: This ensures that only authenticated users can access the resource.
Step 4: Test your configuration
Save your Apache configuration file and restart Apache:

Now, try to access https://your-apache-domain.com/protected in your browser. You should be redirected to your Okta login page.
After successful authentication, you'll be redirected back to your protected Apache resource.
How to achieve this even faster with a Loadbalancer appliance
Alternatively, for an easier workaround, you can use our load balancer appliance for an easier and quicker way to achieve this same result in half the time.
By deploying a Web Application Firewall (WAF) Gateway in conjunction with a Layer 7 Virtual Service configured for SSL Termination, our appliance automates a substantial portion of the necessary configuration. This significantly simplifies and accelerates the process of implementing robust authentication and authorization mechanisms.
For organizations specifically requiring Single Sign-On (SSO) capabilities without the immediate need for advanced threat blocking, the WAF's blocking engine can remain disabled. This optional step further reduces the complexity and time required for initial setup, allowing for a quicker deployment of SSO functionality while still leveraging the Loadbalancer appliance's capabilities for traffic management and SSL offloading.
Here's a step-by-step run-down:
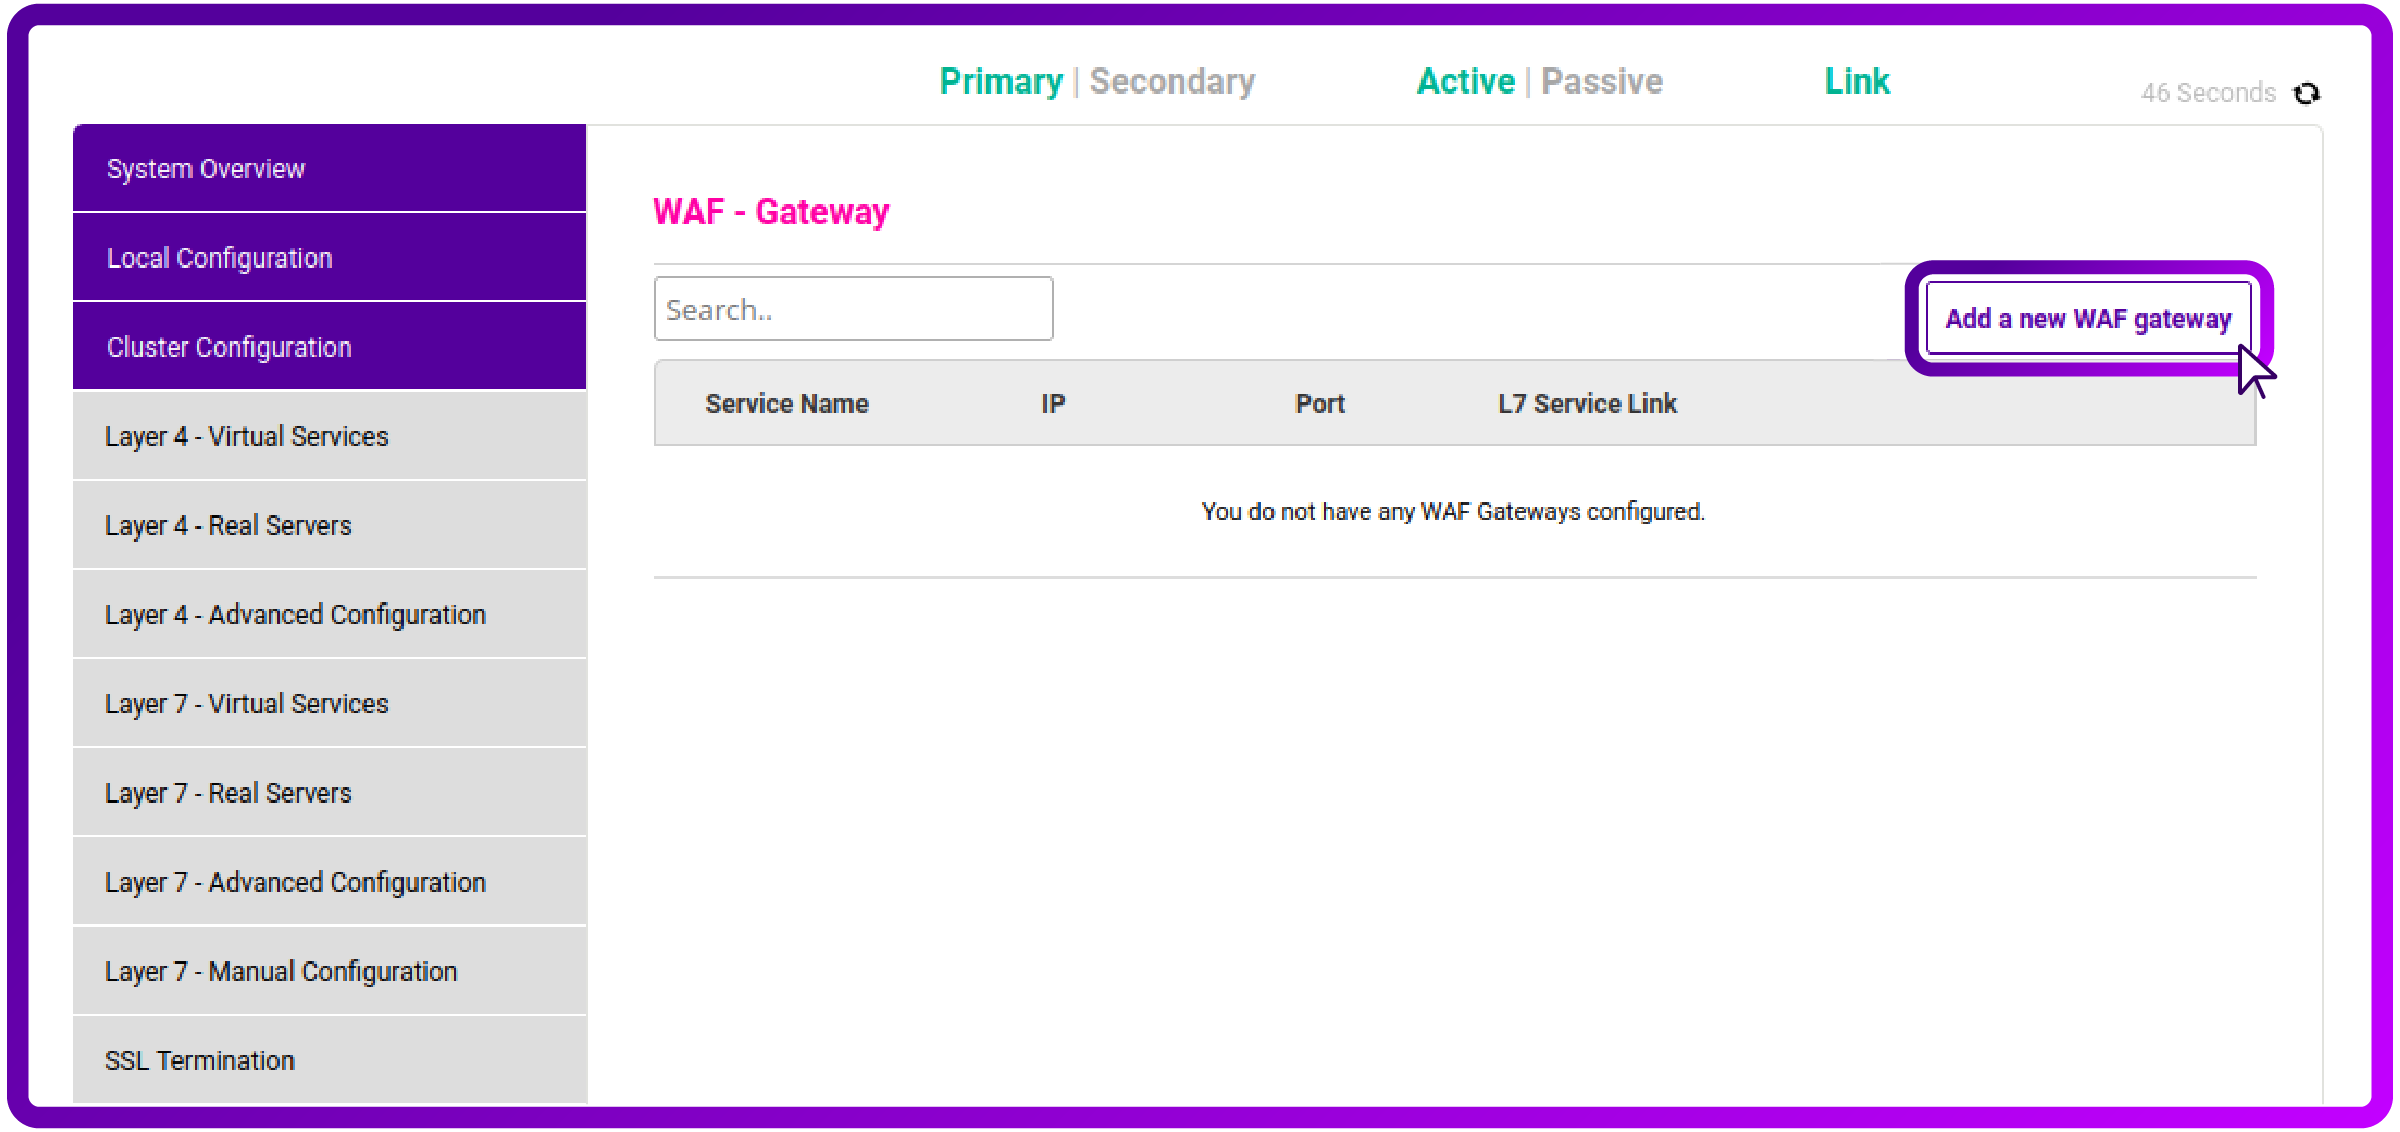
Navigate to Cluster Configuration -> WAF Gateway and click Add a New Gateway button:
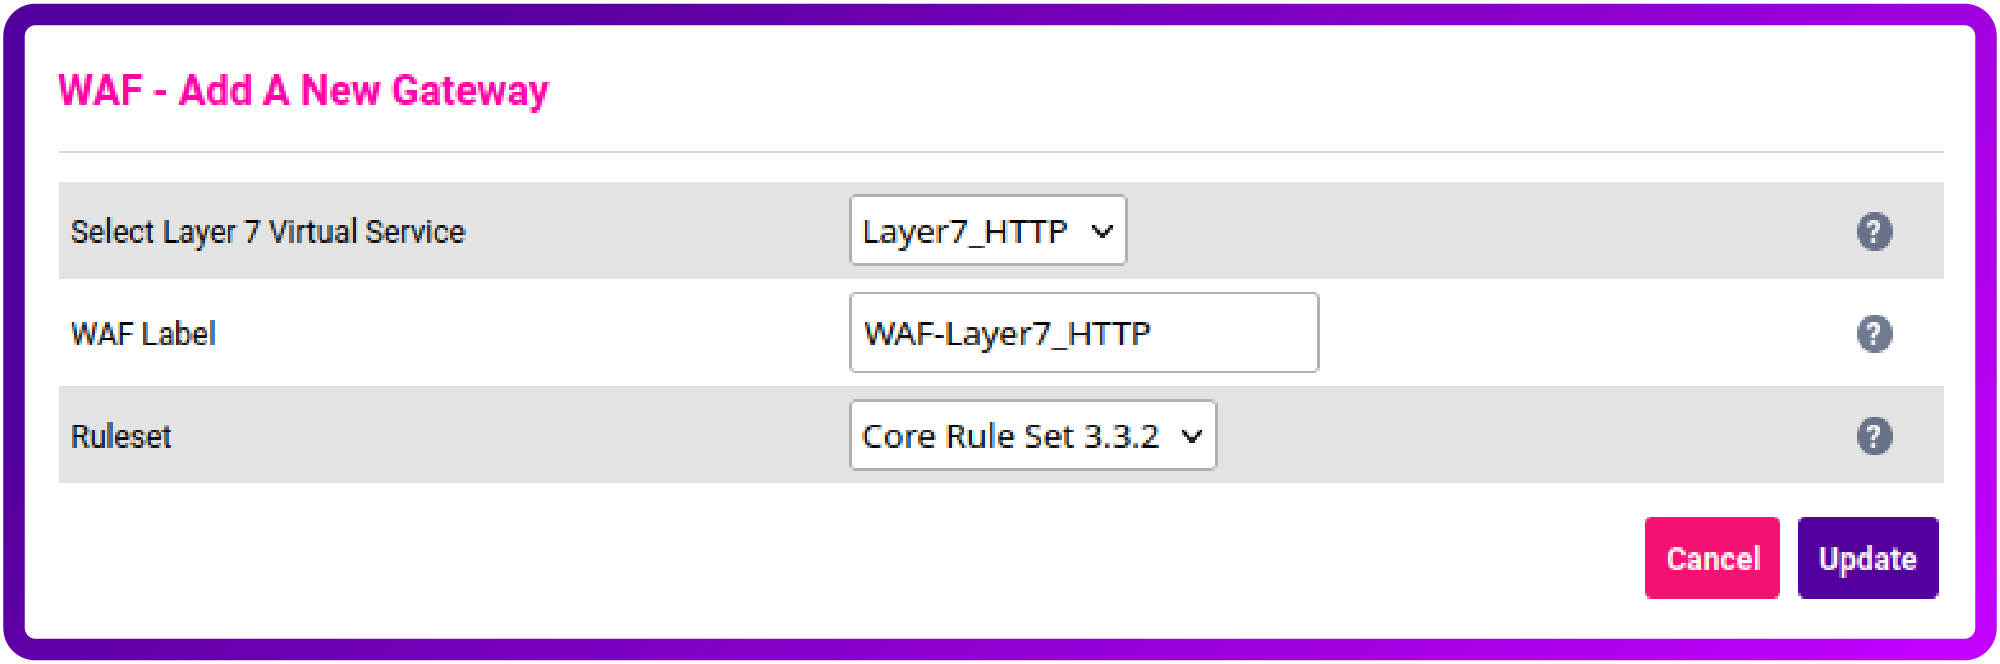
Select Layer 7 Virtual Service that you wish to protect with SSO from the dropdown list and click Update:
Afterwards navigate to WAF - Manual Configuration and choose your newly created WAF Service from the dropdown:
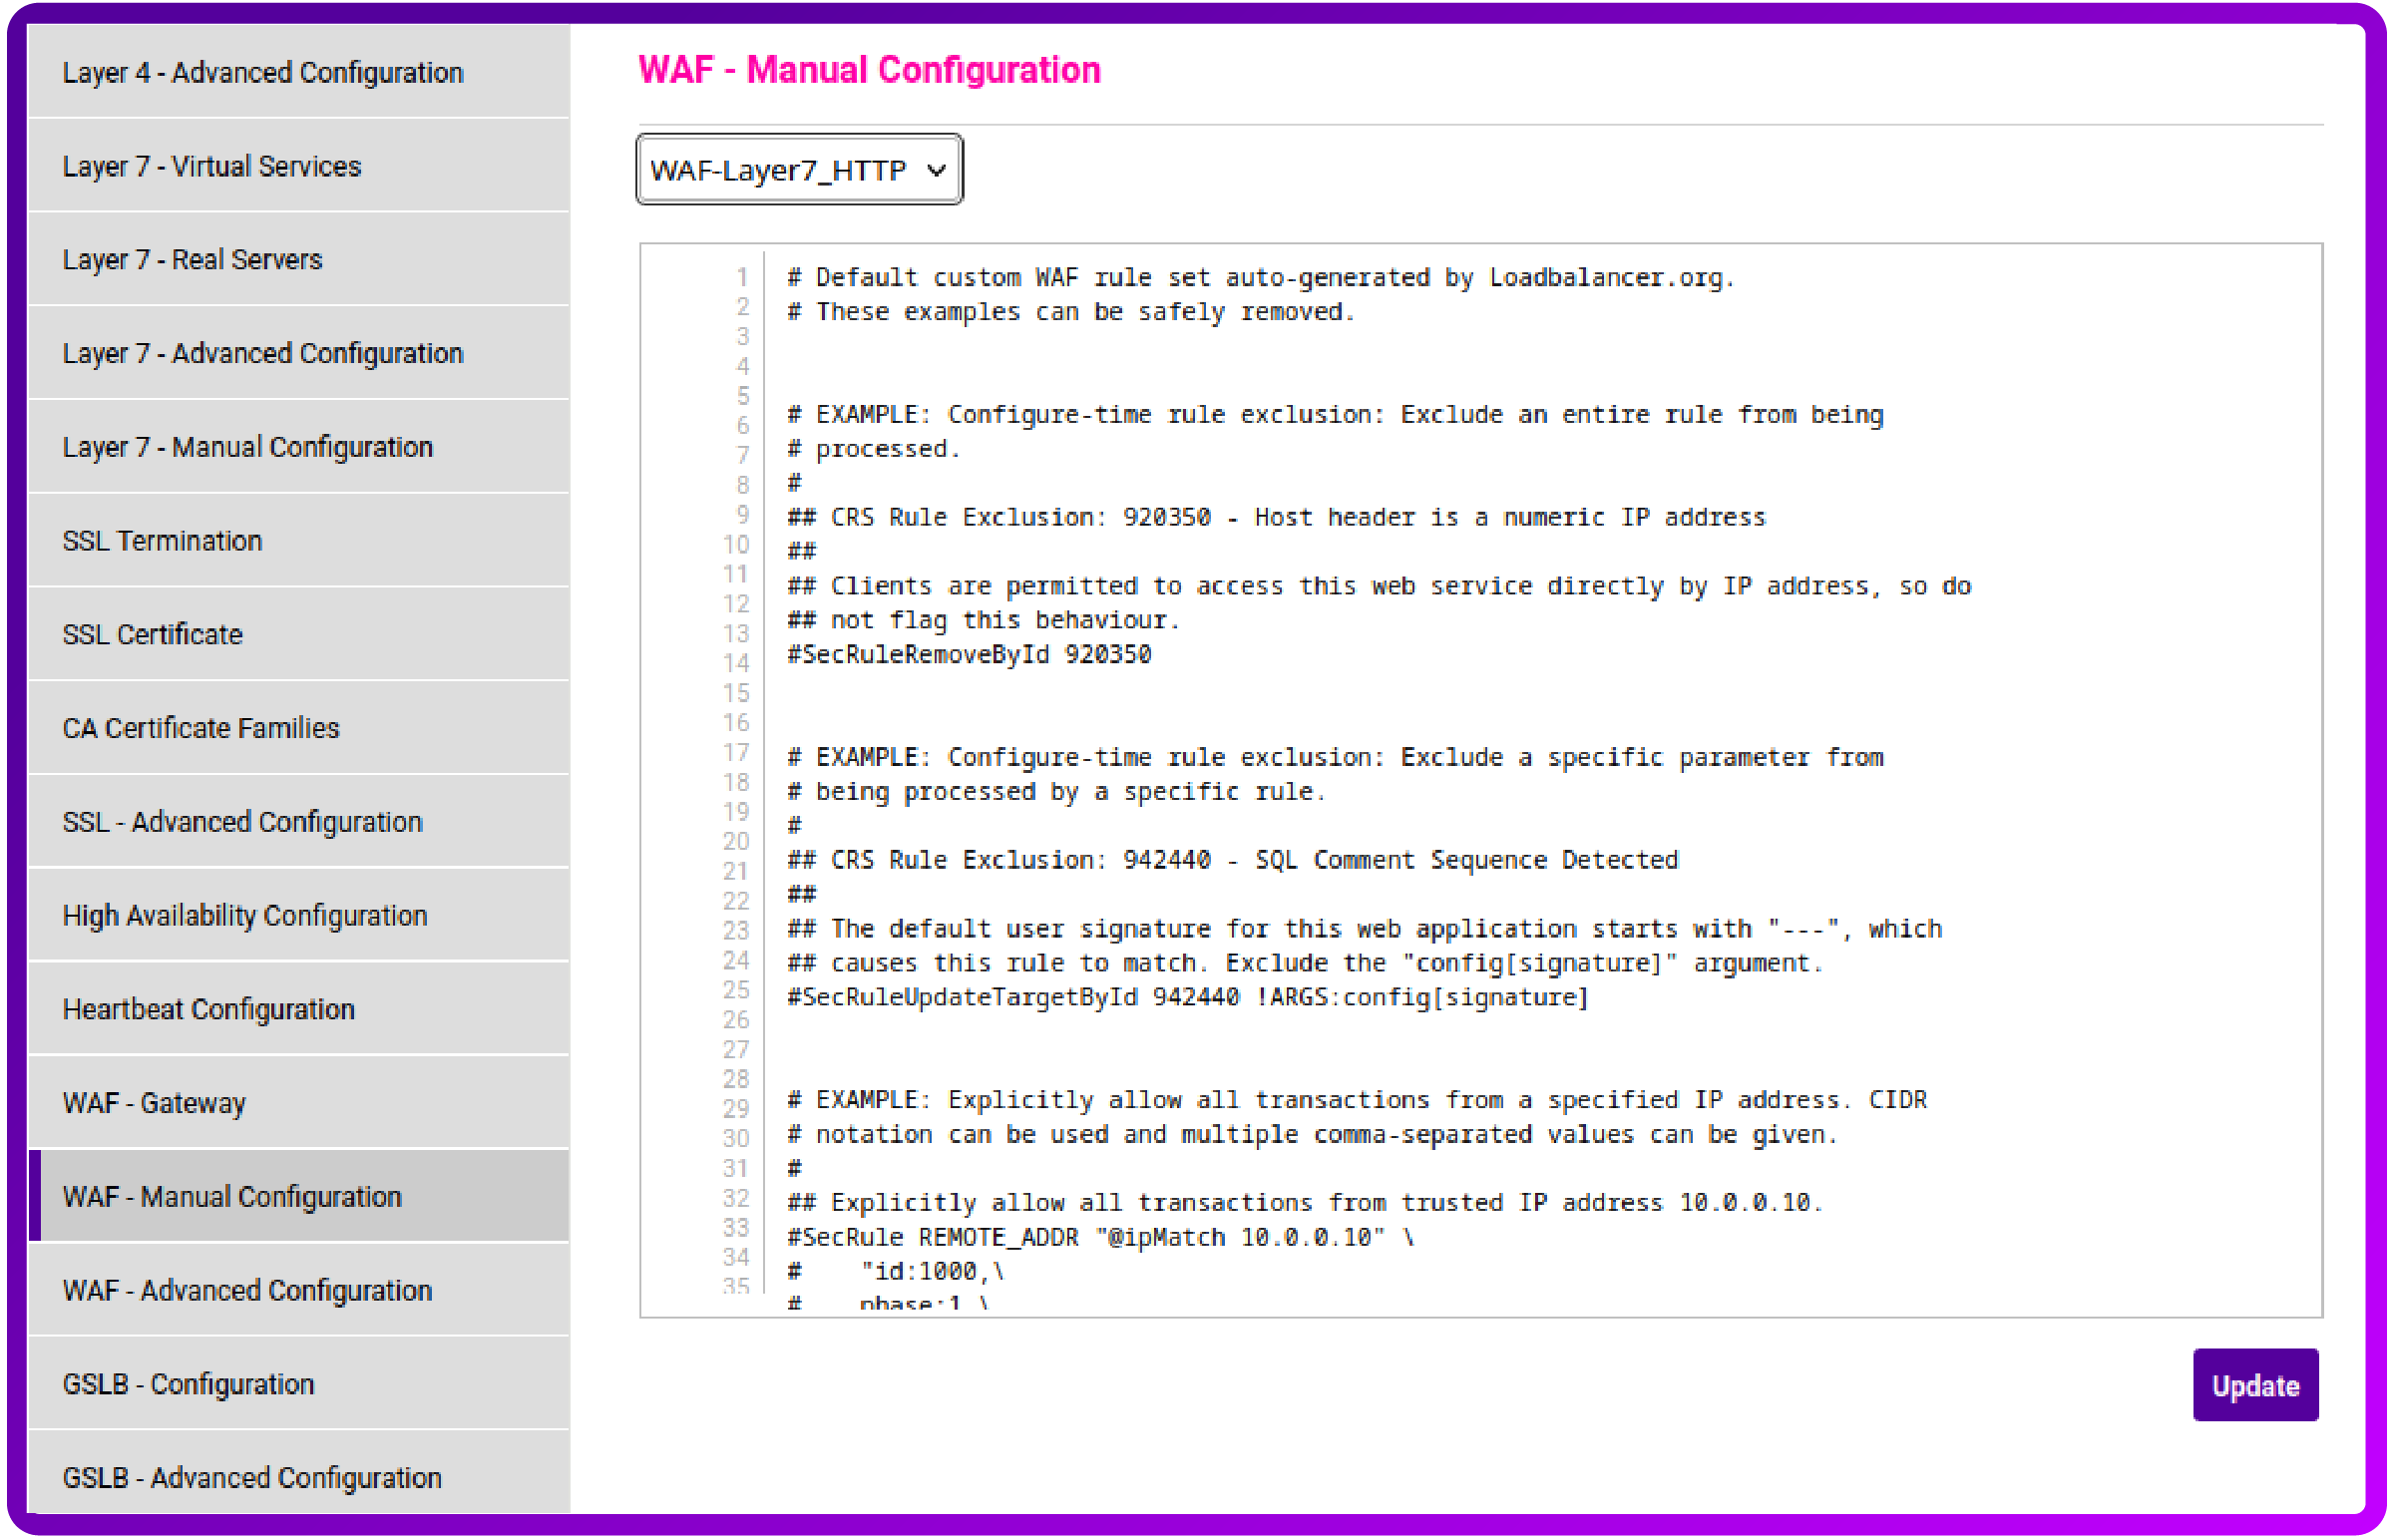
Scroll to the bottom of the text field and add your OIDC configuration (similar to the example below) and click Update:
# OIDC Configuration
OIDCProviderMetadataURL https://YOUR_OKTA_DOMAIN/.well-known/openid-configuration
OIDCClientID YOUR_OKTA_CLIENT_ID
OIDCClientSecret YOUR_OKTA_CLIENT_SECRET
OIDCRedirectURI https://sso.lb.org/authorization-code/callback

OIDCCryptoPassphrase a-long-random-string # IMPORTANT: Change this!

# Protect a whole website
<Location />
AuthType openid-connect
Require valid-user
</Location>

# or a certain location
<Location /protected>
AuthType openid-connect
Require valid-user
</Location>
All that’s left is for you to then reload your WAF service as per the prompt that appears in the top of your Loadbalancer appliance WebUI, and test the solution!
Conclusion
Integrating Apache with mod_auth_oidc and Okta provides a powerful and secure way to manage access to your web applications. It centralizes identity, simplifies authentication for end-users, and offloads the complexities of identity management from your application servers.
This combination of technologies exemplifies how modern identity solutions can be seamlessly integrated into your infrastructure, all while benefiting from the high availability and performance provided by our load balancers.
If you have any questions or need assistance configuring this setup with a Loadbalancer appliance, don't hesitate to reach out to our support team!