This blog will provide a quick start guide on how to load balance Microsoft Remote Desktop Session Host servers using the Enterprise Azure Loadbalancer.org Azure cloud appliance.
- Microsoft Connection Broker is used, the Loadbalancer.org appliance interacts with the Routing Token to reconnect user sessions to the correct Session Host.
- The Loadbalancer.org Feedback Agent is installed on the Session Host servers to provide real time performance stats to enable optimum load distribution.
Useful Resources
For additional information about the Loadbalancer.org Azure Appliance, please also refer to the following documents:
Load Balanced Ports
| Port | Use | Transport Layer Protocol |
|---|---|---|
| 3389 | Remote Desktop Protocol (RDP) | TCP |
VPC Security Group Inbound Rules:
The following inbound rules must be configured in your Network Security Group:
- For Management: TCP 22 (SSH), TCP 9443 (Appliance WebUI), 7777 (HAProxy Stats page)
- For RDP services: TCP 3389 (RDP)
Load balancer Configuration
The first step to configuration is to deploy the Loadbalancer.org Azure appliance which can be found detailed in the Quick Start Guide.
Accessing the appliance WebUI
Using a browser, navigate to the Public DNS name or Public IP address on port 9443, i.e.
https://< Public DNS name >:9443
or
https://< Public IP address >:9443
You'll receive a warning about the certificate as it's a self signed cert not related to an Internet based CA.
Confirm you want to continue and a login prompt will be displayed. Use the following default credentials:
Username: loadbalancer
Password: loadbalancer
Note with that in mind, to change the password for the 'loadbalancer' account, use the WebUI option: Maintenance > Passwords.
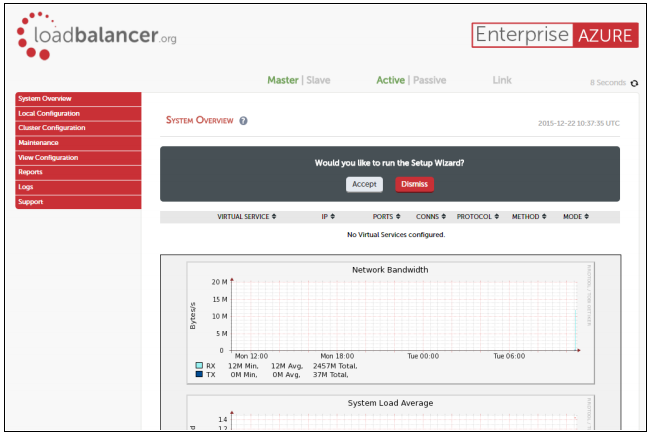
Once logged in, the WebUI is displayed:

Configuration
The diagram below shows how the system is configured.

Notes
- The Loadbalancer.org Server Feedback Agent provides real time server utilization statistics based on either CPU or RAM utilization or a combination of both.
- Connection Broker can be deployed in HA mode if required using 2 Connection Broker servers and an SQL database.
Deploy the Loadbalancer.org Azure Appliance
- Deploy an Azure loadbalancer.org appliance as detailed in the Quick Start Guide.
Configure the Virtual Service
- Using the WebUI, navigate to: Cluster Configuration > Layer 7 – Virtual Services and click Add a New Virtual Service
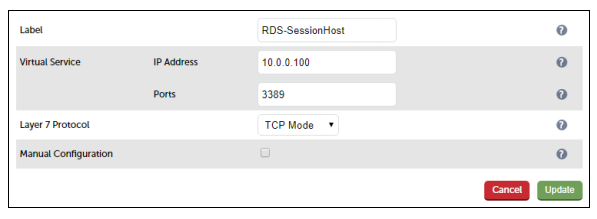
- Enter the following details:

- Define the required Label (name) for the VIP, e.g. RDS-SessionHost
- Set the Virtual Service IP Address field to an appropriate value, e.g. 10.0.1.50
- Set the Virtual Service Ports field to 3389
- Change Layer 7 Protocol to TCP Mode
- Click Update
- Now click Modify next to the newly created VIP
- Change Persistence Mode to MS Session Broker
- Change Feedback Method to Agent
- Enable (check) the Timeout checkbox and set both Client Timeout and Real Server Timeout to a suitable value, e.g. 1h (1 hour)
- Click Update
Define the real (session host) servers
Real Servers, i.e. the Session Host servers are now defined.
- Using the WebUI, navigate to: Cluster Configuration > Layer 7 – Real Servers and click Add a new Real Server next to the newly created VIP
- Enter the following details:

- Enter an appropriate label for the Real Server, e.g. SH1
- Set the Real Server IP Address field to the required address, e.g. 10.0.0.120
- Set the Real Server Port field to 3389
- Click Update
- Repeat the above steps to add your other Session Host server(s)
Once the configuration is complete, use the Reload HAProxy button at the top of the screen to commit the changes.
Session host server configuration
Configure server settings
To configure the Session Host Servers, please refer to the section ”Load balancing Session Hosts when deployed with Connection Broker” in the Microsoft Remote Desktop Services Deployment Guide.
Install the feedback agent
The Loadbalancer.org Windows Feedback Agent can be downloaded here. To install and configure the Feedback Agent, please refer to the section “Server Feedback Agent” in the Microsoft Remote Desktop Services Deployment Guide.
Testing
The load balanced Session Host Servers should now be accessible using the Public IP address or corresponding public DNS name. Connect to this address from the Microsoft RDP client (mstsc.exe) or equivalent.
If you have any questions regarding the appliance or would like assistance designing your deployment, please don't hesitate to contact our support team: support@loadbalancer.org


