

Microsoft Print Server provides a great way to share printers throughout your organisation, but when the print server falls over, the phone quickly starts to ring. By adding a load balancer and a second print server configured with the same print queues, you'll quickly have a load balanced and resilient printing infrastructure for your users.
The load balancer is configured using Layer 4 DR (Direct Return) mode, and therefore you'll also need to solve the ARP problem on the print servers. This is a straight forward process as mentioned below in the section "Setup the Print Servers".
Note: This blog has recently (Jan 2018) been updated to distinguish between the later versions of Windows that use direct hosted SMB and older versions that require NBT (NetBIOS over TCP/IP). This determines which ports need to be included in the load balanced VIP.
This information is also available here in a Loadbalancer.org QuickGuide in pdf format.
Overview of steps required
- Create a Virtual Service (VIP) on the load balancer that listens on the required ports
- Associate your print servers to this Virtual Service, i.e. define them as 'Real Servers' (RIPs) for the VIP
- Install and configure the same print queues on all print servers
- Configure registry settings on your print servers to enable them to be accessed via a shared name
- Configure name resolution related settings on your print servers
- Point your clients at the VIP to access the print server and the printer shares
Here's the details ...
Setup the load balancer
Note: the steps listed are for a v8.x appliance, but are similar for all versions.
Step 1 - Configure the Virtual Service (VIP)
- Using the WebUI, navigate to: Cluster Configuration > Layer 4 – Virtual Services and click Add a New Virtual Service
- Configure the VIP - the ports required depend on your environment:
- If your environment is based on Windows 2000 and later, by default it will use DNS name resolution & file & print sharing using direct hosted SMB over TCP/IP
- If your environment is based on versions of Windows prior to Windows 2000, by default it will use NetBIOS name resolution & file & print sharing using SMB and NBT (NetBIOS over TCP/IP)
For Windows 2000 and later, enter the following details:
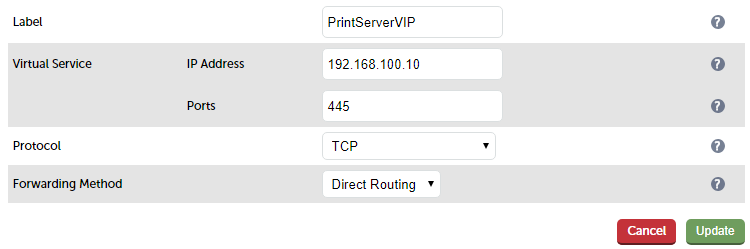
- Define the required Label (name) for the VIP, e.g. PrintServerVIP
- Set the Virtual Service IP address field to the required IP address, e.g. 192.168.100.10
- Set the Virtual Service Ports field to 445
- Click Update
- Now click Modify next to the newly created Virtual Service
- Ensure the Check Port is set to 445
- Click Update
For legacy environments prior to Windows 2000, enter the following details:
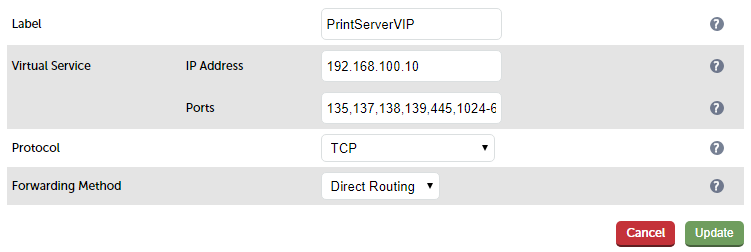
- Define the required Label (name) for the VIP, e.g. PrintServerVIP
- Set the Virtual Service IP address field to the required IP address, e.g. 192.168.100.10
- Set the Virtual Service Ports field to 135,137,138,139,445,1024-65535
- Click Update
- Now click Modify next to the newly created Virtual Service
- Ensure the Check Port is set to 135
- Click Update
Step 2 - Define the Real Servers (RIPs)
- Using the WebUI, navigate to: Cluster Configuration > Layer 4 – Real Servers and 2. click Add a new Real Server next to the newly created VIP
- Enter the following details:
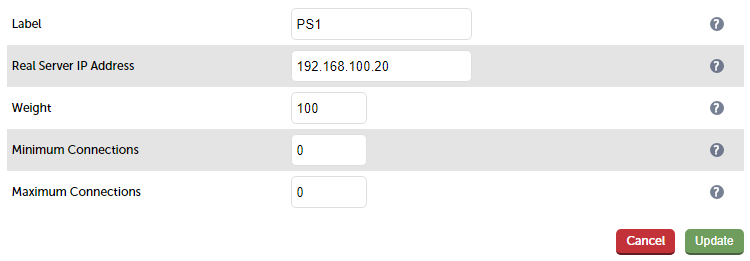
- Enter an appropriate label for the Real Server , e.g. PS1
- Change the Real Server IP Address field to the required address, e.g. 192.168.100.20
- Click Update
- Repeat the above steps to add your other Print Server(s)
Setup the Print Servers
Step 1 - Initial Configuration
Complete the following steps on each print server:
- Join the server to the same domain as the client PC's
- Install the Print and Document Service role / Print Server service
- Install & share the printers (use exactly the same share names and permissions across all servers)
- Solve the “ARP Problem” on each print server - please refer to the appliance Administration Manual and search for “Solving the ARP Problem for Windows Servers” and follow the steps for your version of Windows.
Note:
You can easily check the host model settings before / after configuration using the command:
netsh interface ipv4 show interface <interface name>
e.g.
netsh interface ipv4 show interface loopback
IMPORTANT NOTE:
When configuring the Loopback Adapter to solve the ARP Problem, make sure that these options are also checked (ticked): 'Client for Microsoft Networks' and 'File & Printer Sharing for Microsoft Networks'
Step 2 - Registry Modifications
To enable the print servers to be accessed via a shared name ("printserver-vip" in this blog), add the following registry entries to each print server:
Key: HKEY_LOCAL_MACHINE\SYSTEM\CurrentControlSet\Control\Lsa
Value: DisableLoopbackCheck
Type: REG_DWORD
Data: 1
Key: HKEY_LOCAL_MACHINE\SYSTEM\CurrentControlSet\Services\lanmanserver\parameters
Value: DisableStrictNameChecking
Type: REG_DWORD
Data: 1
Key: HKEY_LOCAL_MACHINE\SYSTEM\CurrentControlSet\Services\lanmanserver\parameters
Value: OptionalNames
Type: REG_MULTI_SZ
Data: printserver-vip
Note: "printserver-vip" is the name that will be used to access the load balanced print servers via the Virtual Service (VIP) created on the load balancer. This can be set to be any appropriate name. Whatever name is used, it must be the same name that is used for the DNS or NetBIOS entry described in the Configure Name Resolution section below.
If your print servers are running Windows 2008 R2 and you want to refer to your printer by the FQDN, e.g. printserver-vip.lbtestdom.com, you'll also need to add the following registry key to each print server.
Key: HKEY_LOCAL_MACHINE\SYSTEM\CurrentControlSet\Control\Print
Value: DNSOnWire
Type: REG_QWORD
Data: 1
Step 3 - Configure Name Resolution
Configure either DNS or NetBIOS name resolution as detailed below:
DNS Name Resolution (Windows 2000 & later) :
To configure DNS name resolution complete the following steps:
- Disable NetBIOS over TCP/IP on all interfaces of each print server as shown below:
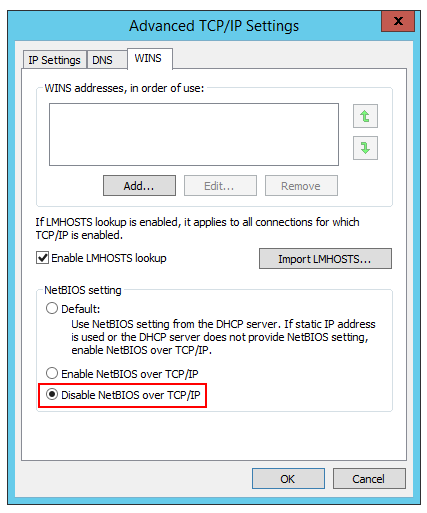
- Create a DNS record for the share name, in this example: printserver-vip ---> 192.168.110.10
NetBIOS Name Resolution (legacy Environments) :
To configure NetBIOS name resolution complete the following steps:
- On each print server, disable NetBIOS over TCP/IP on the main NIC, leave it enabled on the Loopback adapter
- Either setup a WINS server and configure all clients to use this or setup pre-loaded entries in the LMHosts file of each client
Note: As shown in the flow chart in this Technet article, for a default H-node client, NetBIOS name resolution occurs on the following order:
- Local NetBIOS cache
- WINS server
- NetBIOS broadcast
- Local LMHosts file
Therefore, to avoid broadcast, LMHost entries must be declared as pre-loaded to ensure they are available in the local NetBIOS cache.
To configure the LMHosts file, create an entry as shown below:
printserver-vip 192.168.100.10 #PRE
Entries with the #PRE directive are loaded into the cache on reboot or can be forced using the following command:
nbtstat -R
Use the following command to view the cache and verify the entry has been added:
nbtstat -c
Step 4 - Server Reboot
To apply all the changes, reboot each print server.
Accessing the load balanced Print Servers
You should now be able to access your printers by browsing using either the Virtual Service IP address, or the share name. In this example:
\\192.168.100.10
or
\\printserver-vip
You'll also see any shared folders that have been configured on the server which may also be useful depending on your requirements.
Deploying printers via Group Policy
- Ensure that the load balanced print server name (e.g. printserver-vip) is resolvable by DNS or NetBIOS as explained above
- On your print server, open: Administrative Tools > Printer Management
- Right-click Print Servers and enter the name for your load balanced print server (e.g. printserver-vip) and click OK
- Expand the Printers section
- Right click the printer you want to deploy, and click Deploy with Group Policy
- Select the relevant GPO and configure the remaining settings according to your requirements