This blog will provide a quick start quide on how to load balance Apache Web Servers and configure a WAF using the Enterprise Azure Loadbalancer.org Azure cloud appliance.
- The WAF addresses the OWASP Top 10 vulnerabilities and is very quick and simple to deploy.
- SSL offload is handled by STunnel, HAProxy handles back-end server re-encryption.
Why Loadbalancer.org for WAF?
The Engineers' choice for smarter load balancing
Useful Resources
For additional information about the Loadbalancer.org Azure Appliance, please also refer to the following documents:
Load balanced ports
| Port | Use | Transport Layer Protocol |
|---|---|---|
| 80 | HTTP | TCP |
| 443 | HTTPS | TCP |
Azure network security group inbound rules
The following inbound rules must be configured in your Network Security Group:
- For Management: TCP 22 (SSH), TCP 9443 (Appliance WebUI), 7777 (HAProxy Stats page)
- For Apache services: TCP 80 (HTTP), TCP 443 (HTTPS)
Load balancer configuration
DEPLOY THE LOADBALANCER.ORG AZURE APPLIANCE
- Deploy an Azure Loadbalancer.org appliance as detailed in the Quick Start Guide
Note: Please make sure that you enable IP Forwarding. In the Azure Management Portal, select the Virtual Machines option, click on the newly deployed Load Balancer VM, click on Network interfaces and then select the network interface attached to the load balancer, then click IP configurations and ensure that IP forwarding is Enabled.
Accessing the appliance WebUI
Using a browser, navigate to the Public DNS name or Public IP address on port 9443, i.e.
https://< Public DNS name >:9443
or
https://< Public IP address >:9443
You'll receive a warning about the certificate as it's a self signed cert not related to an Internet based CA.
Confirm you want to continue and a login prompt will be displayed. Use the following default credentials:
Username: loadbalancer
Password: loadbalancer
Note: To change the password for the 'loadbalancer' account, use the WebUI option: Maintenance > Passwords.
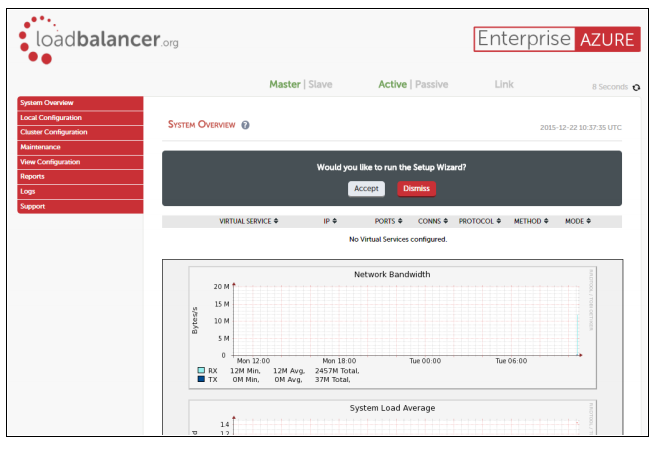
Once logged in, the WebUI is displayed:
Configuration Diagram
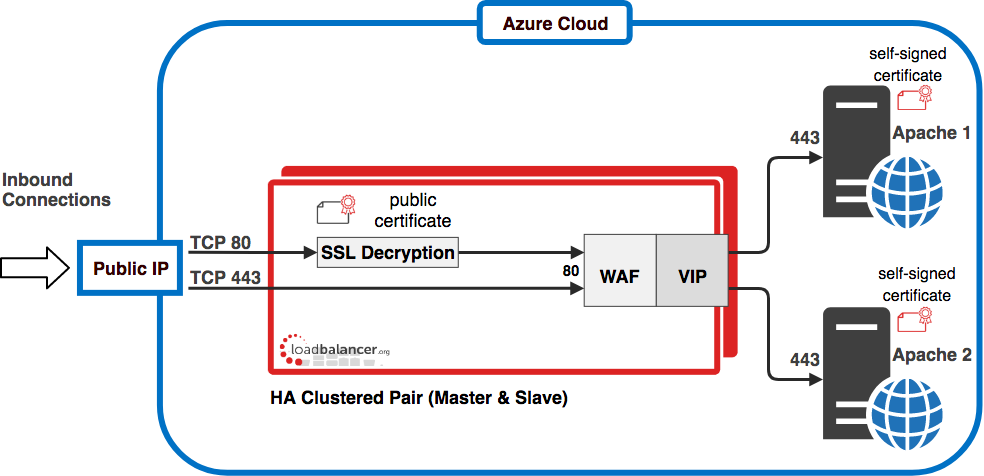
The diagram below shows how the system is configured.
Configure the virtual sevice (VIP)
- Using the WebUI, navigate to: Cluster Configuration > Layer 7 – Virtual Services and click Add a New Virtual Service
- Enter the following details:
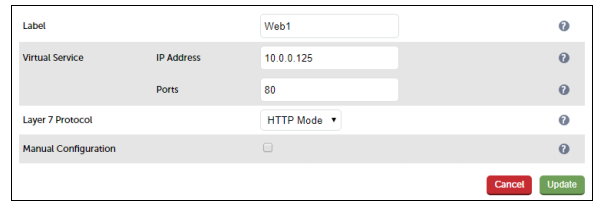
- Enter the required Label (name) for the VIP, e.g. Web1
- Set the Virtual Service IP Address field to an appropriate value, e.g. 10.0.0.125
- Set the Virtual Service Ports field to the required port, e.g. 80
- Leave Layer 7 Protocol set to HTTP Mode
- Click Update
Define the real (Apache) Servers
- Using the WebUI, navigate to: Cluster Configuration > Layer 7 – Real Servers and click Add a new Real Server next to the newly created VIP
- Enter the following details:
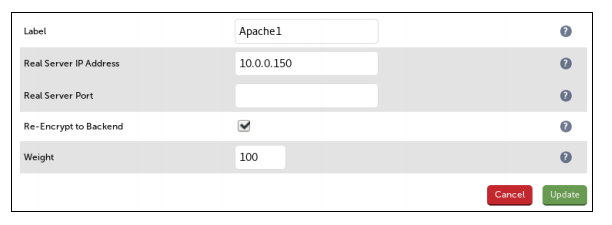
- Enter an appropriate label for the Real Server, e.g. Apache1
- Set the Real Server IP Address field to the required address, e.g. 10.0.0.150
- Leave the Real Server Port field blank
- Enable (check) Re-Encrypt to Backend
- Click Update
- Repeat the above steps to add your other Apache server(s)
Upload the public SSL Certificate
- Using the WebUI, navigate to: Cluster Configuration > SSL Certificate and click Add a New SSL Certificate
- Select Upload prepared PEM/PFX file
- Enter the following details:
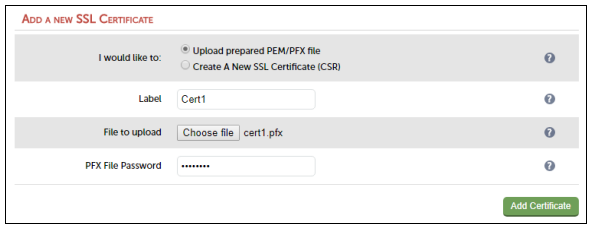
- Specify and Label (name) for the certificate, e.g. Cert1
- Click Choose File and browse to and select the relevant PFX or PEM file
- Enter the PFX file Password
- Click Add Certificate
Configure the Stunnel Virtual Service (VIP)
STunnel is used to terminate SSL on the load balancer.
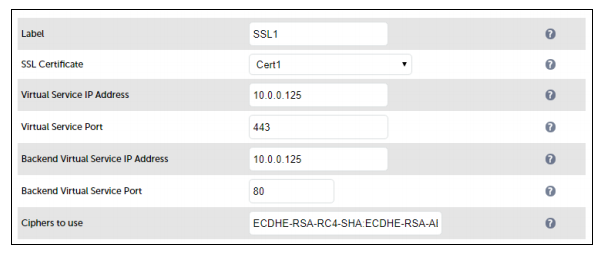
- Using the WebUI, navigate to: Cluster Configuration > SSL Termination and click Add a New Virtual Service
- Enter the following details:
Configure the WAF
- Using the WebUI, navigate to: Cluster Configuration > WAF – Gateway and click Add a New WAF Gateway
- Enter the following details:
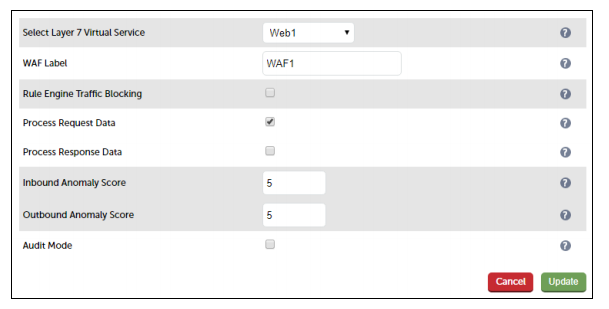
- Select the VIP created previously, e.g. Web1
- Specify a suitable WAF label (name), e.g. WAF1
- Leave Rule Engine Traffic Blocking unchecked for now
Note:While disabled, this option ensures that the ModSecurity Rule Engine logs any critical errors. You should leave the WAF in this mode until you are confident that the error logs are not showing false positives. Once you are confident you can enable this mode and the WAF will start blocking any malicious requests with a 403 Forbidden response.
- Click Update
Apply the new settings
- Once the configuration is complete, use the Reload HAProxy, Restart STunnel and Reload WAF buttons at the top of the screen to commit the changes.
Testing
The load balanced Apache Web Servers should now be accessible on ports 80 & 443 using the Public IP address or corresponding public DNS name.
Logging client source IP addresses in Apache
The Apache service on a web server can be configured to store the value of X-Forwaded-For headers for incoming web traffic. These headers are added by default by the load balancer. This allows upstream servers and network devices to see the real source IP addresses of clients, even though the load balancer is acting as a proxy.
For full details on how to configure Apache for this, see our blog post
If you have any questions regarding the appliance or would like assistance designing your deployment, please don't hesitate to contact our support team: support@loadbalancer.org.


