
This blog post will cover the instructions on how to install HAProxy and configure it on RHEL 7 (Red Hat Enterprise Linux).
Before we dive into the installation and configuration, first we will have to compile it.
In order to compile HAProxy we will require the following prerequisites:
yum install gcc openssl-devel readline-devel systemd-devel make pcre-devel
Once the prerequisites are installed, we will download the latest stable Lua and HAProxy:
curl https://www.lua.org/ftp/lua-5.4.2.tar.gz > lua-5.4.2.tar.gz
curl http://www.haproxy.org/download/2.3/src/haproxy-2.3.2.tar.gz > haproxy-2.3.2.tar.gz
Follow the link to view the readme.
Next we'll extract, then compile – and install:
Lua
tar xvf lua-5.4.2.tar.gz
cd lua-5.4.2
make INSTALL_TOP=/opt/lua-5.4.2 linux install
HAProxy
cd ..
tar xvf haproxy-2.3.2.tar.gz
cd haproxy-2.3.2
make USE_NS=1 \
USE_TFO=1 \
USE_OPENSSL=1 \
USE_ZLIB=1 \
USE_LUA=1 \
USE_PCRE=1 \
USE_SYSTEMD=1 \
USE_LIBCRYPT=1 \
USE_THREAD=1 \
TARGET=linux-glibc \
LUA_INC=/opt/lua-5.4.2/include \
LUA_LIB=/opt/lua-5.4.2/lib
make PREFIX=/opt/haproxy-2.3.2 install
We will also create an unpreviliged user and group for HAProxy.
groupadd -g 188 haproxy
useradd -g 188 -u 188 -d /var/lib/haproxy -s /sbin/nologin -c haproxy haproxy
In order to control how HAProxy will be started, stopped, restarted, reloaded or monitored, using your text editor of choice, a SystemD Unit file /etc/systemd/system/haproxy.service will be created
[Unit]
Description=HAProxy 2.3.2
After=syslog.target network.target

[Service]
Type=notify
EnvironmentFile=/etc/sysconfig/haproxy-2.3.2
ExecStart=/opt/haproxy-2.3.2/sbin/haproxy -f $CONFIG_FILE -p $PID_FILE $CLI_OPTIONS
ExecReload=/bin/kill -USR2 $MAINPID
ExecStop=/bin/kill -USR1 $MAINPID

[Install]
WantedBy=multi-user.target
To set environment variables required by HAProxy and to notify SystemD when its started, a SystemD Environment file /etc/sysconfig/haproxy-2.3.2 will also be created.
# Command line options to pass to HAProxy at startup
# The default is:
#CLI_OPTIONS="-Ws"
CLI_OPTIONS="-Ws"

# Specify an alternate configuration file. The default is:
#CONFIG_FILE=/etc/haproxy/haproxy-2.3.2.conf
CONFIG_FILE=/etc/haproxy/haproxy.cfg

# File used to track process IDs. The default is:
#PID_FILE=/var/run/haproxy-2.3.2.pid
PID_FILE=/var/run/haproxy.pid
To load these configuration changes, SystemD will be reloaded:
systemctl daemon-reload
Unless it has been created already, the directory for the configuration will be created mkdir /etc/haproxy with the corresponding user and group ownership.
The final step for HAProxy installation and configuration: enable it to run at boot.
systemctl enable haproxy
Here's a sample of a simple haproxy.cfg that will load balance two IIS servers running on both 443 and 80:
global
daemon
log 127.0.0.1 local2 #Log configuration
chroot /var/lib/haproxy
pidfile /var/run/haproxy.pid
maxconn 4000
user haproxy
group haproxy
stats socket /var/lib/haproxy/stats
defaults
mode http
log global
option tcplog
option dontlognull
retries 3
maxconn 10000
option redispatch
timeout connect 4s
timeout client 5m
timeout server 5m
listen stats
bind *:8080
mode http
option forwardfor
option httpclose
stats enable
stats show-legends
stats refresh 5s
stats uri /stats
stats realm Haproxy\ Statistics
stats auth loadbalancer:loadbalancer
stats admin if TRUE
listen FrontendName
bind 192.168.77.100:80,192.168.77.100:443
mode tcp
option tcplog
balance leastconn
stick on src
stick-table type ip size 10240k expire 30m
server RIPName0 192.168.77.200 check port 80 inter 10s rise 2 fall 3
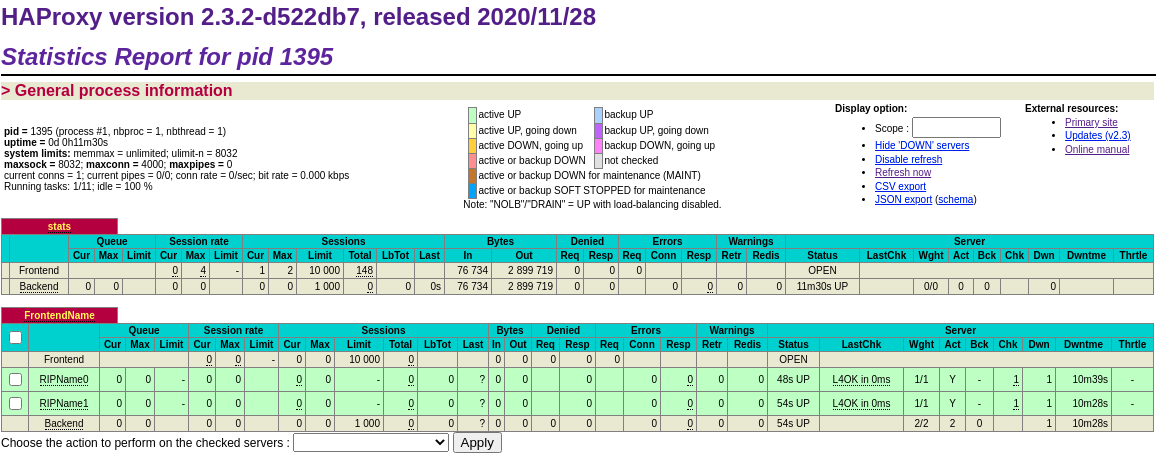
server RIPName1 192.168.77.201 check port 80 inter 10s rise 2 fall 3The stats page can be accessed in a browser at http://192.168.77.10:8080/stats using the username and password 'loadbalancer', as set in the configuration file.
It should look something like this: