


With today's remote working culture, having a secure and reliable network connection is a must. Always On VPN (AOVPN) can provide this, with a seamless always on connection that boosts both security and the user experience.
Unlike traditional VPNs, AOVPN connects automatically whenever your device is online, ensuring you have continuous, secure access. It supports modern authentication methods and works well with Active Directory and multi-factor authentication making it a great fit for modern security needs.
It is, however, a complex VPN to set up correctly. Hence, this technical step-by-step guide to configuring each component.
Table of contents
- Understanding AOVPN
- How to set up AOVPN
- How to set up the DC server
- How to set up the NPS server
- How to set up the VPN server
- How to set up an internal CA and issue certificates
- How to configure the client side VPN
- How to load balance Always On VPN
Want to load balance AOVPN?
Stay connected to critical services.
Understanding Always On VPN
What is AOVPN?
Always On VPN (AOVPN) is a remote access technology that provides secure, automatic user connections from a remote location to an enterprise environment.
Why is AOVPN used in Windows environments?
AOVPN is natively supported by Windows and offers robust integration with their operating system, so the use of AOVPN in enterprise environments that use Microsoft Windows is common.
Is AOVPN just for Windows?
The short answer is no. Although most people associate AOVPN with Windows, AOVPN is not exclusively for Microsoft Windows.
While it's primarily designed and used with Windows operating systems, there are third-party VPN clients and plugins that can integrate with AOVPN and provide support for other platforms like macOS, Linux, and Android.
Here's a list of AOVPN supported integrations:
- Windows Information Protection (WIP)
- Windows Hello for Business
- Microsoft Azure conditional access platform
- Microsoft Entra multifactor authentication platform
- Third-party VPN plug-ins
What's the difference between AOVPN and a traditional VPN?
- Automatic connections: Unlike a traditional VPN which requires users to initiate and terminate connections, Always On VPN (AOVPN) automatically connects authorized devices to a VPN whenever they have an active internet connection. Hence it is described as being 'always on'.
- Multiple VPN tunnels: AOVPN can also support two tunnels at the same time — one for devices, and the other for users. With traditional VPNs on the other hand, the user connects to a VPN host via a piece of client software on their device, creating a single 'tunnel' at a time.
- Security features: Traditional VPNs employ various tunnelling protocols, such as Layer 2 Tunnelling Protocol (L2TP) and Internet Protocol Security (IPsec), which establish and maintain secure network connections. However, with AOVPN, because the connection is automatic, there are a number of additional security considerations to take into account. Having said that, there are also a number of additional security features incorporated with AOVPN to address these concerns, including traffic filters, LockDown VPN, split and force tunnelling.
- Redundancy: Both traditional VPN and AOVPNs require redundancy, to protect against network failures, cyberattacks, and performance issues. However, with AOVPN, more than one RRAS server is likely to required to provide this, as well as a load balancer, to increase the capacity of the service.
- Windows Autopilot: Windows Autopilot, a tool for automating operating system deployments, relies on AOVPN. However, a traditional VPN is not required for Intune and AutoPilot, as they are cloud-based services that can be accessed over the internet.
What does AOVPN allow enterprise to do?
The adoption of AOVPN allows enterprise to achieve the following:
- Create advanced scenarios by integrating Windows operating systems and third-party solutions.
- Maintain network security by restricting connections by traffic type, application, and authentication method.
- Configure auto-triggering for user and device authenticated connections.
- Control your network by creating routing policies at a granular level; even down to the individual application.
- Configure your VPN settings with a standard XML profile (ProfileXML) which is defined by an industry standard configuration template. Here are some PowerShell scripts and sample ProfileXML files for configuring Windows 10 Always On VPN.
Should you leave AOVPN on all the time?
While there may be some legitimate reasons to disable AOVPN, keeping it on all the time keeps your device and personal data protected from possible security risks. Having said that, if latency, internet connectivity issues, or problems accessing services arise, AOVPN may need to be temporarily disabled.
To safely remove AOVPN connections, check out these resources:
The irony however, is that you're much more likely to experience the opposite problem i.e. users inadvertently disconnecting AOVPN in error, when the whole point of AOVPN is that it should in fact remain 'always on'! To prevent users from disconnecting the AOVPN user tunnel, use this fix!
What are the advantages and disadvantages of Always On VPN?
As with all things in life, there are pros and cons. And the same is true of AOPVN, so it's important to understand both:
AOVPN advantages
AOVPN offers a number of advantages, including:
- Better security
- AOVPN ensures that devices are always connected to a secure network, even when idle, providing continuous protection. Sensitive information is also protected from unauthorized access with encrypted data transmission.
- AOVPN prevents malware infection by blocking access to malicious websites and limiting exposure to potential threats with the help of VPNs.
2. Enhanced privacy
- With AOVPN, the real IP address is hidden, making it harder for malicious users to track online activities.
- Location spoofing also means it's possible to change your apparent location by connecting to a VPN server in a different country, facilitating access to content that can only be access in certain locations.
3. Uninterrupted connectivity
- AOVPN automatically connects to an enterprise network, ensuring uninterrupted access for the end user.
- The user experience can further be enhanced with split tunnelling which allows traffic to be selectively routed through the VPN tunnel, while allowing other traffic to bypass it, optimizing performance and conserving bandwidth.
4. Remote access
- With AOVPN secure remote access, users can work from home while maintaining a secure connection to their corporate network, affording them access to the same applications, and services as those available on-site.
5. Centralized management
- IT administrators can centrally manage AOVPN, allowing them to deploy and configure VPN settings more easily across multiple devices and locations.
- Centralized management also facilitates the enforcement of security policies with enhanced visibility.
AOVPN disadvantages
However, while AOVPN offers numerous advantages, there are also a few disadvantages worth flagging:
- Performance restrictions
- VPNs can introduce latency, in particular when the server being connected to is located a long way away from the end user, which slows down service provision.
- Slower bandwidth can also occur when VPN connections reduce the server resources available for other services, leading to network congestion.
2. Increased costs
- AOVPN service typically require a subscription, adding to the overall cost of internet access.
- VPN routers or separate VPN devices might also be required, adding to upfront costs.
3. Data privacy issues
- VPN providers may retain data, allowing them to track user activity and raising privacy concerns.
- Relying on third-parties for VPN services also makes organizations potentially more vulnerable to cybersecurity attacks.
4. Blocked VPN services
- The effectiveness of VPN services may be limited in some countries due to imposed restrictions or VPN blocking.
5. Technical complexity
- Setting up, configuring, and troubleshooting AOVPN issues can be challenging. Readers are encouraged to follow the detailed steps outlined in the next section, "How to set up Always On VPN" to ensure this is done successfully.
What are the key features of AOVPN?
AOVPN automatically establishes VPN connections using protocols like IKEv2 or SSTP, each of which are explained below:
- IKEv2 protocol: Internet Key Exchange version 2 (IKEv2) is a VPN tunnelling protocol based on IPsec (Internet Protocol Security), used to establish secure connections between two networks or devices over the internet.
- SSTP protocol: The Secure Socket Tunnelling Protocol (SSTP) can be used to access a private network using HTTPS. It is often used as a fallback option if IKEv2 is blocked.
They are complemented by the Network Policy Server (NPS):
- NPS server role:- The Network Policy Server (NPS) can be used to manage VPN connections such as IKEv2 and SSTP protocol, acting as a central authorization, authentication, and accounting (AAA) server for network access.
Together, these components ensure data privacy and security through secure VPN connections.
How can you scale AOPVN?
Scaling Always On VPN (AOVPN) might sound like a daunting task, but it's actually pretty straightforward once you understand the fundamentals. The key is that AOVPN scales based on CPU and memory usage.
Each CPU core can comfortably handle around 200 users, so as the number of connected users grows, you'll want to make sure you’ve got enough resources to support them.
The simplest way to start scaling is to add more CPU or RAM to your server, but that only takes you so far. For a more robust and reliable solution, it's better to add multiple servers. This does two important things:
- It lets you spread the load across different machines (so no one server gets overwhelmed); and
- It gives you high availability (so if one server happens to go down, the others can pick up the slack, meaning your users won’t be left hanging).
At a minimum, it’s a good idea to have two VPN servers, but as your needs grow, you can easily add more.
To make sure traffic is evenly distributed across your servers, you can use a load balancer, which ensures no single server is doing all the heavy lifting. This way, you’re ready to scale your VPN infrastructure to support thousands of users.
Each server in your AOVPN setup will run Windows Server Routing and Remote Access Service (RRAS) or a third-party VPN solution—whatever fits best with your organization’s setup.
One of the great things about RRAS is that it’s cost-effective because you don’t need to buy additional licenses for connected users. That makes it an attractive option for many companies looking to scale their VPN without breaking the bank.
If your organization has a distributed workforce, you might also want to think about deploying AOVPN in the cloud (like in Azure), where you can dynamically add resources as needed.
This kind of setup is great for ensuring that users, no matter where they’re located, get a stable and reliable connection.
In summary, scaling AOVPN is all about adding the right resources at the right time (whether that’s more CPU, additional servers for high availability, or even moving to the cloud). The best part is, it’s a flexible solution that grows alongside your business.
How to set up Always On VPN
Here I'll share how I set up a lab environment to test load balancing for Always On VPN (AOVPN) using both SSTP and IKEv2 protocols.
The setup includes several servers and a load balancer appliance all hosted on VMware's vSphere platform. This setup ensures secure VPN connections and improves scalability and reliability by distributing the load across multiple servers.
Lab environment overview
To test the Always On VPN AOVPN setup, a lab environment was created with the following components:
Servers used
- VPN Server: Handles the VPN connections
- Network Policy Server (NPS): Manages network access policies and serves as a RADIUS server.
- Domain Controller (DC): Provides Active Directory DNS and Certificate Authority (CA) services All servers are running Windows Server 2019.
Client
- Windows 10 Machine: Acts as the client device that connects to the VPN
Load balancing
- Virtual Appliance: A virtual load balancing solution is deployed to distribute traffic and enhance the availability of VPN services.
Network layout
The network is divided into two main subnets:
- Public Subnet: Contains the client machine the load balancer and the VPN server. This is where external users connect to access internal resources via VPN.
- Internal Subnet: Hosts the NPS and DC DNS servers These servers manage authentication directory services and internal network resources.
The VPN server is configured to connect to both the public and internal subnets, with a pfSense firewall/router in place to manage traffic between these segments ensuring security and proper routing.
How to set up the DC server
This section outlines the steps to configure a Domain Controller (DC) for an Always On VPN environment, focusing on integrating Active Directory Domain Services (AD DS) and DNS services.
Setting up a DC is critical as it manages authentication and DNS resolution within the network.
1. DC/DNS server installation
- Open Server Manager: Start by clicking 'Manage' in the top right corner and selecting 'Add Roles - and Features'.
- Begin installation: In the 'Add Roles and Features Wizard' proceed past the initial page by selecting 'Role based or feature based installation' and confirm your server selection.
- Install server roles: Check the box for 'Active Directory Domain Services'. When prompted, accept the addition of required features by clicking 'Add Features' then continue.
- Skip additional features: No extra features are necessary for this installation, so you can proceed directly to the next step.
- Active Directory Domain Services: Familiarize yourself with the details provided about AD DS and advance to the 'Confirm Installation Selections' section, where you'll begin the installation.
- Promote to domain controller: Post installation click 'Promote this server to a domain-controller'.
- Configure deployment: Select 'Add a new forest' and specify your root domain name (e.g. example com).
- Domain controller options: Set both the Forest and Domain functional levels to Windows Server 2016 or higher. Ensure both 'DNS server' and 'Global Catalog' are checked Set a Directory Services Restore Mode (DSRM) password.
- DNS configuration: Ignore any warnings about DNS delegation and continue.
- Set additional options: The NetBIOS domain name will be auto-filled. Confirm this and proceed.
- Path settings: Use the default paths provided for the AD database logs and SYSVOL.
- Review and install: Double-check your settings in the 'Review Options' phase then proceed to 'Prerequisites Check'. Once all checks are completed and successful initiate the installation.
- Reboot: The server will automatically restart once the installation is finished to apply changes and complete the domain controller setup.
2. Post-server installation
Log in: Start by logging into the server using the domain credentials you established such as EXAMPLE\Administrator.
Verify ADC DS and DNS services
- Open Server Manager and check that 'Active Directory Domain Services' (AD DS) and 'DNS' are both listed under the roles and are running without issues.
- Access the DNS Manager to verify that all DNS zones expected for your domain are present and correctly configured.
Update DNS settings
- Confirm that the DNS server settings are properly configured to efficiently resolve domain names within your network.
- Update the DNS server settings on the network adapter to ensure it points to the DNS serve.
- Also consider setting up a Reverse Lookup Zone.
PS C:\Users\Administrator> nslookup 172.24.11.13
Server: UnKnown
Address:  ::1

Name:    lab.local
Address: 172.24.11.13

PS C:\Users\Administrator> nslookup lab.local
Server: UnKnown
Address:  ::1

Name: lab.local
Address: 172.24.11.13
How to set up the NPS server
The Network Policy Server (NPS) is essential for handling VPN authentication and authorization. It ensures that only authenticated and authorized users can access your VPN. The following steps will guide you through setting up NPS on a domain joined server.
1. NSP server installation
Install the NPS role
- Open an administrative PowerShell window.
- Install the Network Policy Server role including management tools with:
Install-WindowsFeature NPAS -IncludeManagementTools
Access the Network Policy Server console
- Navigate to Server Manager, click on Tools, and select Network Policy Server to open the console.
Register NPS in Active Directory
- Within the NPS console right click on NPS Local and choose "Register server in Active Directory".
- Confirm the action to ensure NPS has the necessary permissions to interact with AD.
2. Configure RADIUS Clients
Adding RADIUS Clients
- In the NPS console go to the RADIUS Clients and Servers section.
- Right click RADIUS Clients and select New RADIUS Client.
- Provide a friendly name for your VPN server such as "VPNServer1."
- Enter the VPN server's IP address of the internal network interface, e. g.
172.24.11.15. - Set a shared secret for authentication, this needs to match with the shared secret you will be setting on the VPN server.
- Confirm by clicking OK.
3. Configure Network Policies
Set up Network Policies
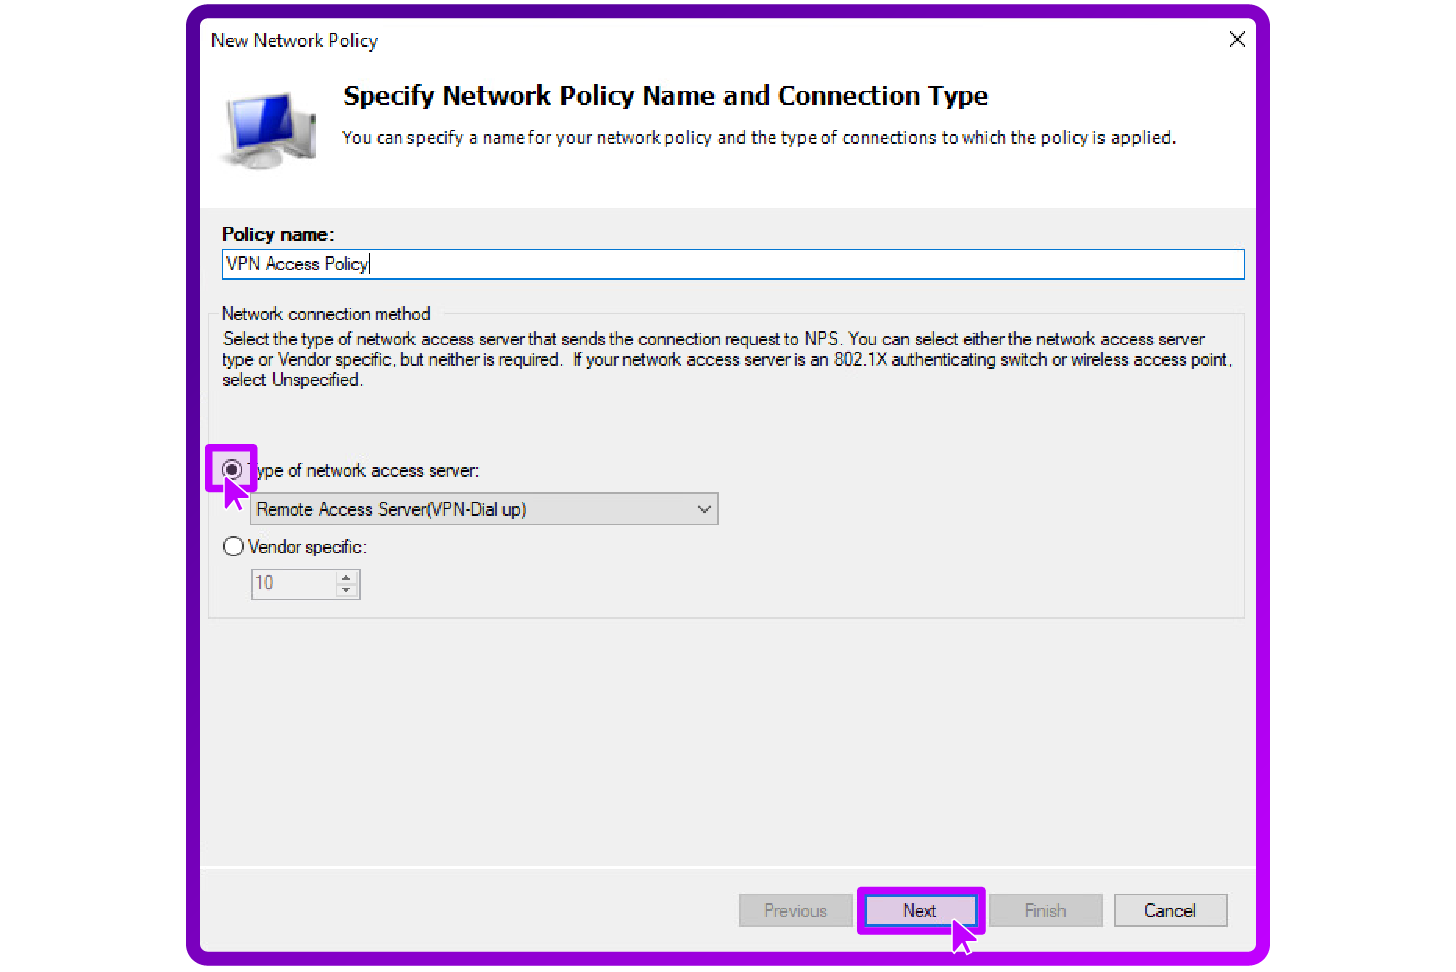
- Within the NPS console navigate to Policies and select "New Network Policy".
- Name the policy e.g. "VPN Access Policy,", set the Type to Remote Access Server (VPN-Dial up), and proceed with Next:
- Define the conditions under which this policy applies such as user groups, NAS Port Type, client IP address etc. :

- Set permissions to "Grant access" and choose the appropriate authentication methods:
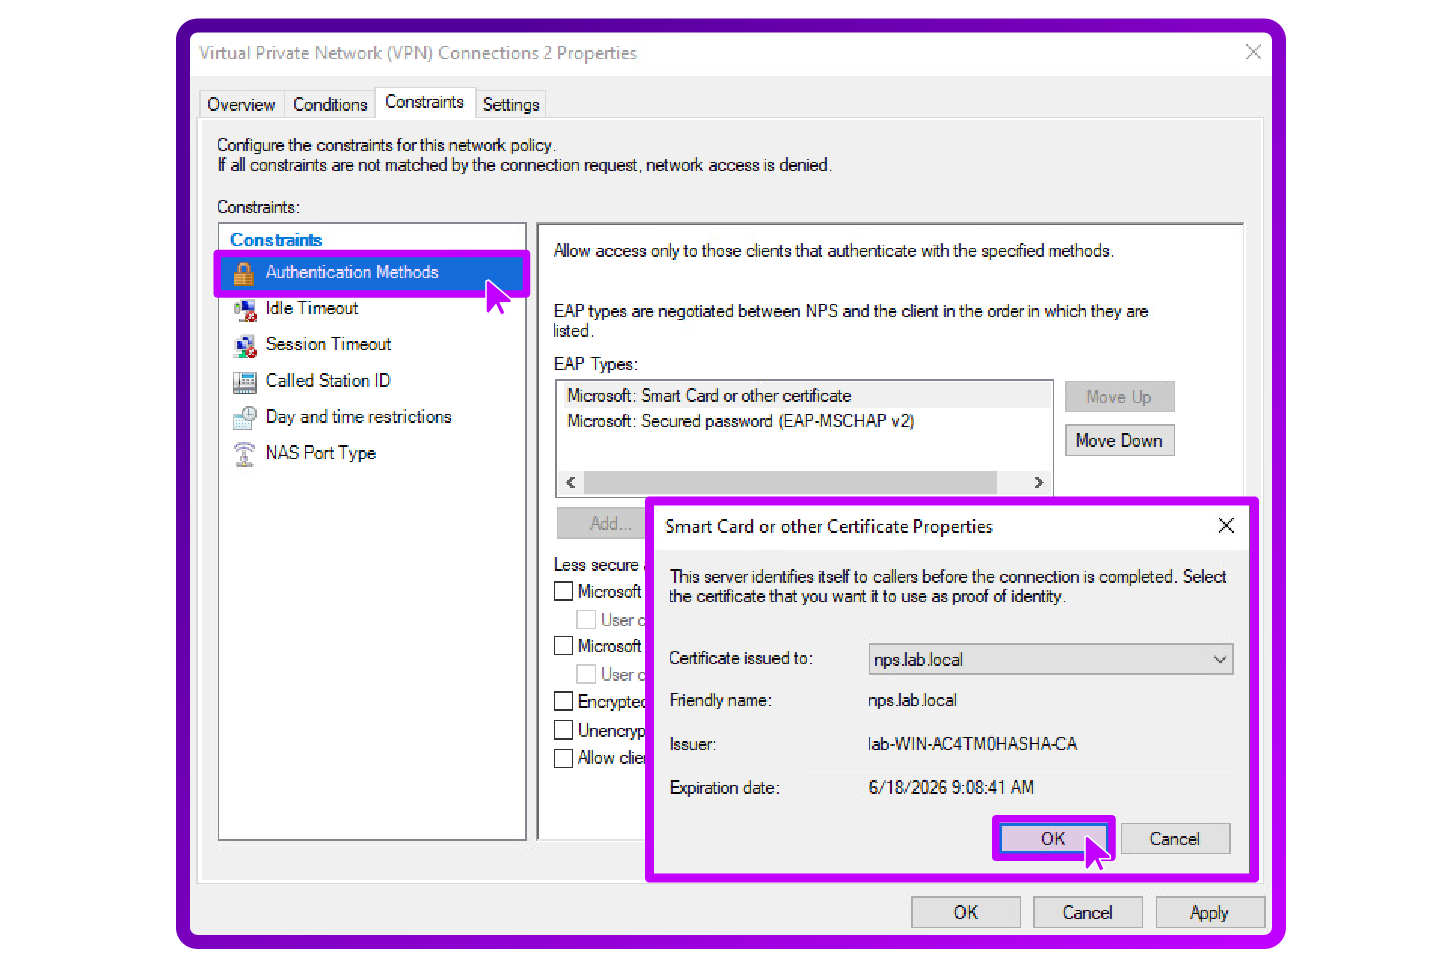
- Remove less secure authentication methods and prefer settings like Smart Card or other certificate-based methods.
- Finalize the configuration by reviewing and finishing the setup.
Troubleshooting NPS setup and Firewall issues
If you encounter permissions issues such as errors when registering the NPS in Active Directory, follow these troubleshooting steps:

Verify administrative privileges
- Ensure you're logged in with a Domain Admin account. This level of access is necessary for registering the NPS and adjusting AD objects.
Adjust membership and permissions
- On your Domain Controller, use Active Directory Users and Computers to add your account to the Domain Admins group if it's not already a member.
- Navigate to the user's properties, find the Member Of tab, and ensure Domain Admins is listed.
Delegate Control for NPS
- In Active Directory Users and Computers ensure Advanced Features are shown under the View menu.
- Right-click the NPS server ’s computer object and choose Delegate Control.
- Follow the wizard to grant the NPS service account appropriate permissions, such as read and write.
Verify changes
- Log out and then back in to refresh your permissions.
- Use the following command prompt to confirm your membership in the Domain Admins group:
whoami /groups
Firewall configuration adjustments
- Remember to allow RADIUS traffic through your firewalls: UDP 1812 for Authentication, and UDP 1813 for Accounting.
- Windows Server 2019 has a bug where the Windows FIrewall rules for the NPS role appear as active but are not actually working address the firewall rule bug by executing the following in the command prompt as administrator if RADIUS ports are not functioning despite being open:
sc.exe sidtype IAS unrestricted
How to set up the VPN Server
In this section we'll detail the steps to configure the VPN server for Always On VPN. The VPN server will use the Routing and Remote Access Service (RRAS) to handle VPN connections.
1. Domain Integration
Consider the security implications of joining the VPN server to your domain. For enhanced security, it is recommended not to join the VPN server to the internal AD domain and instead manage authentication through RADIUS.
If domain joining is necessary, the DNS servers should be specified on the internal adapter. Also ensure proper credentials are used and restart the server post-configuration.
2. Network configuration and placement
Network Adapter setup
- External Adapter (Internet-facing): Assign a static IP address and gateway IP Only enable IPv and IPv protocols.
- Internal Adapter (Internet-facing): Assign a static IP address within a different subnet Configure static routes for internal network access.
Firewall configuration
- External Adapter: Open ports for IKEv (UDP 500 and UDP 4500) and SSTP (TCP 443).
- Internal Adapter: Open ports for RADIUS Authentication (UDP 1812 and 1813) to ensure secure communication with the NPS server.
- If the VPN server is domain joined and there isn't a read-only domain controller in the perimeter network, specific ports will need to be opened to facilitate communication with the domain controller on the internal network presenting a potential security risk.
- The necessary ports include TCP and UDP 53 for DNS, TCP and UDP 88 for Kerberos, TCP 135 for RPC Endpoint Mapper, TCP 389 and UDP for LDAP, TCP 445 for SMB, TCP 636 for LDAPS, and TCP 3268 and 3269 for LDAP GC and LDAPS GC respectively.
- These openings ensure the VPN server can effectively communicate and authenticate with domain services, essential for network operations and security authentication processes.
3. Remote Access role installation
Access the Remote Access role
- Open Server Manager.
- Click Manage > Add Roles and Features.
- Select the Remote Access role and proceed with the installation.
- In the Configure Remote Access window, select Deploy VPN only.
- In Server Manager, navigate to Tools > Routing and Remote Access.
- Right-click the server name, select Configure, and Enable Routing and Remote Access.
- In the wizard, choose Custom configuration select VPN access and complete the setup by clicking Finish. Start the service immediately after.
4. Remote Access configuration
Change Authentication Provider to RADIUS
- In the RRAS console, right-click the server name and go to Properties.
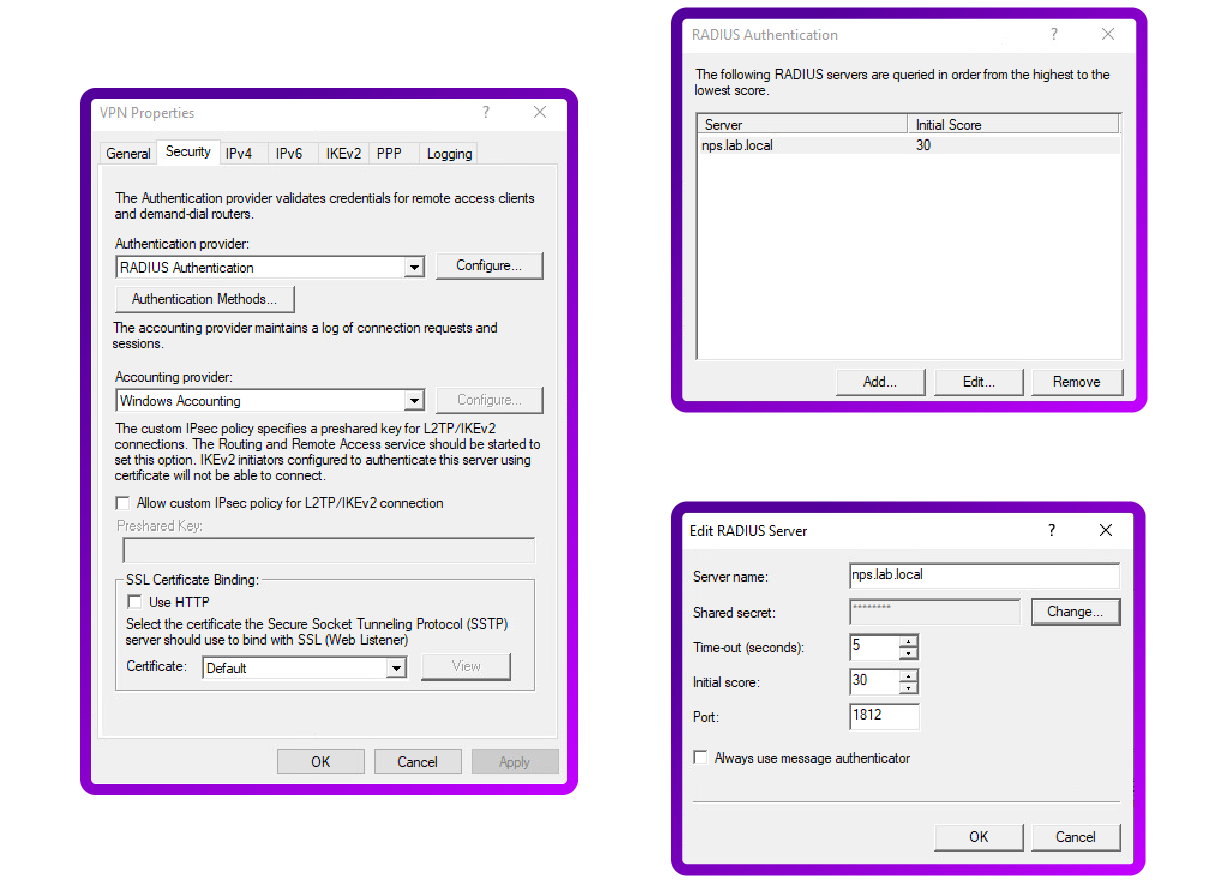
- On the Security tab, select RADIUS authentication and click Configure.
- Add the NPS server's FQDN and the shared secret configured previously:
Configure Authentication Methods
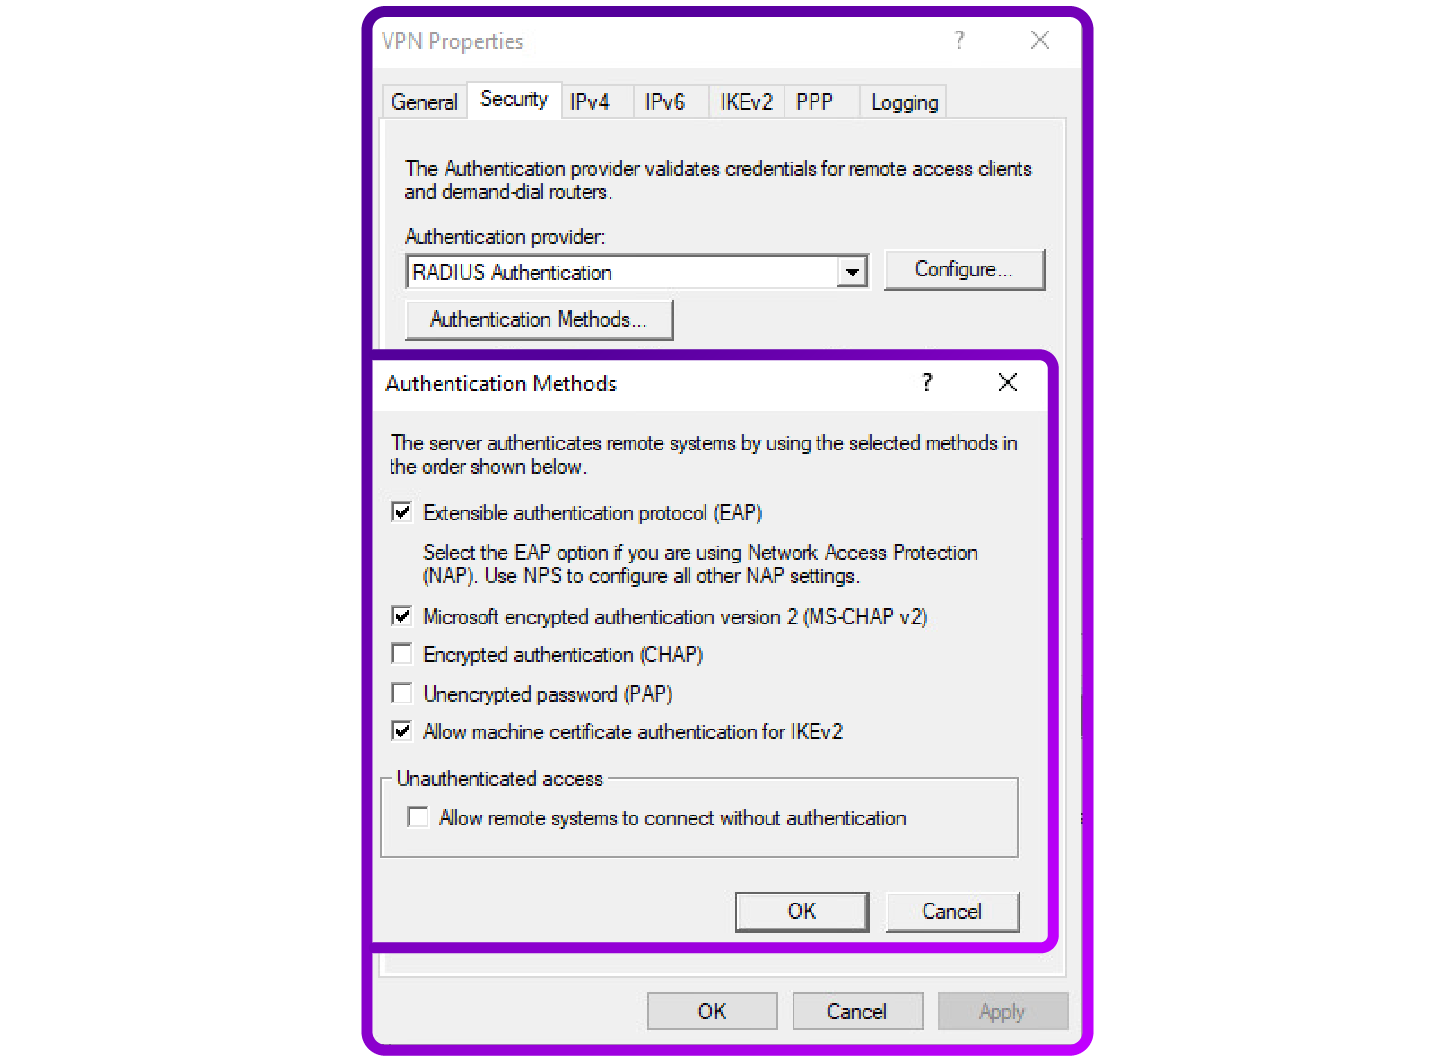
- Back in the Security tab, click Authentication Methods.
- Enable Extensible Authentication Protocol (EAP) for robust authentication methods that include certificates and other advanced features.
- Enable Microsoft Encrypted Authentication version 2 (MS CHAP v2) for password-based authentication.
- Ensure Allow machine certificate authentication for IKEv2 is checked to enable certificate-based device authentication:
Note: The specified authentication settings enable SSTP connections using EAP MSCHAP v2 for secure password based authentication and IKEv connections using machine certificates for device tunnelling.
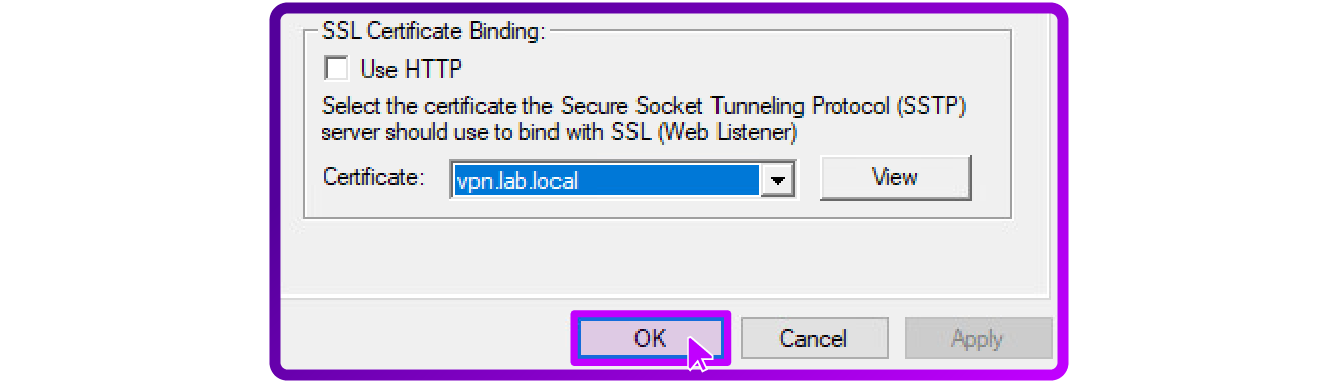
SSL Certificate Binding for SSMP
- Still on the Security tab of the RRAS server properties, locate the SSL Certificate Binding section.
- From the dropdown menu choose the appropriate certificate:
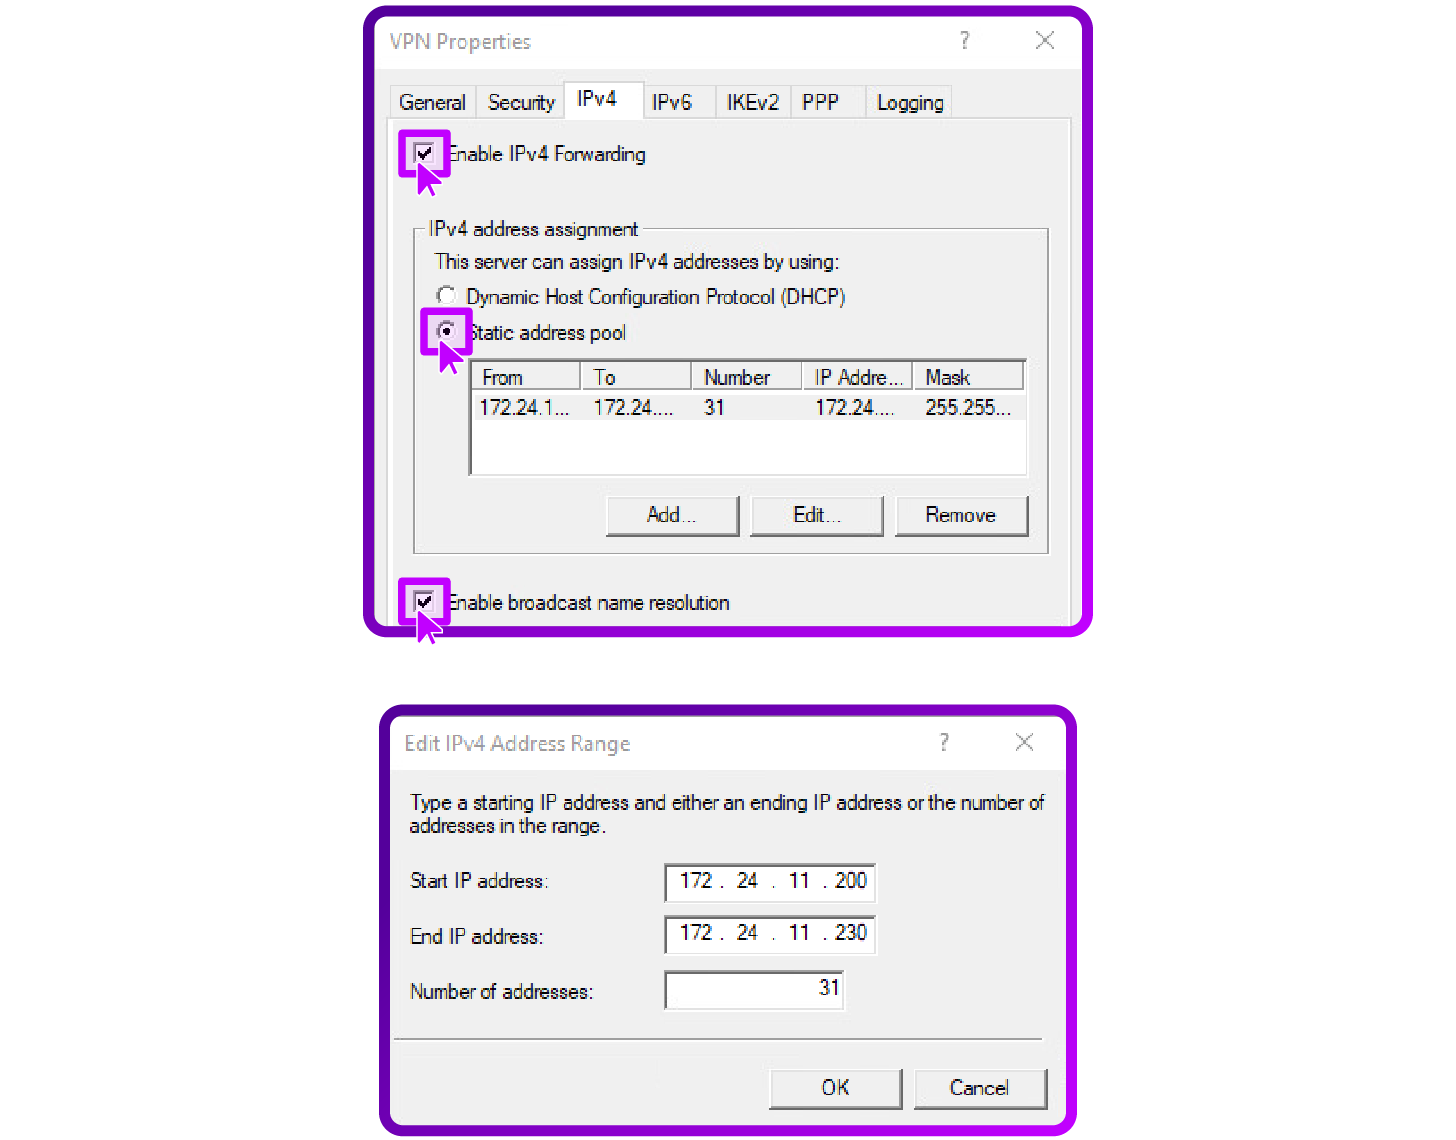
Configure IP address assignment
- In the IPv4 tab, choose between DHCP or a static address pool for client IP allocation. If using a static pool, ensure the IP addresses are excluded from DHCP assignments. If using DHCP, it's crucial to set up an IP Helper and configure appropriate firewall rules.
- Set the adapter to the internal network interface:
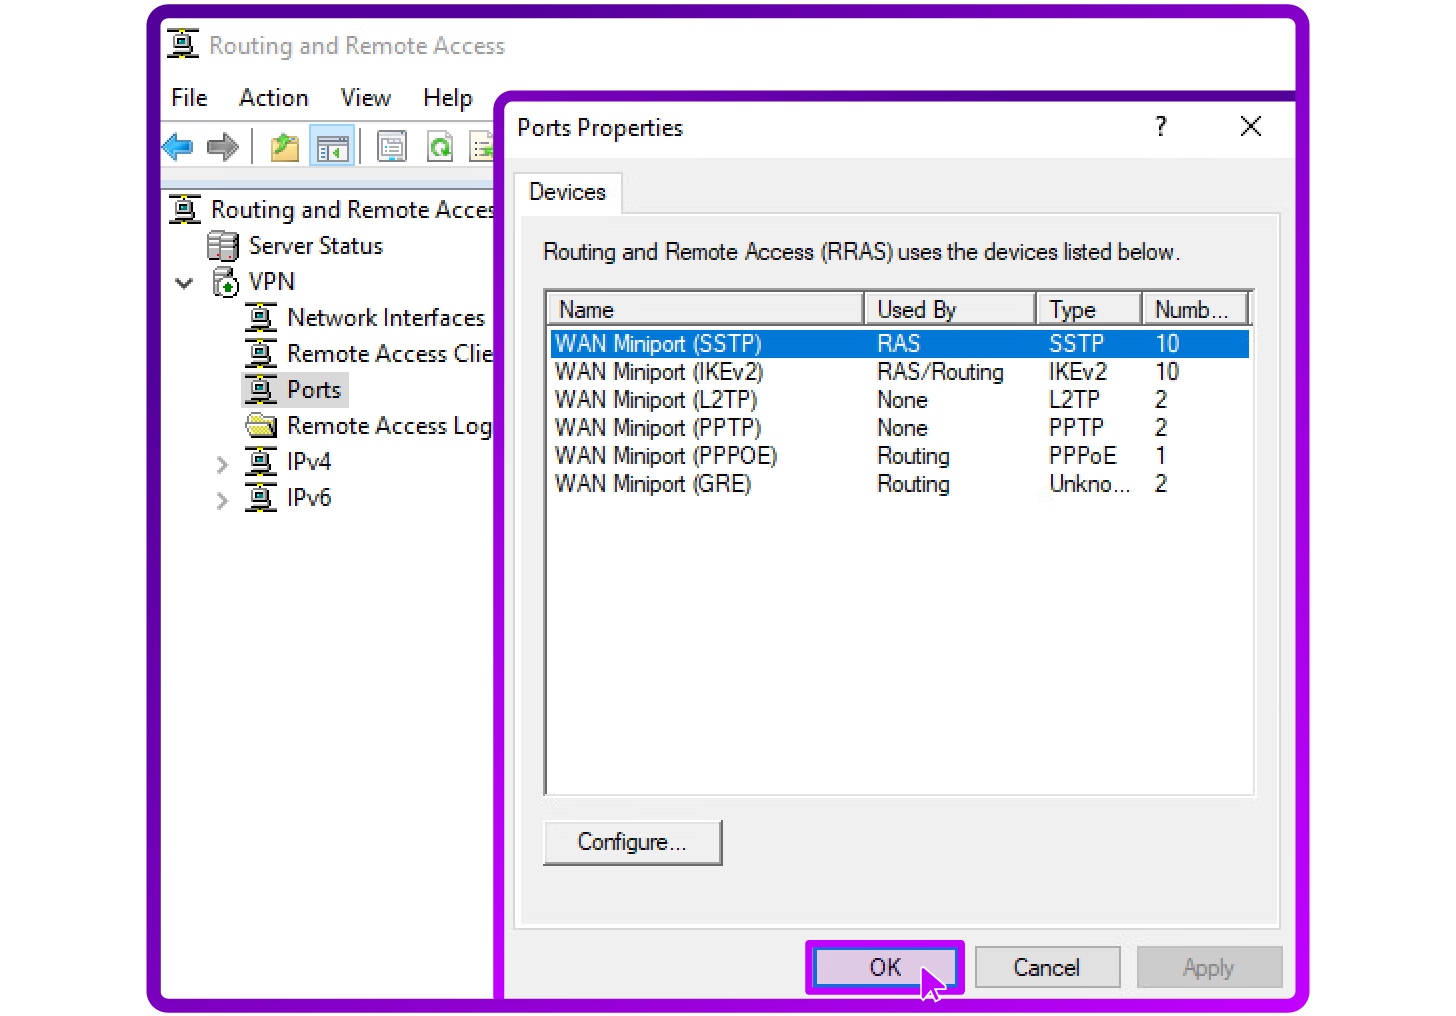
Configure Ports
Access Port configuration
- In the RRAS console, right-click on Ports, and select Properties:
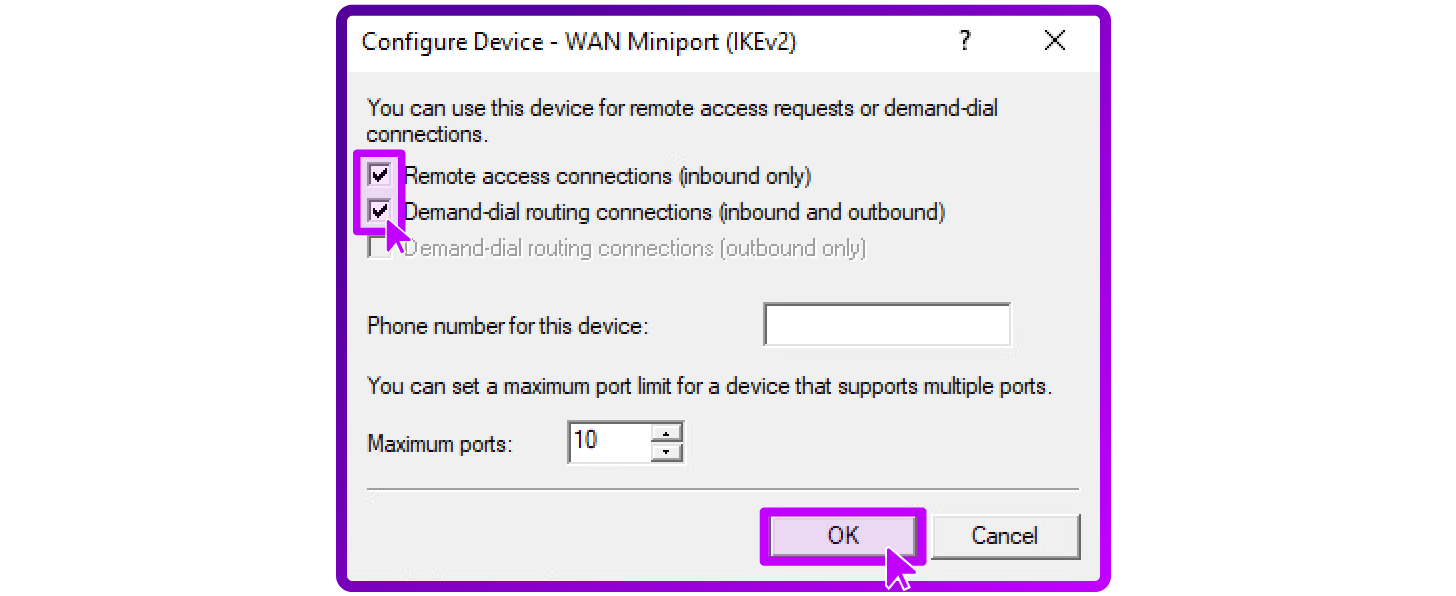
Configure IKEv2 ports
- Select WAN Miniport (IKEv2) and click Configure.
- Ensure Remote access connections (inbound only) is checked to allow VPN connections to the server.
- Ensure Demand-dial routing connections (inbound and outbound) is checked to allow the server to initiate connections if needed.
- Optionally, modify the maximum ports setting depending on the expected number of concurrent VPN connections, and then click OK:
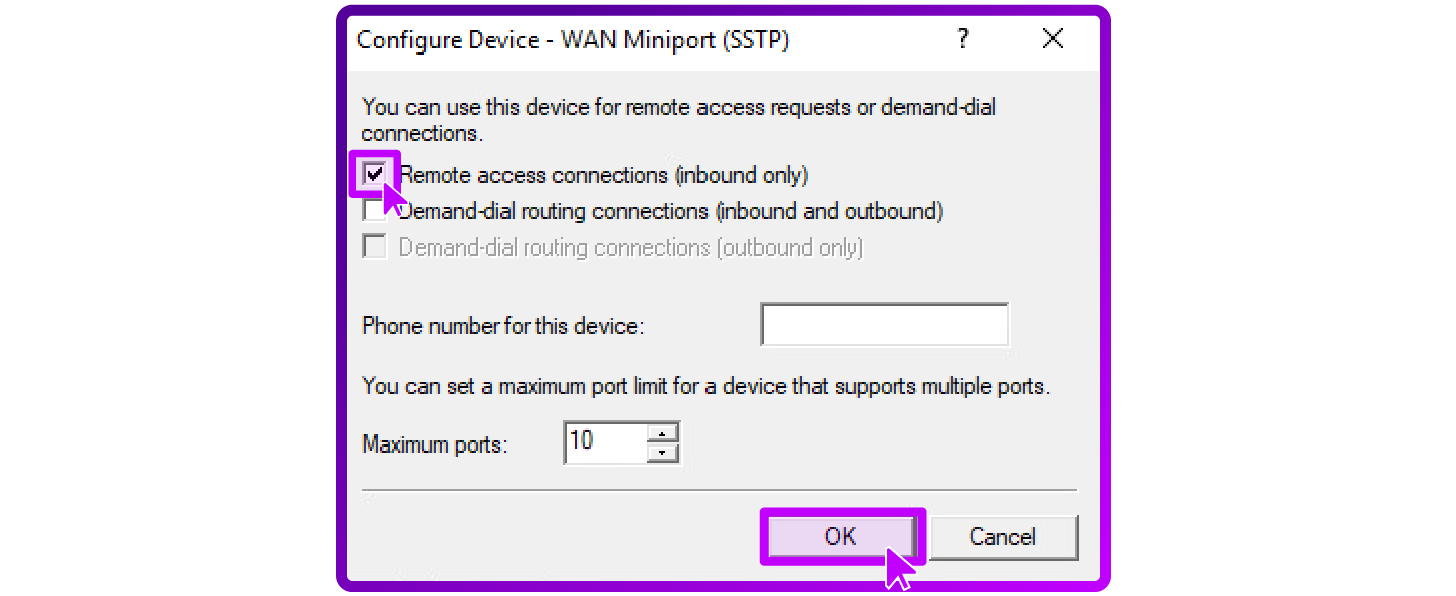
Configure SSTP Ports
- Select WAN Miniport (SSTP) from the list and click Configure.
- Check Remote access connections (inbound only) to enable SSTP connections.
- SSTP does not use demand dial routing, so no changes are necessary for that setting.
- Similar to IKEv2, adjust the maximum ports setting based on your requirements and click OK.
Adjust settings for unused protocols
- For other RAS Routing ports such as L2TP and PPTP, which you may choose not to use, it's a good practice to disable them to reduce security risks.
- Select each unused protocol (L2TP, PPTP) and uncheck both Remote access connections (inbound only) and Demand-dial routing connections (inbound and outbound) to disable them.
5. Enhanced security settings for IKEv2 connections
Strengthening IKEv2 connection security
The default security configurations for IKEv2 within the Routing and Remote Access service may not suffice for optimal security. To enhance the security level of IKEv2 connections on your server:
- Access the VPN server and launch an administrative PowerShell window.
- Execute the following command to update the IPsec security parameters for IKEv2, ensuring advanced cryptographic protection:
Set-VpnServerConfiguration -CustomPolicy -AuthenticationTransformConstants
SHA256128 -CipherTransformConstants AES128 -DHGroup Group14 -EncryptionMethod
AES128 -IntegrityCheckMethod SHA256 -PFSgroup PFS2048 -
SADataSizeForRenegotiationKilobytes 102400```- Restart the Remote Access Management service to apply these changes. This requires corresponding configuration on the client side to establish the connection. From a Windows X client:
$connection = “[connection name]”
Set-VpnConnectionIPsecConfiguration -ConnectionName $connection -
AuthenticationTransformConstants SHA256128 -CipherTransformConstants AES128 -
DHGroup Group14 -EncryptionMethod AES128 -IntegrityCheckMethod SHA256 -
PFSgroup PFS2048 -Force
Enabling IKEv2 fragmentation support
Due to the possibility of IKEv2 traffic fragmentation from large IP packets, enabling IKEv2 fragmentation improves data flow and connection stability,
especially in newer Windows Server environments.
- Run the following PowerShell command to activate IKEv2 fragmentation on servers running Windows Server 1803 or later.
New-ItemProperty -Path
"HKLM:\SYSTEM\CurrentControlSet\Services\RemoteAccess\Parameters\Ikev2\" -
Name EnableServerFragmentation -PropertyType DWORD -Value 1 -Force
- This setting ensures that the server can handle large packets efficiently, which is particularly useful when Windows 10 is used on the client side.
Support for device tunnels with IKEv2
The default setup of the Routing and Remote Access server does not facilitate machine certificate authentication, which is essential for device tunnels. To fix this:
- Connect to the VPN server and open an administrative PowerShell window.
- To enable machine certificate authentication, allowing device tunnels, execute this script:
$VPNRootCertAuthority = "Common Name of trusted root certification authority"
$RootCACert = (Get-ChildItem -Path cert:LocalMachine\root | Where-Object
{$_.Subject -Like "*$VPNRootCertAuthority*" })
Set-VpnAuthProtocol -UserAuthProtocolAccepted Certificate, EAP -
RootCertificateNameToAccept $RootCACert -PassThru
How to set up an internal CA and issue Certificates
When setting up Always On VPN for protocols like IKEv2 and SSTP, it's essential to have a reliable internal Certification Authority (CA). Here are the steps I took to install and configure the internal CA.
Install Active Directory Certificate Services
- Open Server Manager: You can find Server Manager in the Start menu or quickly open it by pressing Win + R and typing:
ServerManager
- Add Roles and Features: At the top right of the Server Manager dashboard, click on "Manage" and then "Add Roles and Features".
- Before You Begin Page: If it appears, click "Next" to proceed.
- Installation Type: Choose "Role-based or feature-based installation" and click "Next".
- Select Destination Server: Identify the server where you'll install the CA role and click "Next".
- Select Server Roles: Tick the box next to "Active Directory Certificate Services". When prompted, click "Add Features" to include the necessary components for AD CS and then proceed by clicking "Next"
- Select Features: No extra features are required for the basic setup of the CA, so you can move forward by clicking "Next".
- AD CS Role Services: Choose Certification Authority " from the role services list. You might also consider selecting "Certification Authority Web Enrollment" if you plan to manage or distribute certificates through a web interface.
- Install and Confirm: Review your choices and click "Install". Once the installation is complete, click on the "Configure Active Directory Certificate Services" on the destination server link to proceed with the configuration.
Configure the Certification Authority (CA)
- Credential validation: Ensure you're using an account with the necessary administrative privileges, such as a domain administrator.
- Role services setup: Select "Certification Authority " for configuration. If "Certification Authority Web Enrollment" was installed, you will set it up in subsequent steps.
- Setup type: Opt for "Enterprise CA" if your network utilizes Active Directory, otherwise, select "Standalone CA".
- CA type: Choose "Root CA" to start a new certification authority hierarchy.
- Private key options: Opt to "Create a new private key".
- Algorithm and key length: Select an appropriate cryptographic service provider and algorithm. RSA with 2048 bits and SHA-256 for hashing are standard choices.
- CA name: Define your CA's name, which should reflect its role and your organization.
- Validity period: Determine how long the CA certificate will be valid before requiring renewal.
- Certificate database: Specify locations for storing the certificate database and its log, along with the private key of the CA.
- Finalize and apply: Double -check your configurations and click "Configure" to finalize the CA setup.
With these steps completed, your server is now a functional internal CA ready to manage and issue certificates.
SSTP certificate requirements
SSTP certificate essentials
- Store location: For SSTP the certificate must be installed in the Local Computer's Personal Certificate store on the RRAS VPN server.
- Key usage: The certificate should have the Server Authentication Enhanced Key Usage (EKU) identifier. While many SSL certificates include both Server and Client Authentication, for SSTP, only the Server Authentication EKU is mandatory.
- Hostname verification: It's critical that the subject name of the certificate, or at least one entry in the Subject Alternative Name (SAN) aligns with the public hostname that VPN clients will use to connect to the server. This ensures that the secure connection is recognized and trusted by client machines.
Certificate Authority considerations
Setting up Always On VPN with self-signed certificates worked well for SSTP connections, but I faced issues with IKEv2, which required an internal Certification Authority (CA).
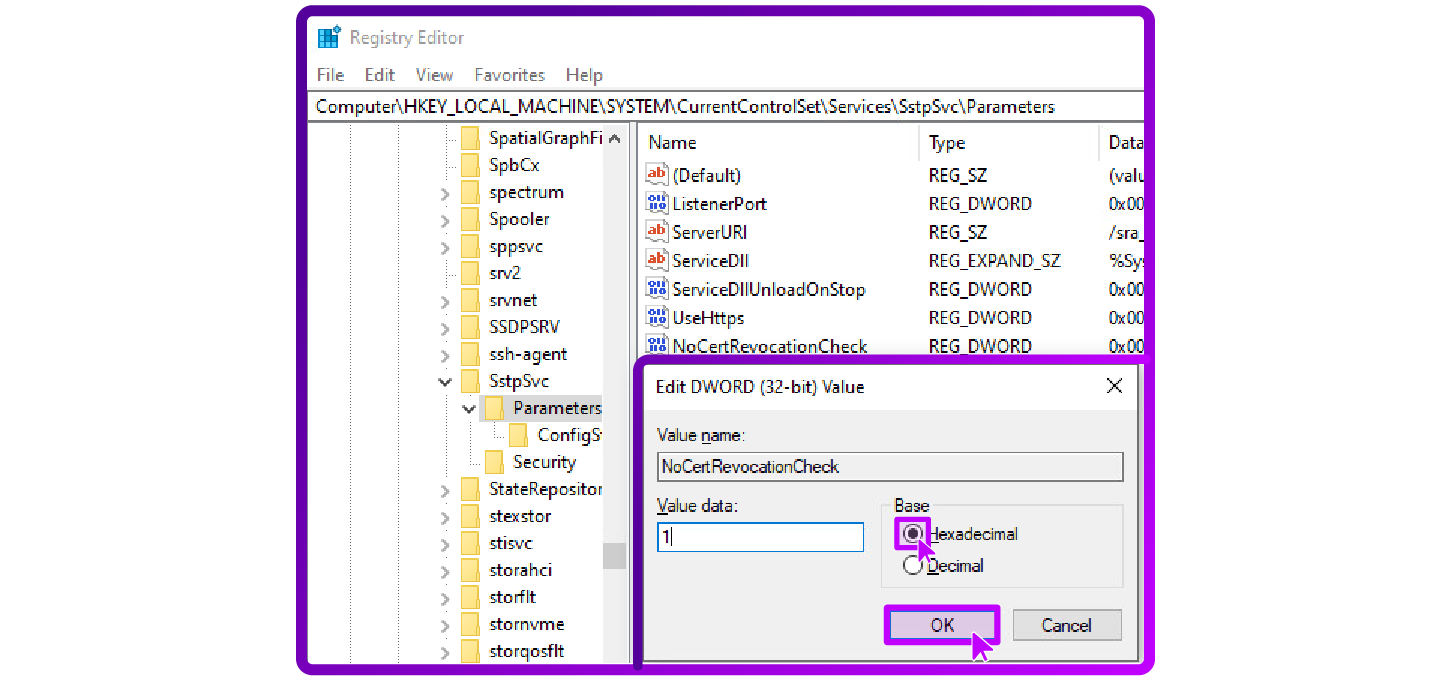
After establishing the internal CA, I encountered a new issue with SSTP. The challenge was ensuring the Certificate Revocation List (CRL) was accessible. CRL accessibility issues led to the "revocation server offline"
error.

To address this, I made the CRL available via an IIS web server, but despite this, the errors persisted so I disabled CRL checks on the client side through registry settings to continue testing.
This isn't recommended for production but helped me focus on other aspects.
SSTP requires careful certificate and CRL management. While temporary adjustments can aid in testing, maintaining an accessible CRL is critical for production environments.
IKEv2 Certificate requirements
IKEv2 Certificate essentials
- Store location: Certificates for IKEv2 should be installed in the Local Computer's Personal Certificate store on the VPN server and must be issued by the organization's Internal private Certification Authority (CA).
- Key usage: The certificate must include the Server Authentication EKU (1.3.6.1.5.5.7.3.1), which is crucial for the VPN server to authenticate itself to connecting clients and the IP Security IKE Intermediate EKU (1.3.6.1.5.5.8.2.2).
- Hostname verification: The certificate's Subject Name or Subject Alternative Name (SAN) must match the VPN server's public hostname. This ensures that the secure connection is recognized and trusted by client machines.
Client Certificate requirements
- User tunnel: IKv2 can leverage certificates for user authentication, which requires installing a client certificate with the Client Authentication EKU in the User's Personal certificate store.
- Device tunnel: For device -level authentication, such as for pre-logon connectivity and device management, a machine certificate with the Client Authentication EKU must be installed in the Local Computer's Personal store on client devices.
Create Certificate template for IKEv2
- Access the Certification Authority Management Console: Open the Certification Authority by typing the following in the Start menu search, or in the Run dialog:
certsrv.msc
- Manage Certificate Templates: Navigate to "Certificate Templates", right click and select "Manage" to access the list of available templates:

- Duplicate a suitable Template: Look for the "RAS and IAS Server" template which is suitable for IKEv2 configurations. Right -click and select "Duplicate Template ":

Then set Template Properties...
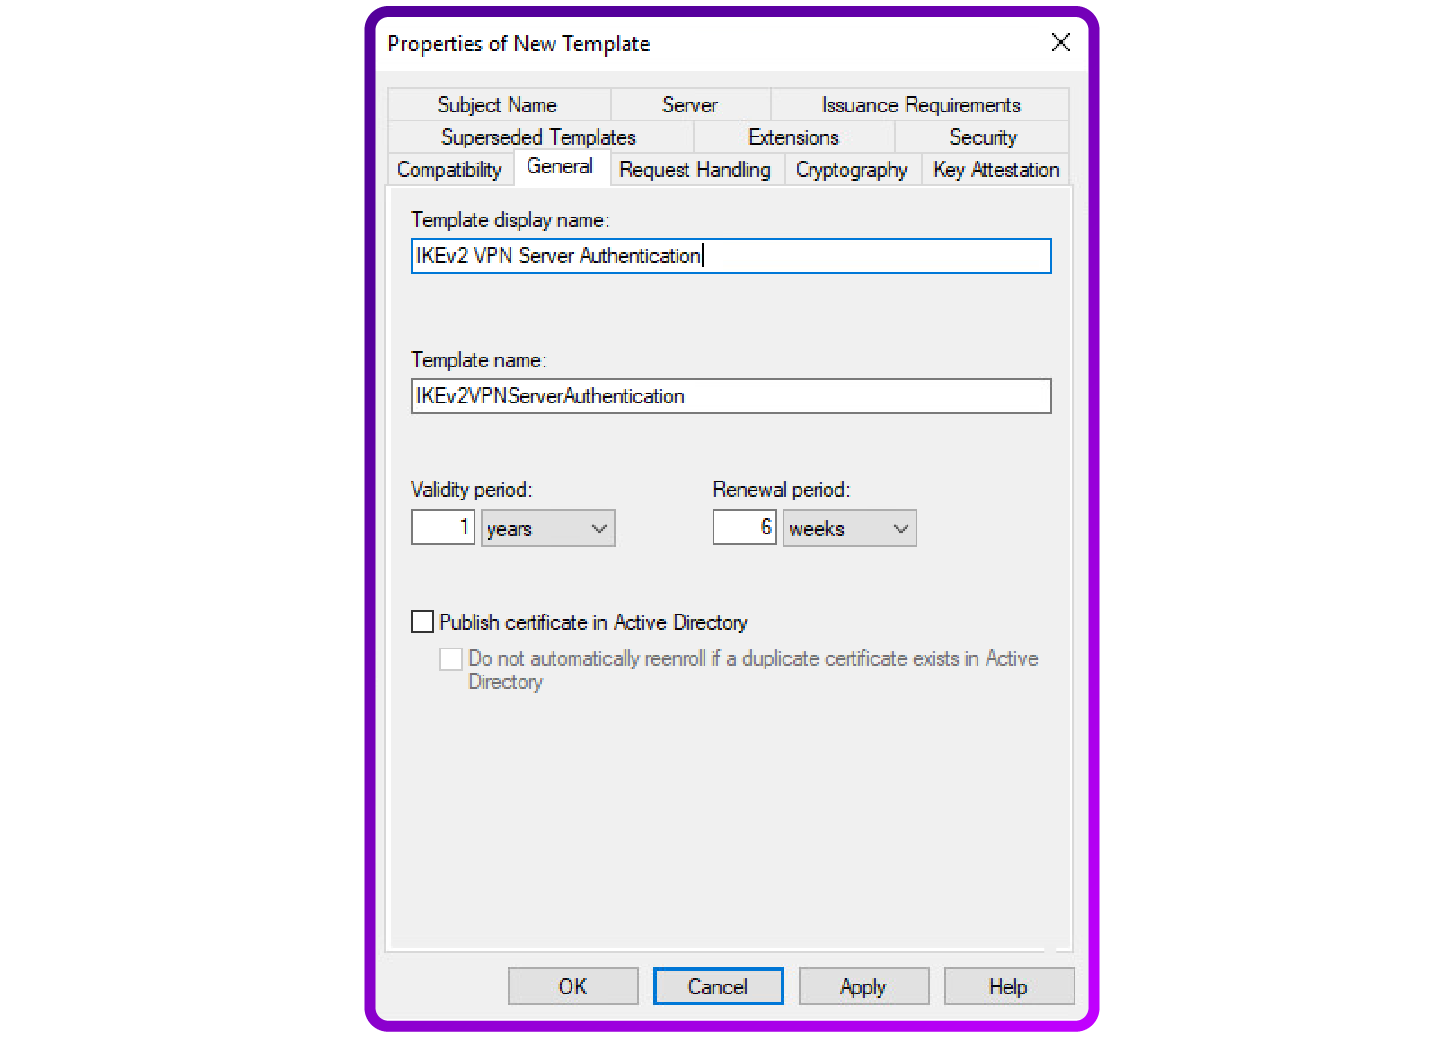
- Compatibility Settings: Set the Certification Authority compatibility to Windows Server 2012 R2 and the Certificate recipient to Windows 8.1/Windows Server 2012 R2.

- General settings: Name your new template, for instance "IKEv2 VPN Server Authentication". You can adjust the validity and renewal periods based on your security policy:
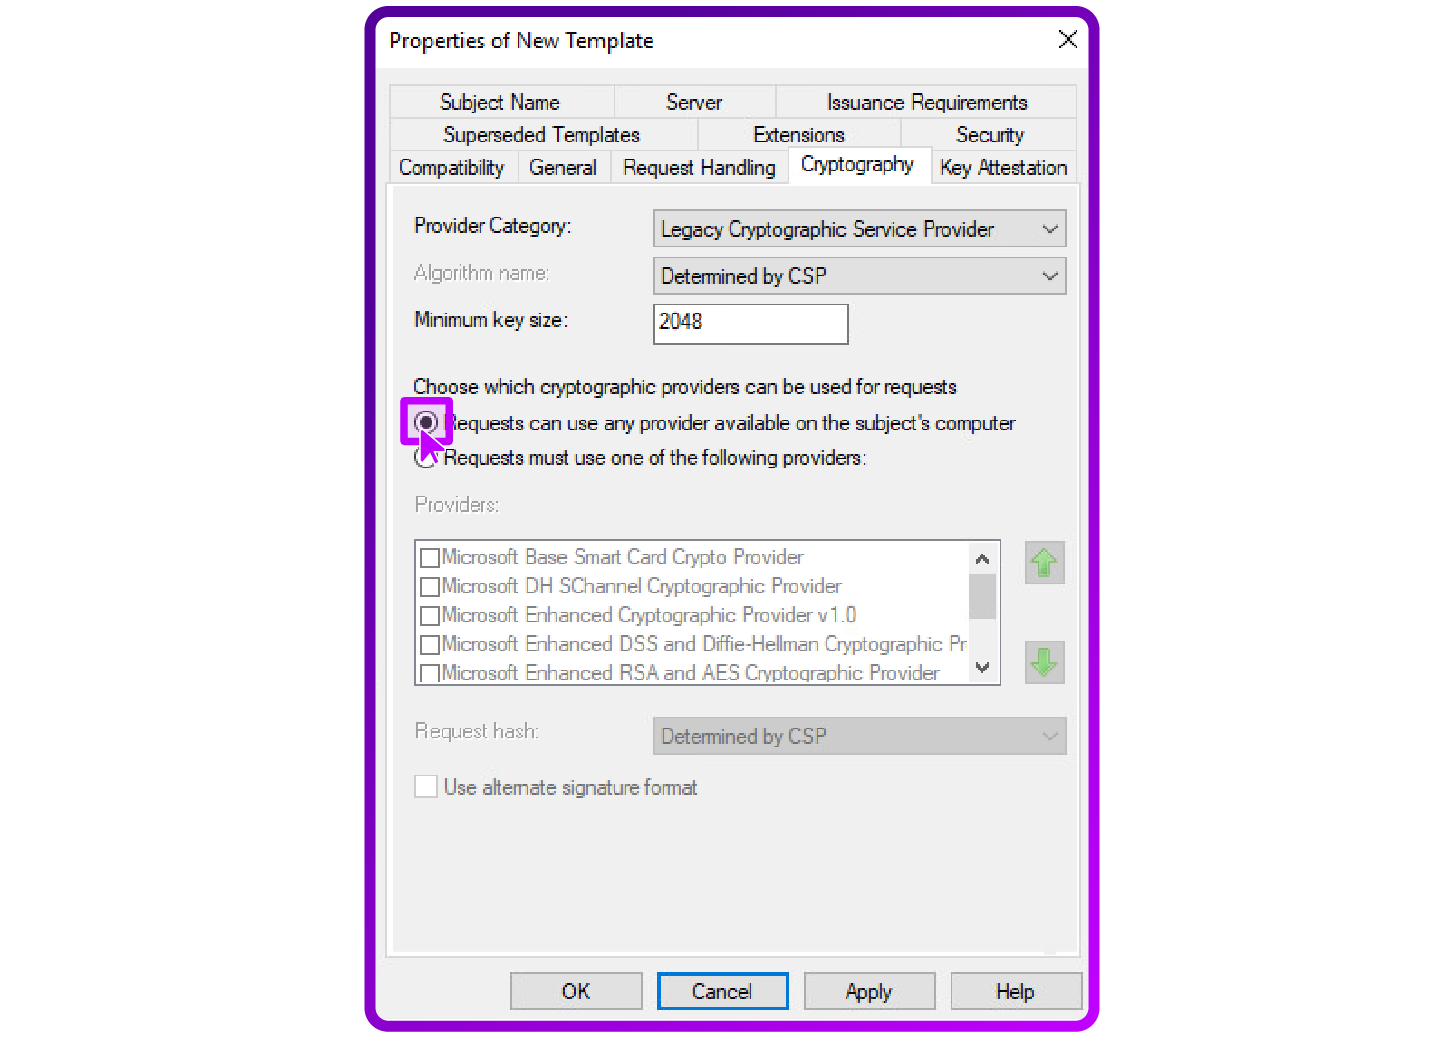
- Configure cryptographic settings: Ensure the cryptographic settings are adequate for IKEv2 by selecting a minimum key size of 2048 bits and opting for RSA as the cryptographic provider:
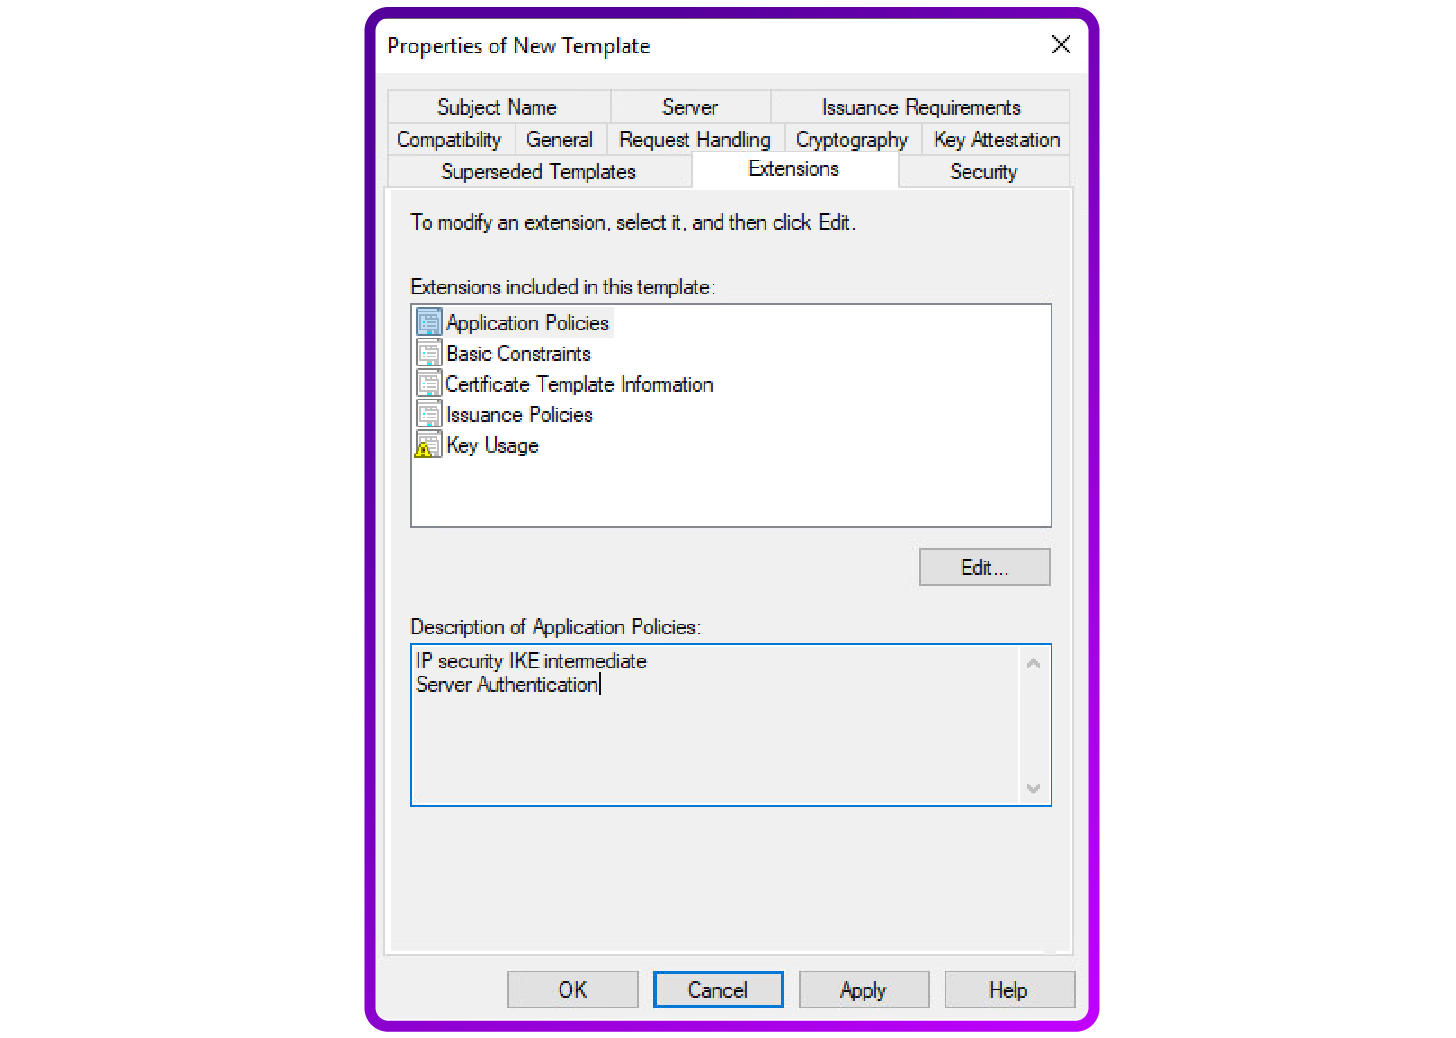
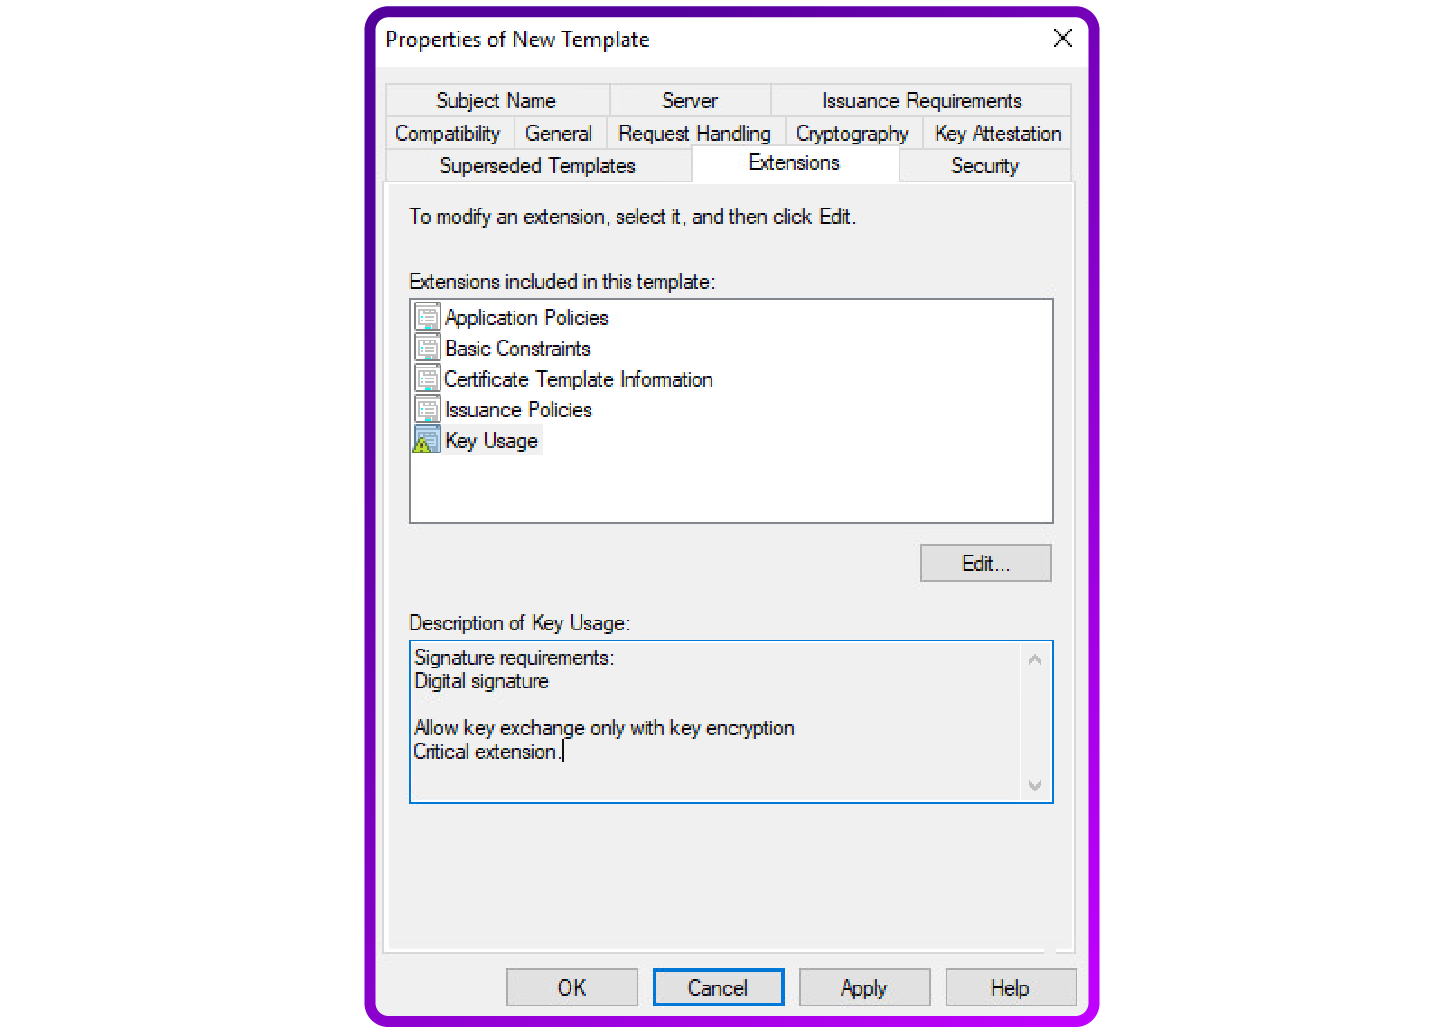
Then configure extensions...
- Application policies: Add both "Server Authentication" and the specific "IP Security IKE intermediate" under the Application Policies to meet IKEv2 requirements:
- Key usage: Ensure it includes "Digital Signature" and "Key Encipherment".
- Adjust security and Access Controls: In the "Security" tab configure permissions to specify which groups can enroll for the certificate. Grant "Enroll" permissions and remove any outdated groups.
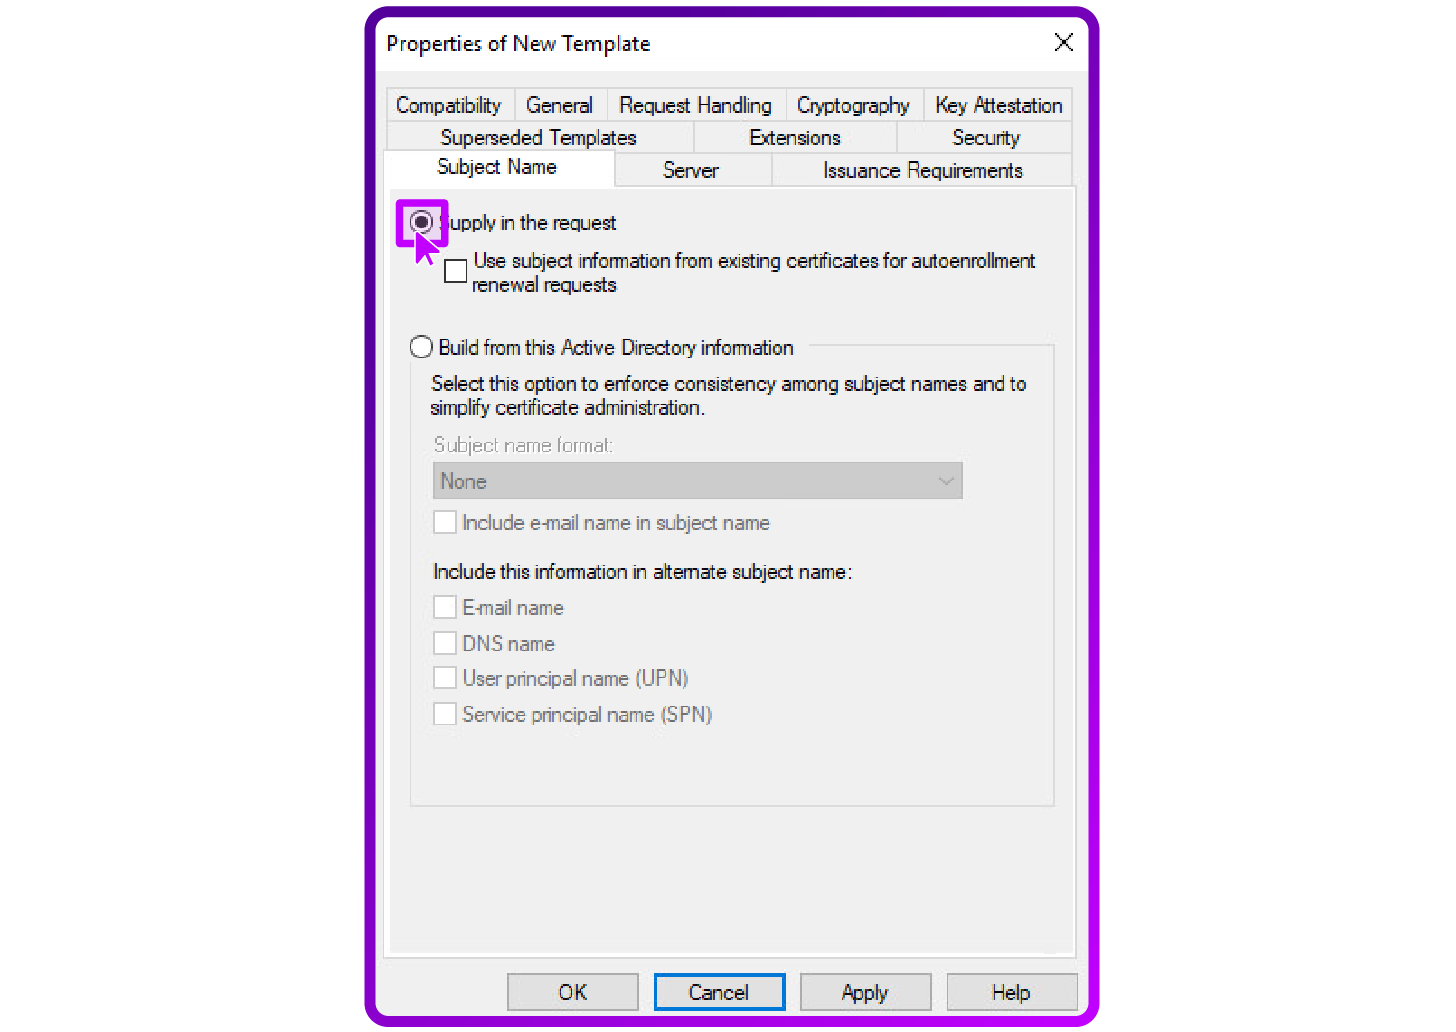
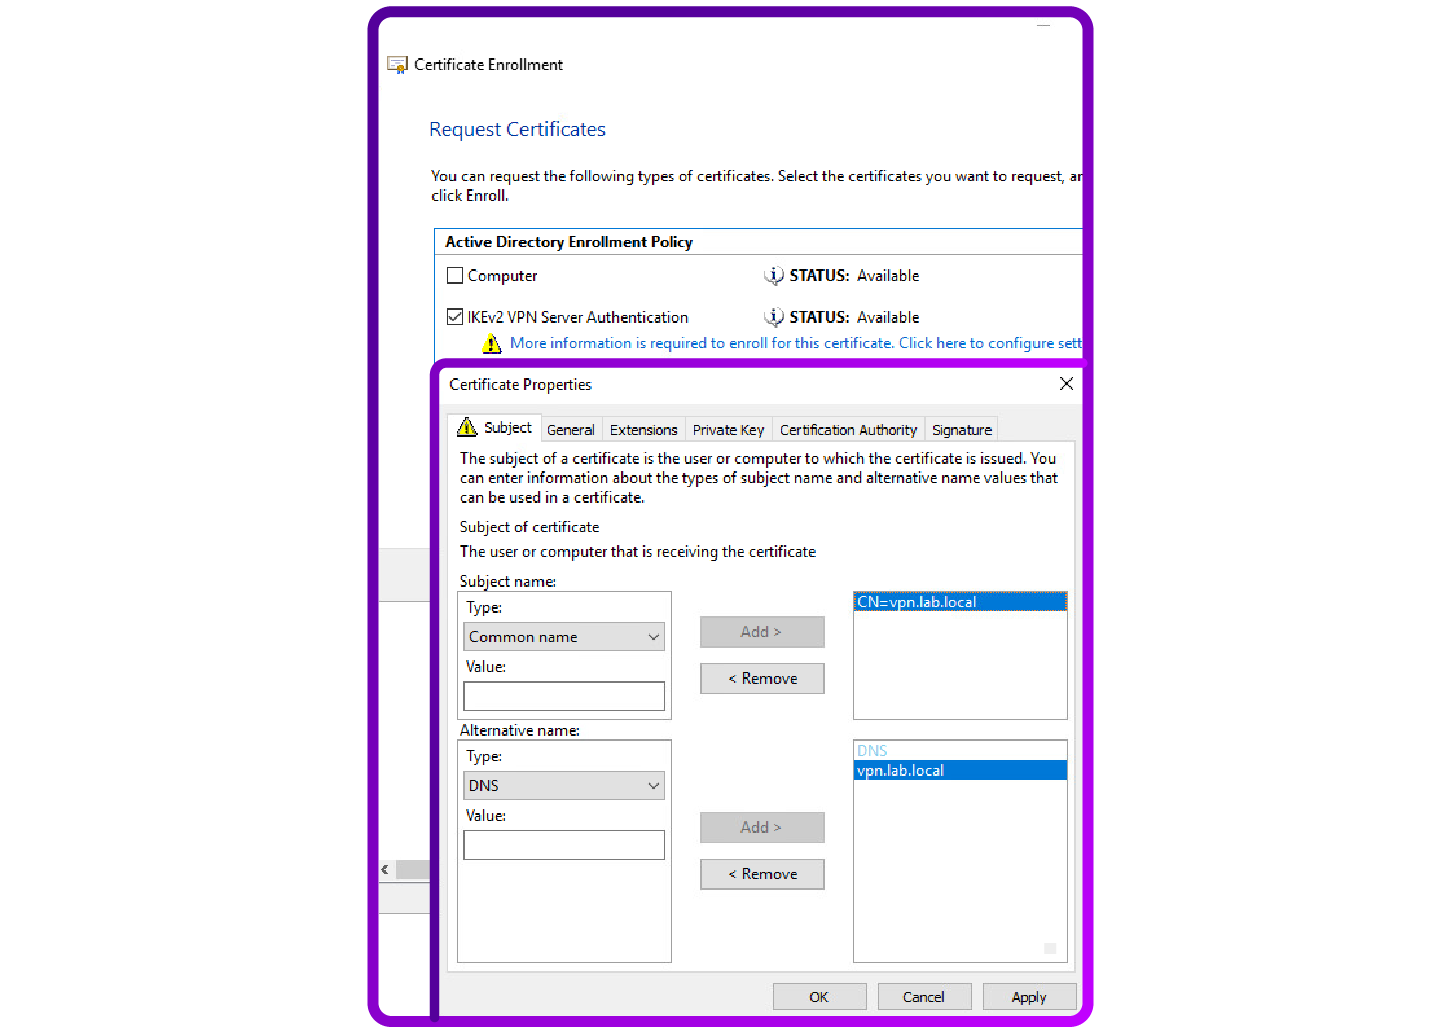
- Specify Subject Name requirements: Under the "Subject Name" tab, ensure that the option "Supply in the request" is checked to allow the subject name to be specified during the certificate request process:
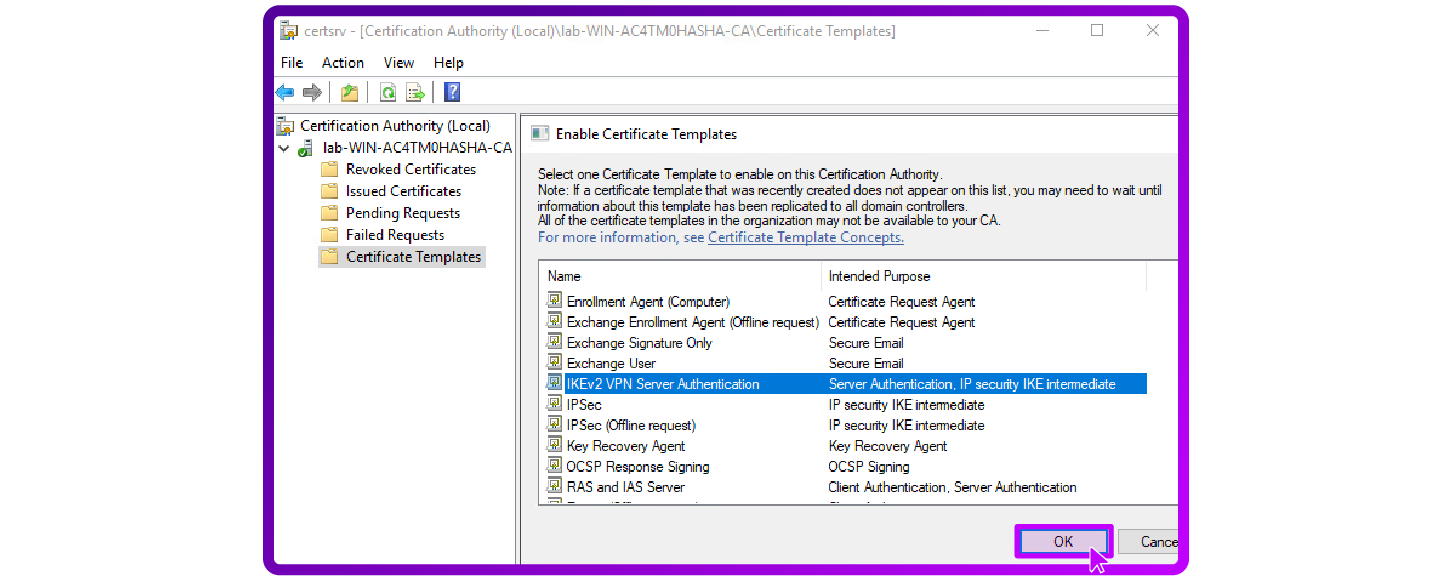
- Publish the Template: Return to the Certification Authority console, right-click on Certificate Templates, select "New", then choose "Certificate Template to Issue ". Select your newly made template to activate it for issuance:
Issue Certificates
- Enroll for Certificates on the VPN server: On your VPN server, proceed to manually request the certificate or allow for auto-enrollment (if configured):
- Open the Certificates MMC snap-in ('certlm.msc for the local computer).
- Navigate to "Personal > "Certificates"
- Right-click "Certificates", select "All Tasks", then "Request New Certificate"
- Follow the prompts in the Certificate Enrollment Wizard (as shown in the screenshot below), ensuring you choose the correct template for the VPN server component.
- Client Machines: For client machines using IKEv2 machine tunnels, request a Client Authentication EKU in Local Computer Personal store to validate device identities securely .
How to configure the client side VPN
After setting up the internal Certification Authority (CA) and issuing the necessary certificates, I configured the VPN client to connect using both SSTP and IKEv2 protocols:
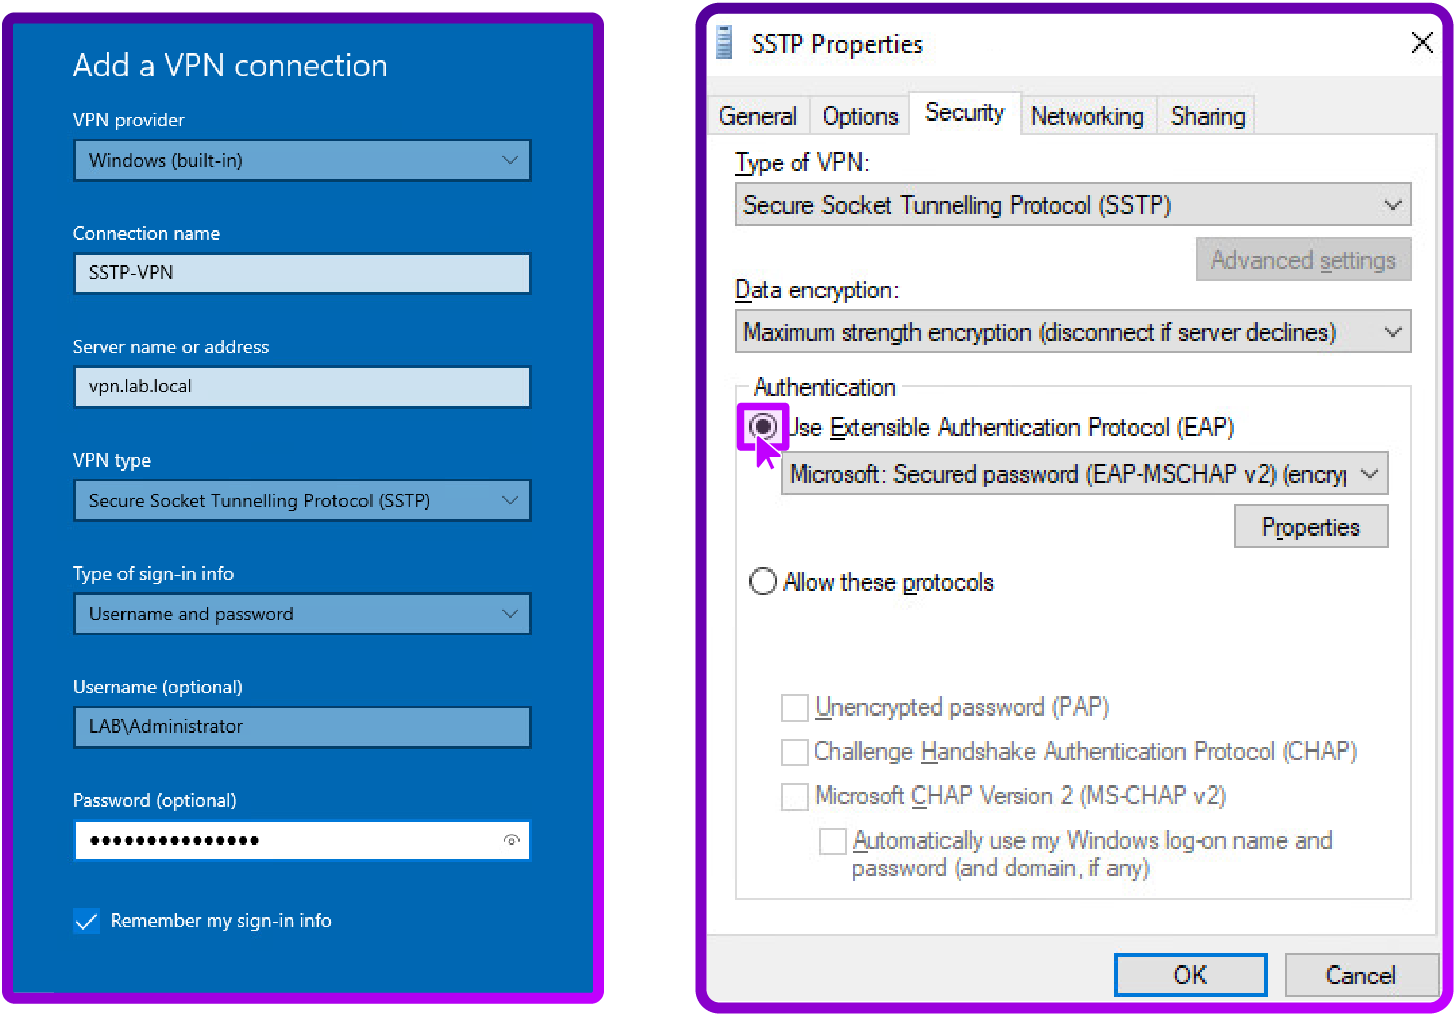
1. SSTP VPN configuration
Enter the details as follows:
2. IKEv2 VPN configuration
This needs to be set up in the following way:
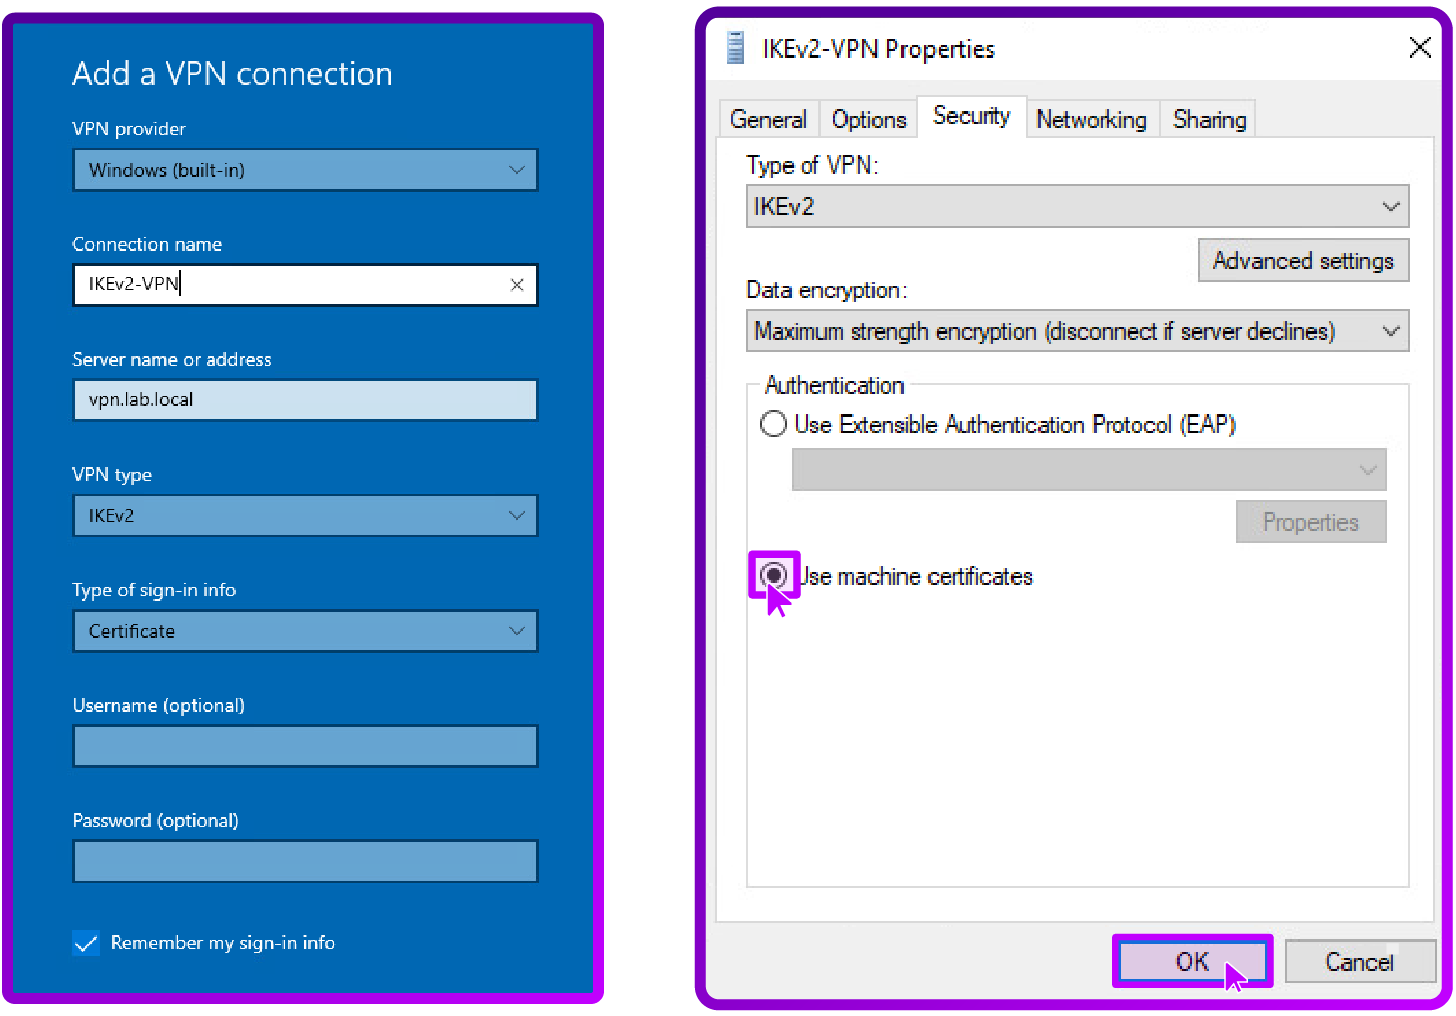
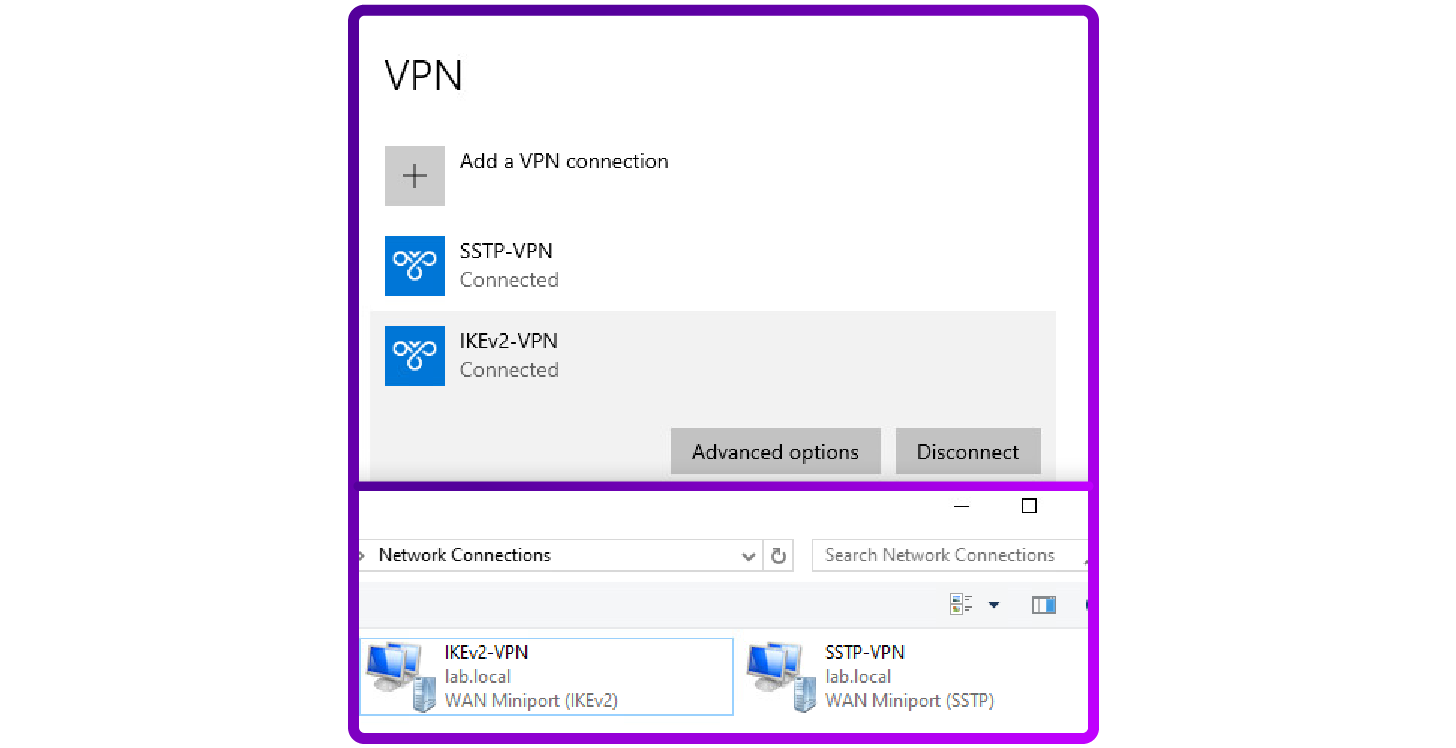
For SSTP we are using EAP-MSCHAP v2 as our authentication method. For IKEv2 we are using machine certificates which provide a higher security level by ensuring device level authentication before establishing the VPN tunnel.
The choice between SSTP and IKEv2 depends on specific network requirements and constraints. SSTP is typically favoured for its ability to bypass most firewalls, while IKEv2 is preferred for its resilience and support for mobile connections.
How to load balance Always On VPN
In my lab, I set up Always On VPN behind a load balancing appliance to test various load balancing methods and their impact on performance and reliability.
Load balancing modes
1. IKEv2 load balancing
- Layer 4 Direct Routing (DR) mode: For IKEv2, load balancing is configured in Layer 4 Direct Routing (DR) mode. DR mode is preferred because it provides high performance and preserves the original client IP address which is critical for IKEv2 's operation. The transparency of DR mode is a key benefit as it allows the VPN server to see the original source IP address, which is necessary for the proper functioning of the IKEv2 protocol. However, DR mode requires ARP Address Resolution Protocol issues to be addressed (a common challenge in direct routing setups). These ARP issues can be resolved by configuring the IKEv2 servers to correctly handle ARP responses.
- Layer 4 NAT Mode (Alternative): Alternatively, NAT mode can be used, where the load balancer acts as the default gateway for each VPN server. In this mode, the load balancer translates the destination IP address of incoming packets from the VIP to the real server's IP, while preserving the original source IP address. Return traffic is routed back through the load balancer, which reverses the translation. This method maintains client IP transparency, essential for IKEv2, and simplifies the setup by avoiding ARP issues but it may introduce slight latency due to the additional processing required for NAT.
2.SSTP and NPS load balancing
- Layer 4 Source NAT (SNAT) Mode: The SSTP and Network Policy Server (NPS) configurations use Source NAT (SNAT) mode. SNAT mode does not preserve the original client IP address but this is not a requirement for SSTP or NPS. Instead, the load balancer rewrites the source IP address of the incoming connections, making it appear as if the connections originate from the load balancer itself. This method simplifies the network setup because it avoids the complexities of handling ARP issues and does not require changes on the server side. SNAT is particularly useful when client IP transparency is not needed.
- Or Layer 7 SNAT (Reverse Proxy): Very similar in behaviour to Layer 4 SNAT mode but because its a full reverse proxy it is much more flexible and powerful. And if you need source IP transparency then as long as the load balancer is the default gateway you can just enable TPROXY. See the TPROXY topology requirements section of the manual.
Key considerations for load balancing methods
- Layer 4 DR Mode: Offers the highest performance with minimal involvement of the load balancer in the traffic flow. It's crucial that the server responds directly to the client meaning the load balancer and server must be on the same subnet, and ARP issues must be properly managed on the IKEv2 servers.
- Layer 4 NAT Mode: Useful when backend servers are on a different subnet or when masking backend servers' IPs from the clients is desired. This mode involves a small performance trade-off due to IP address translation.
- Layer 4 SNAT Mode: Ideal for situations where preserving the original client IP is unnecessary such as with SSTP and NPS It simplifies the configuration process and is suitable when even distribution of traffic is the main goal without needing client IP transparency. But it does usually require the load balancer to be configured as the default gateway.
- Layer 7 SNAT (Reverse Proxy): Very similar in behaviour to Layer 4 SNAT mode but because its a full reverse proxy it is much more flexible and powerful. And if you need source IP transparency then as long as the load balancer is the default gateway you can just enable TPROXY. See the TPROXY topology requirements section of the manual.
Note: The Virtual IP must resolve to the Fully Qualified Domain Name (FQDN) of the VPN (VIP) servers. This ensures that client connections pass through the load balancer to reach the VPN servers correctly.
This load balancing setup not only enhances the availability of the VPN service but also improves its fault tolerance and scalability. For a detailed, step-by-step deployment guide, check out the steps outlined here:
Need help with AOVPN?
The above AOVPN configuration is achieved using Layer 4 of a Loadbalancer.org appliance. If you're ready to try load balancing AOVPN, why not download our free Enterprise appliance and give it a go!
And if need help, our technical experts are always here to walk you through it. Because we're always-on too ; ) .