Ansible is an open source project sponsored by RedHat, and is the simplest way to automate IT tasks. Used by systems and network administrators, as well as developers and managers, its human-readable data-serialization language can be used to build lists of specific, ordered tasks or 'plays' that are then automated using metadata which determines which user will execute it, when and where. Here's one example of how Ansible can be used with your load balancer....
How does Ansible work?
Ansible is orchestrated by using "Playbooks". These playbooks are simple YAML formatted text files; which are then used to automate common tasks to a predetermined list of targets, in this case a Loadbalancer.org appliance.
In the context of a Loadbalancer.org appliance, what will Ansible do for you?
- Automate deployments: VIPs, RIPs etc.
- Automate the movement of files, certificates and scripts.
- Free up your time to do more with less.
- Allow the same tasks to be repeated with reduced risk of human error.
Ansible connects with remote machines over the SSH protocol. By default, Ansible uses OpenSSH and connects to remote machines using a valid user account, just as SSH does.
Before we start...
The Loadbalancer.org IP address used in the following examples is 192.168.83.70. Replace this with your own appliance’s IP address.
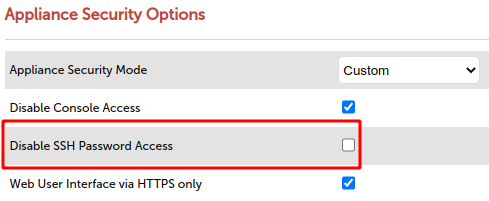
Before we can connect to the Loadbalancer appliance using Ansible (which uses SSH), we first need to allow this action through the Appliance Security Options via Local Configuration and then, Security.
Here, you will need to change Appliance Security Mode to Custom. This will then reveal additional security options.
Un-check the Disable SSH Password Access options, as per the example below, then Update:

Connect to the load balancer appliance using SSH with the root user (in the example below we assume that 192.168.83.70 is the appliance IP address being used):
ssh root@192.168.83.70Enter your password for the root user when prompted (this is set during the initial configuration of the appliance).
Once connected, from the terminal prompt, enable API access with the following command (we’ll keep the user and password credentials the same):
lbcli --action api --function enable --username loadbalancer --password loadbalancerThis should output something similar to the following:
LBCLI API Credentials have been set as
username=loadbalancer
password=loadbalancer
apikey=ZTxlBacRkQHupVNKoAYUMm0P3Igveihd
NOTE: Now we have our API key; which we will need to use in our Playbook.
Install Ansible
We won't go into how to install Ansible here, however we recommend you head over to the Ansible website and follow their guides for installation (make sure you choose the one specific to your environment).
How to deploy your first Ansible Playbook
Now let's look at a simple playbook below which will add a virtual service, terminate it, and add a Web Application Firewall (WAF) and a real server all in a single playbook.
Please remember to update your API key that was issued previously.
---
- name: Ansible your loadbalancer.org appliances

  gather_facts: true
  hosts: lb1


#
# Remember to replace the api_key with your own!
#

  vars:
    api_username: "loadbalancer"
    api_password: "loadbalancer"
    api_key: "ZTxlBacRkQHupVNKoAYUMm0P3Igveihd"
    api_host: 192.168.83.70
    api_port: 9443

    lbapicall:
      lbcli:

       - action: add-vip
         layer: 7
         vip: AnsibleRules
         ip: 192.168.83.75
         ports: 80
         mode: http

       - action: add-waf
         vip: AnsibleRules
         waf: WAF_AnsibleRules

       - action: termination
         type: stunnel
         function: add
         vip: SSL_AnsibleRules
         associated_to: AnsibleRules
         port: 443
         sslmode: high
         sslcert: server

       - action: add-rip
         vip: AnsibleRules
         rip: my_web_server
         ip: 192.168.83.16
         port: 80
         weight: 100


  tasks:
    - name: Ansible Blog Example
      uri:
        url: "https://{{ api_host }}:{{ api_port}}/api/v2/"
        method: POST
        body: "{{ lbapicall }}"
        body_format: json
        force_basic_auth: true
        validate_certs: no
        user: "{{ api_username }}"
        password: "{{ api_password }}"
        headers:
          X-LB-APIKEY: "{{ api_key | b64encode }}"
          Content-Type: "application/json"

        use_proxy: false
        return_content: yes


      register: result
      delegate_to: 127.0.0.1
      loop: "{{ groups['all']}}"


    - name: Results
      ansible.builtin.debug:
        var: result

      delegate_to: 127.0.0.1
      loop: "{{ groups['all']}}"
Now, save your Playbook, with the .yaml file extension. In this example we'll call it:
ansible-blog-lab1.yamlAnd to deploy the Playbook, we can use:
playbook ./ansible-blog-lab1.yamlAnsible will then output its progress as it processes each step within the Playbook; an example of which you can see below:
TASK [Gathering Facts] ***********************************************************************************************************************************************************************************
ok: [lb1]
TASK [Answering your Ansible prayers!] *******************************************************************************************************************************************************************
ok: [lb1 -> 127.0.0.1] => (item=lb1)
TASK [Results] *******************************************************************************************************************************************************************************************
ok: [lb1 -> 127.0.0.1] => (item=lb1) => {
"ansible_loop_var": "item",
"item": "lb1",
"result": {
"changed": false,
"msg": "All items completed",
"results": [
{
"ansible_loop_var": "item",
"changed": false,
"connection": "close",
"content": "{\"lbapi\":[[{\"itteration\":[{\"lbcli\":[{\"action\":\"add-vip\",\"vip\":\"AnsibleRules\",\"status\":\"success\"}]}]},{\"itteration\":[{\"lbcli\":[{\"action\":\"edit-vip\",\"vip\":\"AnsibleRules\",\"status\":\"success\"}]}]}],[{\"itteration\":[{\"lbcli\":[{\"action\":\"add-waf\",\"waf\":\"WAF_AnsibleRules\",\"vip\":\"AnsibleRules\",\"status\":\"success\"}]}]}],[{\"itteration\":[{\"lbcli\":[{\"action\":\"termination\",\"type\":\"stunnel\",\"function\":\"add\",\"vip\":\"SSL_AnsibleRules\",\"status\":\"success\"}]}]}],[{\"itteration\":[{\"lbcli\":[{\"action\":\"add-rip\",\"vip\":\"AnsibleRules\",\"rip\":\"my_web_server\",\"status\":\"success\"}]}]}]]}",
"content_length": "559",
"content_type": "application/json",
"cookies": {},
"cookies_string": "",
"date": "Wed, 21 Dec 2022 12:04:44 GMT",
"elapsed": 7,
"failed": false,
"invocation": {
"module_args": {
"attributes": null,
"body": {
"lbcli": [
{
"action": "add-vip",
"ip": "192.168.83.75",
"layer": 7,
"mode": "http",
"ports": 80,
"vip": "AnsibleRules"
},
{
"action": "add-waf",
"vip": "AnsibleRules",
"waf": "WAF_AnsibleRules"
},
{
"action": "termination",
"associated_to": "AnsibleRules",
"function": "add",
"port": 443,
"sslcert": "server",
"sslmode": "high",
"type": "stunnel",
"vip": "SSL_AnsibleRules"
},
{
"action": "add-rip",
"ip": "192.168.83.16",
"port": 80,
"rip": "my_web_server",
"vip": "AnsibleRules",
"weight": 100
}
]
},
"body_format": "json",
"ca_path": null,
"client_cert": null,
"client_key": null,
"creates": null,
"dest": null,
"follow_redirects": "safe",
"force": false,
"force_basic_auth": true,
"group": null,
"headers": {
"Content-Type": "application/json",
"X-LB-APIKEY": "WlR4bEJhY1JrUUh1cFZOS29BWVVNbTBQM0lndmVpaGQ="
},
"http_agent": "ansible-httpget",
"method": "POST",
"mode": null,
"owner": null,
"password": "VALUE_SPECIFIED_IN_NO_LOG_PARAMETER",
"remote_src": false,
"removes": null,
"return_content": true,
"selevel": null,
"serole": null,
"setype": null,
"seuser": null,
"src": null,
"status_code": [
200
],
"timeout": 30,
"unix_socket": null,
"unredirected_headers": [],
"unsafe_writes": false,
"url": "https://192.168.83.70:9443/api/v2/",
"url_password": "VALUE_SPECIFIED_IN_NO_LOG_PARAMETER",
"url_username": "VALUE_SPECIFIED_IN_NO_LOG_PARAMETER",
"use_gssapi": false,
"use_proxy": false,
"user": "VALUE_SPECIFIED_IN_NO_LOG_PARAMETER",
"validate_certs": false
}
},
"item": "lb1",
"json": {
"lbapi": [
[
{
"itteration": [
{
"lbcli": [
{
"action": "add-vip",
"status": "success",
"vip": "AnsibleRules"
}
]
}
]
},
{
"itteration": [
{
"lbcli": [
{
"action": "edit-vip",
"status": "success",
"vip": "AnsibleRules"
}
]
}
]
}
],
[
{
"itteration": [
{
"lbcli": [
{
"action": "add-waf",
"status": "success",
"vip": "AnsibleRules",
"waf": "WAF_AnsibleRules"
}
]
}
]
}
],
[
{
"itteration": [
{
"lbcli": [
{
"action": "termination",
"function": "add",
"status": "success",
"type": "stunnel",
"vip": "SSL_AnsibleRules"
}
]
}
]
}
],
[
{
"itteration": [
{
"lbcli": [
{
"action": "add-rip",
"rip": "my_web_server",
"status": "success",
"vip": "AnsibleRules"
}
]
}
]
}
]
]
},
"msg": "OK (559 bytes)",
"redirected": false,
"server": "Apache",
"status": 200,
"url": "https://192.168.83.70:9443/api/v2/",
"x_content_type_options": "nosniff",
"x_frame_options": "SAMEORIGIN",
"x_xss_protection": "1; mode=block"
}
],
"skipped": false
}
}
PLAY RECAP ***********************************************************************************************************************************************************************************************
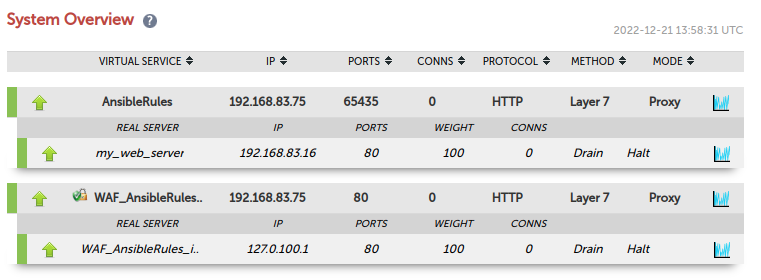
lb1 : ok=3 changed=0 unreachable=0 failed=0 skipped=0 rescued=0 ignored=0 After the execution of the playbook has completed, head over to the Loadbalancer appliance (in this example our appliance IP address is 192.168.83.70). You should now see the results on the System Overview page:

This is just one example that demonstrates the simplicity of Ansible. Watch this space for more to come!


