


We all know that the built-in Azure load balancer is perfectly functional, but sometimes you need a proper load balancer. HAProxy is an excellent choice if you need layer 7 functionality, but its a full reverse-proxy, so the application thinks that all of the traffic is coming from HAProxys IP - rather than the clients. So what can you do if the load balanced application needs to know the real clients IP address in Azure?
The easiest solution is to insert an X-forwarded-for header, or you could use the HAProxy proxy protocol (which is growing in popularity) but not all applications support this. The final option is to make the HAProxy instance FULLY TRANSPARENT by using the TProxy Linux kernel modification. When you correctly configure TProxy the application servers think the traffic is coming directly from the clients IP and can't even see the proxy IP address.
TProxy is always a little bit tricky - So how do we configure this in Azure?
The important part when using TProxy is routing the return traffic from the real servers through the load balancer. As the back end servers see the client's IP address as the source IP they respond directly to this address. However, if this happens load balancing will not work so we need to route the traffic back through the load balancer. Normally a simple solution for this would be to set the default gateway of the back-end server to be the load balancer. However, things are not always this straightforward in the cloud and so another alternative solution is required.
There are many guides around giving details on how to configure HAProxy and TProxy such as this. So I will not duplicate that here but instead, show you how to configure the routing and networks needed in Azure to make TProxy with HAProxy, work. I am going to assume you are familiar with Azure and know how to launch your VM's into the necessary subnets and so will skip past those details.
To start with we need to create the networks, I am using a network of 192.168.0.0/16. Then have my public subnet where the load balancer is located and the private where the back end servers are.
Public - 192.168.1.0/24
Private - 192.168.2.0/24
I am cheating a bit here and using our Loadbalancer.org appliance for Azure for the load balancer as it has HAProxy with TProxy ready to go. This has been deployed into the public subnet and has an address of 192.168.1.4. The back end servers in this test are just a pair of Ubuntu servers with Apache installed and have addresses of 192.168.2.4 and 192.168.2.5.
It should now look something like this:
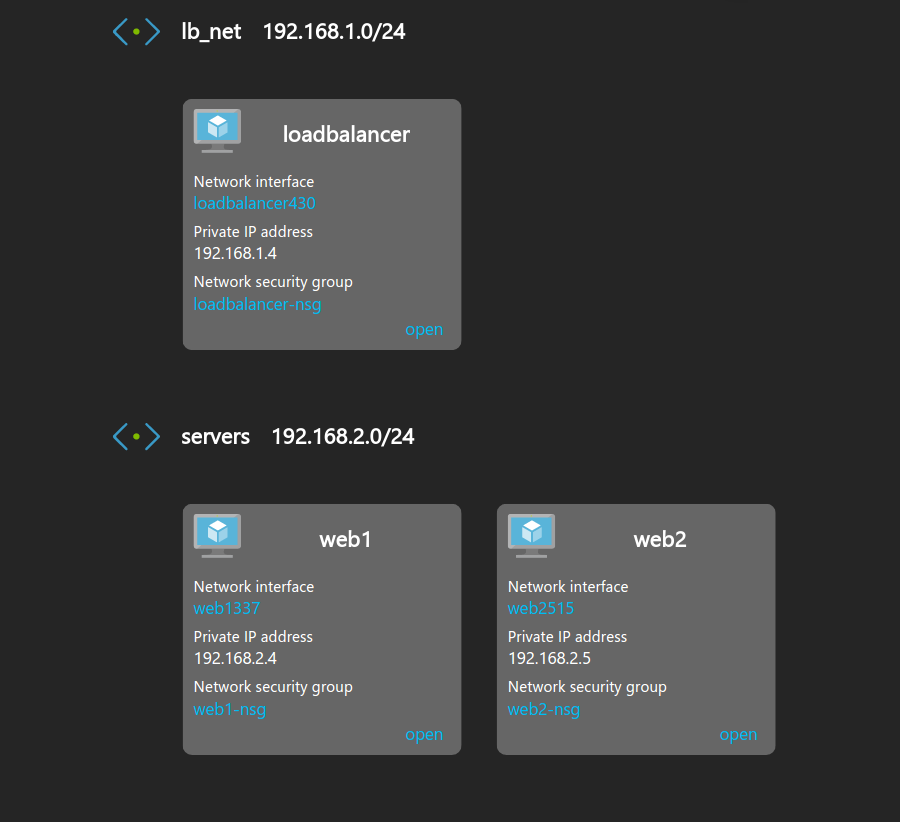
Network view of HAProxy and servers for TProxy
You next need to configure your network security groups for your load balancer and the real server(s). As we are just load balancing a simple web server we are only using port 80.
For the load balancer and the real servers, we need to add an inbound rule to allow traffic to port 80 from 0.0.0.0/0 as this is a public facing service. Then we need to add an outbound rule on the load balancer to allow outgoing traffic to port 80 from 0.0.0.0/0. This allows the load balancer to forward the traffic to the back-end servers.
For the next steps, you will need the Azure CLI tools, it can also be done with PowerShell but as I'm using a Linux desktop I will demonstrate using the CLI tools. (If you do not have the tools installed please take a look here and get them setup).
To enable the load balancer to receive traffic that is not addressed to itself (The return traffic from the real servers) we need to enable IP Forwarding on the load balancer. So we run:
azure network nic set -g haproxy_group -n loadbalancer430 -f true
Here -g is your resource group and -n is the name of the nic on your HAProxy instance.
Now our load balancer is able to receive the forwarded traffic we need to set up the route that forwards the traffic. First, we need to create a new route table that contains our route:
azure network route-table create -g haproxy_group -n lb_table -l centralus
- g is our resource group
- n is the name of the new route table
- l Is the name of the region we are in.
Next, we need to create our new route:
azure network route-table route create -g haproxy_group -r lb_table -n tproxy_rule -a 0.0.0.0/0 -y VirtualAppliance -p 192.168.1.4
- r is the name of our newly created route table
- n is the name of our new rule
- a is the network to forward
- y is the next hob type
- p IP address of the next hop
Now we have our route we need to associate the route table with the subnet:
azure network vnet subnet set -g haproxy_group -e haproxy_group-vnet -n servers -r lb_table
- e is the name of your virtual network
- n is the name of your subnet.
That is it, all the traffic to your backend servers will show the client's IP address as the source IP.