
Printing without pain: How to scale print environments and avoid downtime
Print Published on •8 mins Last updated
We’ve had many companies come to us over the years with problems they’re facing in their print environments. These systems might vary hugely in their size and complexity - but we’ve learned that, whatever the scale, it all comes down to a few main issues.
Print environments often bring together multiple technologies and applications, which presents challenges in environments of all sizes. There’s the issue of planned downtime: end-users may need to make manual changes to their network when print services fail, taking servers out of production for maintenance or updates.
Unplanned downtime is a concern too. End-users want to be able to manage unpredictable loads, as jobs from clients can come in sporadically, putting servers through their paces. Unexpected surges in demand might slow performance and eventually cause a crash. Without load management, users will complain of lost print jobs or slow printing times.
Why load balancing?
Ultimately, whatever the company is trying to do and whatever their print environment looks like, they want to achieve four goals: zero downtime, simplified infrastructure, easy maintenance and optimal performance.
Implementing a load balancer is key in each of these areas. When it comes to achieving zero downtime, load balancing grants the ability to failover servers without any impact on users. Infrastructure can be scaled up and down, mitigating the need for constant DNS and firewall configuration changes. Servers can be brought on and offline at the touch of a button, making change controls simpler. And optimal performance is ensured, as the load balancer spreads network traffic across multiple servers.
Simple environments
Windows print server is the defacto when setting up a printing service within a Windows environment. It’s as simple as installing the Print and Document Services via the server manager. This sort of environment might be found in a small business with two print servers and printers segmented by departments; in an enterprise with multiple sites across the globe; or in hospitals that require medical images to be sent to various devices such as printers, tablets or PCs.
How to load balance Windows print server
On the Load balancer (layer 4 direct routing)
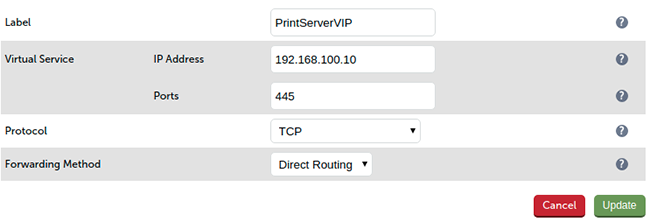
- Create a layer 4 virtual service
- Define the required label (name) for the VIP, eg. PrintServerVIP
- Set the Virtual Service IP address filed to the required IP address, e.g. 192.168.100.10
- Set the Protocol to TCP mode
- Select Direct Routing as the forwarding method
- Enter port 445
- Click Update
- Add the real (print) servers to the newly created VIP

- Enter the appropriate label for the real server, e.g. PS1
- Change the Real Server IP Address field to the required address, e.g. 192.168.100.20
- Click Update
- Repeat the above steps to add your other print server(s)
On the Windows Print Servers
- Ensure that the server is joined to the same domain as the client’s PCs
- Install the Print and Document Service role/Print Server service
- Install and share the printers (use the same names and permissions across all servers)
- ‘Solve the arp problem’ on the real servers
- Create a loopback adaptor pointing the VIP address in a /32
- Configure the Windows networking stack to use the weak host model.
- Important Note: when configuring the loopback adapter, make sure that these options are also checked (ticked): 'Client for Microsoft Networks' and 'File & Printer Sharing for Microsoft Networks'
- Modify the registry to enable the print servers to be accessed via a shared name.
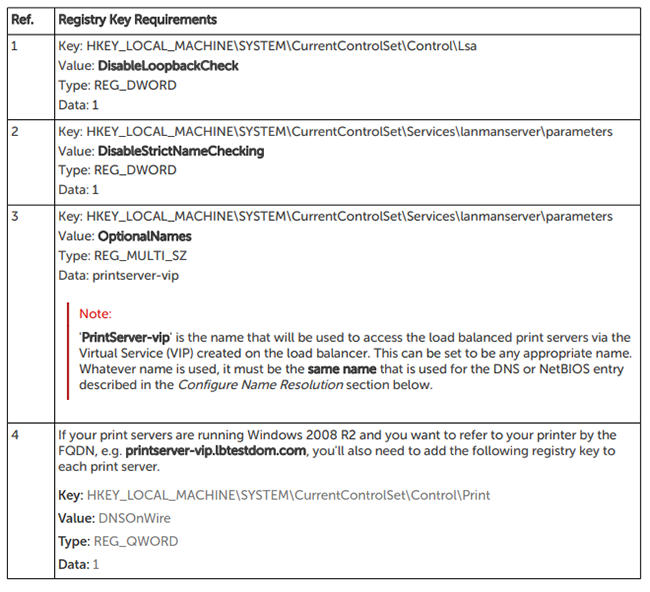
- Configure DNS name resolution to point to the load balancer virtual service you’ve created (Windows 2000 & later).
- Disable NetBIOS over TCP/IP on all interfaces of each print server
- Create a DNS record for the share name, in this example: PrintServer-vip ---> 192.168.110.10
- Reboot each print server to apply all changes
- Test and verify that you can access your printers via the VIP address \192.168.100.10 or \PrintServer
- For further details on how to deploy this scenario please see our Load balancing Microsoft Print Server Deployment Guide
- Note: Print Servers can be load balanced at either layer 4 (direct routing) or layer 7 (SNAT). We recommend layer 4 direct routing where possible because it provides the fastest throughput.
Read more about load balancing Microsoft Print Server on our blog here.
Load balancing print servers can link to load balancing third-party vendor products such as Nuance Autostore, Equitrac and Output Manager - see ‘Most challenging environments’ below for more on this.
More challenging environments
Moving on from simplistic and standardized Microsoft print server deployment, vendor-specific print solutions such as Ricoh, Xerox and Konica Minolta have more involved requirements. There are also other print management vendors who provide an agnostic approach, integrating their third-party application with the aforementioned print vendors.
How to load balance Ricoh print servers
We’ve partnered with Ricoh to load balance their print servers. You can read more about the solutions we provided for Ricoh on our application page.
Ricoh servers can be load balanced in either layer 4 Direct Routing DR mode or Layer 7 SNAT mode.
- Create a Virtual Service layer 4 (DR mode) or layer 7 SNAT mode
- Define a label for the VIP
- Set the IP address of the VIP
- Set protocol to TCP mode
- Set the Ports to 445
- Click Update
- Add the real (print servers) servers to the newly created VIP
How to load balance Xerox print servers
We’ve also worked with Xerox to design a load balancer deployment for their print servers.
On the Load balancer (Layer 4 direct routing)
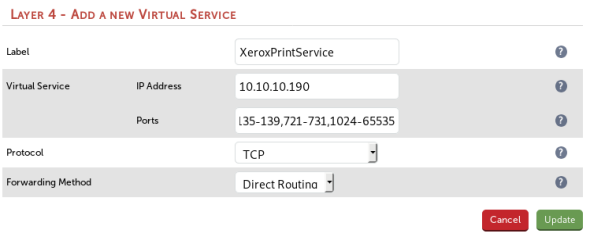
- Create a layer 4 virtual service
- Define the required label (name) for the VIP, eg. XeroxPrintService
- Set the Virtual Service IP address filed to the required IP address, e.g. 10.10.10.190
- Set the Protocol to TCP mode
- Select Direct Routing as the forwarding method
- Set the Ports to 445,135-139,721-731,1024-65535
- Click Update
- Add the real (print servers) servers to the newly created VIP
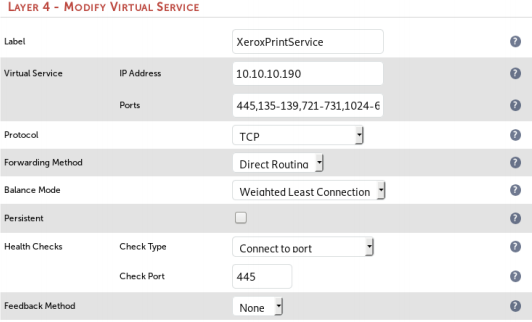
- Modify the newly created VIP
- Make sure that the Persistent checkbox is not selected
- Set the Check Port for server/service online to 445
- Click Update
On the Print Servers
- Using the web user interface, navigate to Cluster Configuration > Layer 4 – Real Servers and click on Add a new Real Server next to the newly created VIP
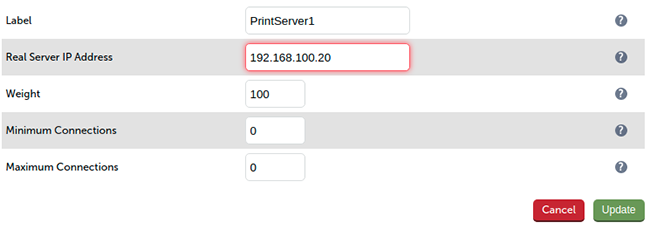
- Define the Label for the real server as required, e.g. PrintServer1
- Set the Real Server IP Address field to the required IP address, e.g. 192.168.100.20 Click Update
- Repeat these steps to add additional print servers as required
- ‘Solve the arp problem’ on the real servers
- Modify the registry to enable the print servers to be accessed via a shared name (XeroxPrintService)
- Configure DNS name resolution to point to the Virtual service IP address.
- Reboot each print server to apply the configuration changes.
- Confirm that the load balanced print servers can be accessed by virtual IP address or their share name. \
How to load balance Konica Minolta print servers
We’ve also created a tailored load balancing solution for Konica Minolta.
Konika Minolta servers can be load balanced in either layer 4 Direct Routing DR mode or Layer 7 SNAT mode.
- Create a Virtual Service layer 4 (DR mode) or layer 7 SNAT mode
- Define a label for the VIP
- Set the IP address of the VIP
- Set protocol to TCP mode
- Set the Ports to 445
- Click Update
- Add the real (print servers) servers to the newly created VIP
Most challenging environments
Some of our customers are running environments which combine multiple technologies. These can be complex to manage: for example, Nuance provides print management software such as Equitrac, Autostore and Output Manager, which must all work seamlessly together to ensure 100% uptime and manageability. Having to make constant changes to DNS names and their related IPs when manual failover is required can become a bit of nightmare when having to control and maintain these applications.
Equitrac
Nuance Equitrac is designed to simplify printer management. Printing costs can be monitored, and reduced by forcing users to follow budget-saving printing habits. Secure and regulation-compliant printing is made possible by allowing users ‘pick up’ and print their secure documents in person at any printer. Flexible printing is achieved as users can print from anywhere, at any time.
Autostore
Nuance autoStoreis a server based middle-tier application that captures, processes and routes paper and electronic documents in a business environment. It lowers costs and improves operational efficiency for organizations of all sizes by automating document handling processes.
AutoStore provides a flexible component-based server for capturing electronic and paper documents. Some of AutoStore’s capabilities include:
- ‘Capture components’ to capture documents from scanners and multifunction devices, fax, email, smartphones and tablets, XML data streams, PC desktops, office applications, and network and FTP locations.
- ‘Process components’ to support functionalities to detect, read, extract, store, convert, classify, and index content in captured documents.
- ‘Route components’ to deliver documents to virtually any destination including fax, email, network folders, PCs, and document management systems.
Output Manager
Nuance Output Manager gives organizations control of what, when, and how they produce and deliver information. Output Manager is designed to route documents through a centralized system.
Nuance Output Manager consolidates input from multiple platforms and applications. It centrally manages resources and documents, and provides end-to-end tracking and reporting. Although documents traditionally travel directly from origin to destination, there are considerable benefits to routing them through a centralized system. Output Manager is designed to:
- Maximize the number of sources from which you can receive documents
- Provide greater control over documents than can be found in other products
- Manage and expand the number of document destinations
- Ensure the security and integrity of documents throughout the send/receive cycle
- Produce a completely integrated audit trail and accounting functionality in order to monitor and control your costs
- Supply the tools necessary to convert document formats based upon the final destination
- Provide an observable process to a variety of audiences including administrators, print operators, end users, and management
Configuring these applications on a load balancer means that you only have 4x virtual services to monitor:
This is where having a load balancer can alleviate technology integration issues, as it provides a configuration hub for all load balanced applications. Ideally you would have a VIP for each application, granting a single location to ascertain the status of your applications and their associated connections, whilst enabling easy maintenance of servers within the VIP cluster with minimum downtime. Again, it’s all about scalability, redundancy and performance!
Talk to us
Scaling your enterprise print environment needn't be complex. Print vendors are accustomed to working with load balancer vendors to address these issues. Speak to them (or us) now.